|
|
|
|
Mail
and Frequently Asked Questions about Kit
Building
These are questions I have received from
visitors regarding kit building. Other Mail and FAQ Pages
|
|
|
|
I build my own airplanes too. I have built four kits in five years as my flying skills improve
and my desire and commitment to be in this hobby increase too.
Now I want to build a second GP Giles 202 (59" wing span). I built my first Giles three years
ago but lost it in a high-speed stall on final approach. I have been studing the problem and I now understand a
series of events: heavy plane, not enough elevator expo, not enough experience flying, probably different LE shape
between wing panels, probably not consistent LE shape in wing panels and dual elevators not traveling at same rate.
Because in every build I strive for building better and better, I have been planning this building
for six months now. During this time I have been improving my workshop, tools and accessories. My goal is to
build it lighter but strong.
In regards to the airplane, this airplane comes with flat truss type stab. Reading about
Rustik, you recomend using airfoil stabs when
possible and replace plywood with balsa-made plywood. I would like to follow your advice in this building.
My questions are:
-
I am not sure about creating the stab as a mini-wing with two small spars at 30% chord, mini
sher-webs, ribs spacing, small spars at other chord points, etc. Could you provide some advice on this?
-
Would NACA-0009 be good for the stab/elevator combo?
-
What airfoil to use for rudder if it helps to the design?
-
To replace the interlocking plywood for the fuselage, do I use the kit plywood as templates for my
own homemade plywood out of balsa, or do I change the design to a Warren Truss design?
Any assistance and/or suggestions is highly appreciated.
-
Build the stabilizer just like you would build a wing.
1/16" light balsa ribs spaced about 1" apart will work well. If you build it up
with ribs and sheet it then you can use 1/8" square hard balsa spars and 1/32" shear webs. It won't break in
flight assuming you have good fitting joints and you selected the wood properly. Use medium-light balsa for the
skins. If you glass the tail then you can use contest balsa for the skins.
-
6-9% should work fine for your stabilizer.
-
The rudder would be the same.
-
Please consider the role of the formers in the fuselage carefully
before you replace plywood with balsa. There may be a good reason for them to be balsa. If you do cut new
formers then I would measure the orginals instead of tracing them. If you trace them and they were a little
inaccurate to begin with you'll just make it worse. Tracing a part makes it larger and it's hard to guess
exactly where inside the line you should cut.
Top |
|
|
|
I'm getting ready to start construction of my first real kit
— a Smith Miniplane (I've built 2 Somethin' Extras, but this one looks like much
more of a challenge). You've made a few references to your Miniplane
build, and I was hoping that you could pass on any helpful tips for this cool
little bipe.
I plan on putting a Saito 90TS up front, and covering using
21st Century Fabric. I will be buying the best jigsaw I can afford, and I
think I'm gonna build your
magnetic board as well. Probably pick up that
Microlux table saw as well, just because I like it. Any tips/experiences
that you could share to help with this build?
I fundamentally disagree with your whole approach to this
project. I would use a .52 four-stroke which will give you excellent power and
a reasonable weight. If you put in anything bigger you’re going to have all
kinds of problems balancing the airplane. You can put the elevator and rudder
servos in the back along with the battery and you’ll still probably need to add
lead.
The Miniplane is a wonderful plane as designed. Use lots of
sandpaper and replace heavy wood. The model is over-built so you can replace
some items such as sheeting and probably the spars.
I would not use fabric covering which is also very heavy. My
choice would be Oracover light (Hobby
Express). If you do a nice job on the plane then
transparents would look very nice and are lighter than opaques. You could also
do something like using opaques around the perimeter to cover the sheeting and
transparents in the open bays.
Those are my honest suggestions for making the plane as good
as it can possibly be. Last thing… use good quality mini
servos that have about 40 in/oz or greater torque. You don’t need heavy
servos. A 500 mAh battery is plenty. You might want to consider using HS-85’s
in the wings for a dual servo setup but the wings are thin so you’ll have to
plan carefully to make them fit and not stick out looking too stupid.
The Microlux saw is excellent but it works best with the
carbide blade. The stock blade is useless. The micro-adjust fence is expensive
but worth its weight in gold.
This site covers building with magnets so I don’t have
anything more to say about it other than if you use it you’ll love it.
Top |
|
|
|
I'm plugging away at my first
kit. I'm trying to be careful and good at it, but little problems creep into the
build. I've framed up one wing and I'm pretty happy with it, now I'm
forming the leading edge.
How close do I have to be
before I call it a day? Right now I'm at about 85% of what I think is
ideal. This is my trainer.
I’d like to say that the leading edge
isn’t that critical, but it can be. If you sand it too sharp you’re asking
for real problems. If you leave it too blunt on your trainer it won’t hurt
anything, but both wings should match fairly closely.
I think you should stop where you’re at
with the leading edge of the one wing panel. When the other panel is at
the same stage, try to bring them to as close of a match as possible.
Again, more blunt is much better than more sharp. Then don’t sweat it too
much. You’re trainer will fly fine.
Top |
|
|
|
I am hesitating between a Midwest Aerostar kit and the Sig
LT-40 kit for my primary trainer. I am favoring the Aerostar based on a
friend's input.
Do you know this model? How it compares with the Sig?
I read somewhere that the Sig may have some issues with the Stab construction.
Second question: Is it worthwhile to invest a bit more and
go with a Futaba 7CAP instead of a 6XAS? If so, are the digital servos a
bit overkill for a trainer? Should I buy supplementary servos and receiver
and keep the better one for a future plane?
Lastly, do you have a plan for a good field box?
I’m not familiar with the Aerostar but I can say that the LT
40 is an excellent airplane. I haven’t heard anything about issues with
strength of the tail.
That being said, I would suggest that you go with the Aerostar
simply because you know somebody who is familiar with it. He will be able to
provide experienced guidance for you.
As far as your radio goes the
servos that come with them aren’t that great. Use them for your trainer,
but don’t even think about digital servos until you’re an expert pilot. They
drain batteries and the typical pilot can’t tell the difference in flight.
As you need more radio equipment, look at servos specifically
for whatever the application. Avoid “standard” servos such as those included
with the radio because they are heavy and slow for their size and weight.
If you think you’re going to stay in this hobby for a long
time then get the best radio you can afford. I have an 8 channel but wish I had
something with more channels. I run out of computer mixes. You’ll understand
why this matters when you get there.
I don’t have a plan for a
field box. It’s an item that really depends on what you take to the field
with you. I take very little so I put my tools in a tackle box and use as small
of a field box as possible. Some guys take their whole shop to the field.
What I recommend is that you use what you’ve got and pay
attention to what you really need to have with you and what you carry “just in
case” but never use. After a couple of seasons you’ll know what you want to
have with you and can either buy a field box that comes close to what you need
or design one yourself.
Top |
|
|
|
If I would want to reduce the dihedral to 1 or 2 degrees and
add ailerons shouldn't I also consider a semi-symmetrical wing? Do you know
the wing specs of the Senior ARF?
I don't know the specs of the model but if you know the span
and area then you can calculate the chord easily: wing area = wing span x
average chord. The Senior has a constant chord wing.
Dihedral provides stability as well as allowing a model to be steered with
the rudder. The
airfoil doesn't affect stability. A semi-symmetrical airfoil will allow the
model to fly better inverted but it's not that type of model. If that's what
you want then you might want to build a new wing with a new airfoil. Personally
I would leave it alone and fly the model as a floater and go in search of
thermals.
Top
|
|
|
|
I am building a Sig Kadet Senior with major modifications.
This is nothing new as this kit has been modified by hundreds in the past.
My changes include the following:
-
Converted tricycle gear to tail dragger.
-
Converted rubber band wing mounts to dowels and wing
bolts.
-
Increased tire diameter to 4 inches.
-
Changed landing gear to heavy duty aluminum flat gear.
-
Removed dihedral completely.
-
Added ailerons and flaps.
-
Strengthened all areas of the entire plane including
firewall.
-
Changed standard engine to O.S. FS 91 Surpass 4 stroke
with pump.
My questions are related to item 8 above. The engine
sticks up too high on the firewall. I don't really want to put the engine
on its side or invert it for simplicity sake.
Would lowering the engine by 3/4" to 1" on the firewall have
detrimental effects on the performance of the airplane?
I have left the down thrust angle at 6 degrees according to
the plans. However, I am not sure if the 2 degrees right thrust is
sufficient for this engine. I am considering an increase in the right
thrust to 3 or 4 degrees because of the torque of this engine.
I plan on using either a 15 x 6 or 16 x 6 propeller. Do you
have any suggestions on the amount of right thrust needed? Your assistance
with these two items will be greatly appreciated.
I realize you asked for my opinion on only the last two items,
but because this is the holiday season, my gift to you will be my opinion
regarding all of your proposed modifications.

The pumped .91 FS is an awful lot of power for the Senior, but
ok. Don't forget that most radios have a throttle stick on them some
place.
-
I would do the
same. Nose gears are heavy. Trike geared planes also seem to tip over
on their wing tips more easily during taxi turns.
-
Another good idea.
I've never noticed that rubber band mounted wings prevent much damage in a
crash. The only real benefit is that they aren't as difficult to build.
-
No opinion on the
wheel size. I assume this is due to the plane being heavier or local
field conditions.
-
Have you checked
around for a carbon fiber gear? This is a good place to save some
weight.
-
I would have left
at least a little bit of dihedral. Straight wings always look like they
droop. A tiny bit of dihedral, perhaps one inch under each tip, would
prevent the droopy look.
-
If you have a
computer radio, be sure to make a
butterfly mix. The plane will fly very slowly and land at a crawl.
Personally, I like lightly loaded aircraft with flaps even though light planes
are the last to actually need flaps. Nevertheless, hovering a model
right in front of you on a breezy day is fun.
-
Take it easy here.
It’s easy to add a lot of weight. At the very least, use
techniques that have high strength to weight and avoid plywood slabs as
much as possible.
-
A side mounted
engine tends to run best because it puts the carburetor in a good relationship
with the
fuel tank. Lowering the engine will change the way the model flies, but
how and how much are hard to say.
I would personally
mount the engine inverted or side mount it before
moving it too far from the designated thrust line. If you can get
away with moving it a smaller amount, say up to 1/2” then ok, but I would
think again before moving it more than that.
I like the idea of a low-pitch
propeller. That will give you very good speed control and an awesome rate
of climb. You may even want to go to a larger diameter propeller having less
pitch. I’m not sure if one is made, but check try 4” and 5” pitch props as
well. This all depends on the final weight of the model. If your
modifications make the plane significantly heavier then it will need more
airspeed to fly.
Right thrust, in theory, has nothing to do with engine size.
I would build 2 degrees of right thrust into the firewall and then perform
flight tests. Make thrust wedges if more or less of an adjustment is needed.
Thrust wedges are easily sanded from
aircraft plywood. You can make a wedge in about 10 minutes if you use a
sanding block with coarse
sandpaper. Drill all the holes, check the fit, finish sand, and then
fuel-proof it.
I do that by dropping the wedge in a can of clear solvent
polyurethane and letting it soak for about 30 minutes or so. Then I slide a
wire into one of the holes, hang it up and let it drip dry over newspaper. Use
the corner of a paper towel after a few minutes to soak up the puddle of paint
that collects at the bottom of the wedge.
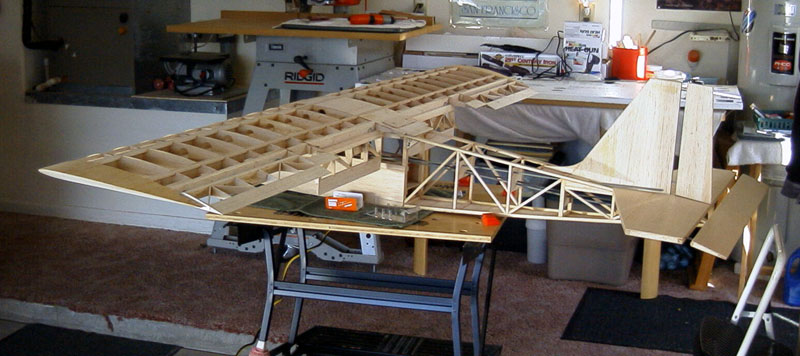
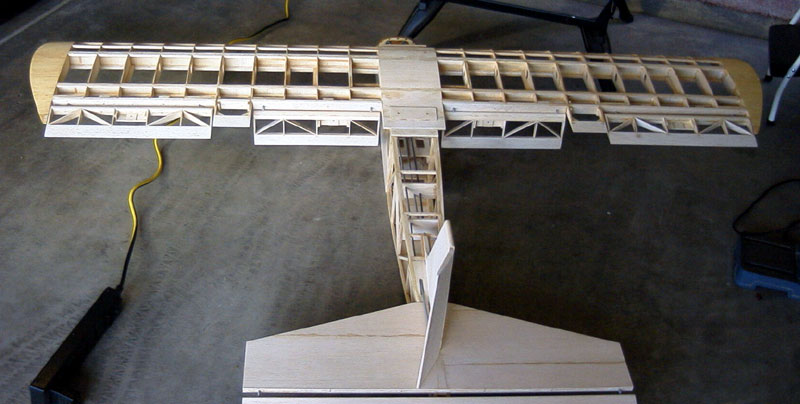
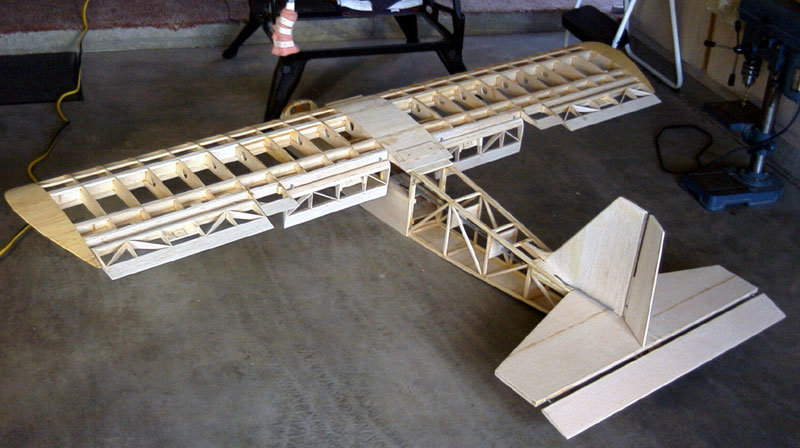
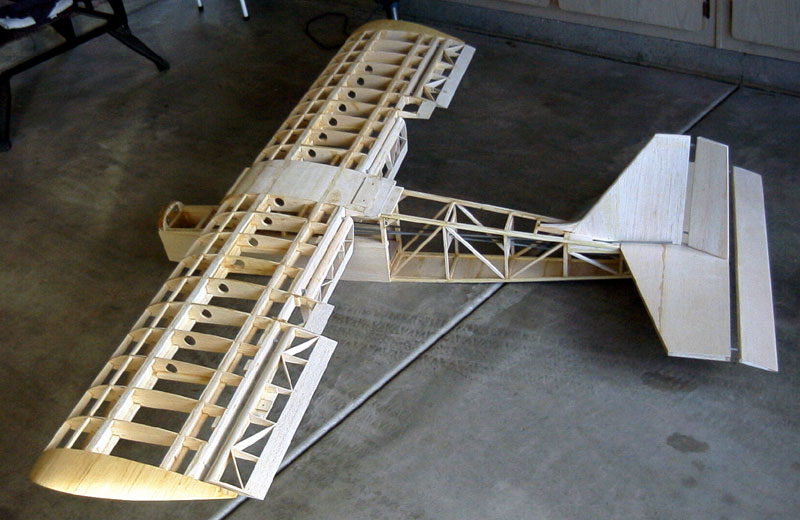
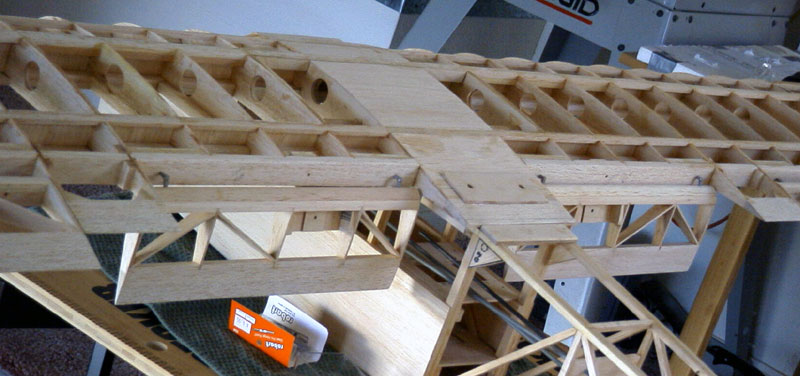
These pictures show the aileron and flap construction on the
wing. I think that you will be able to see the ailerons although not an
exact end shot as such. If you look carefully you will be able to see that
they look like little wings with symmetrical airfoils.
You might also note that I used the original trailing edges
from the kit for the trailing edges of the ailerons and flaps. The
corresponding trailing edges on the wings were added and constructed from 3/8” x
1” balsa. The leading edges of the flaps and ailerons were constructed of
3/8” x 3/4" balsa with rounded leading edge material added in front.
I am not sure at this point whether I will use y-harness
connectors for the two flap and two aileron servos or connect the four servos to
separate channels so that I can program the radio for mixes. I haven’t
flown since 2001 so may a little rusty. However I am practicing on the
RealFlight G2 simulator using an Extra 300 which is super fast and agile.
I have also been practicing with a P3 that has flaps.
I figure if I can take off and land 100% with the Extra I should be able to fly
this bashed up Kadet. What do you think? Also, do you have any
suggestions as to channel assignment configurations as described above?
I can't tell you what you need to do to set up your radio
unless you have the same radio I do. If your radio comes with a Crow
or Butterfly mix then that's one way to do it. The modification
looks good. Assuming your radio gives you enough mixes to make it do what
you want it should be a lot of fun!
Top
|
|
|
|
Have you ever added Barn Door
Ailerons to a Sig Kadet Sr.? I'm working on the kit now and noticed the
ARF's have the Ailerons and would really like to add them to my kit.
I've searched the web but have
not found any info on how to add them to a Kadet. I also thought I would
just buy a wing for the ARF, but it is $150 & could get the entire ARF plane for
$219.
In all honestly, I would leave this kit the way it comes. I
like 3-channel airplanes and the Kadet Senior is a very good airplane. But
that’s just me.
Draw a complete cross section of the airfoil including all
details. Sig plans usually have a rib cross section on the plan someplace so
that part is already done.
Draw in the aileron. The aileron should have a leading edge
that is at least 3/8" thick (front to back). You will also need to cap the
trailing edge of the ribs so that the covering can be terminated and so there is
material to install hinges. Draw in these details.
Now select the ribs from both wings where the ailerons will
be. Trim the excess from the aft end of the ribs. Leave the ribs
over length for now. Pin the ribs together and sand them to match.
You can attempt to use the leftovers to build new ailerons or
simply cut new pieces from balsa sheet. If you use the leftover pieces you
will still need to cut a few extras because the ailerons will have more ribs if
you line the aileron ribs up with the wing ribs.
For control you can either use 90 degree bellcranks with a
servo in the wing center section or you can use a separate servo for each
aileron and mount them in the wing using hatches. I prefer the separate servos.
Top
|
|
|
|
I would like to move forward
to a low wing. Been in love with my Bridi Trainer 20 and after it an RCM
Advance Trainer I built myself from the plan, I would like to try a Kaos.
First question: do you know
what is the differences between all the versions (Super, Ultimate, Utter Chaos,
Killer)? Second question: is it true that rotating the 90 degrees you can
avoid the right and down thrust?
I don’t have any idea what the
difference is between the various Kaos models. Try contacting these people
who now kit Bridi designs.
As far as rotating the engine
goes, it has no effect on thrust adjustments. If the plane needs right or down
thrust it will still need it regardless of how the engine is rotated.
Top
|
|
|
|
I build quarter scale,
gasoline engined military scale airplanes. The span is a transport problem
and I want to build the root span into the fuselage, allowing the outboard spans
to be removed for transport and easily rigged to make the aircraft flyable.
I have a Sopwith Pup on the
bench and I'd really like to include this feature if I can. I know that
metal and composite tubing is available but have not found it yet in my search.
Thank you for your response.
The method will depend on what
you want to do exactly. If you want the flying/landing wire to be
functional then you can reinforce the root rib of the outer panels and glue a
dowel stub into them. Have the dowel key into the center panels and use
the wires to hold it all together.
If you go with the dowel and
flying wire system, the dowel needs to go through more than one rib in the outer
panel.
That is the system I would
probably use. It's lighter overall and even with the thicker airfoil you
plan to use, the tube-in-tube may not be able to have a large enough diameter to
be strong enough.
If you want the wings to be
self-supporting then a tube-in-tube arrangement is probably the best way to go.
I’m not sure how big of a tube you’ll need. I don’t do a lot of large
scale stuff.
Check with
Aerospace Composites
to see if they might have what you need.
Top
|
|
|
|
I read my instructions wrong and drilled my wing bolt holes
17/64" instead of the 13/64" that's called for so I have to use a 5/16" 18 tap.
No big deal, I have the correct size.
What I'm unsure of is where do I find plastic screws that
size? I can't use the 1/4" x 20's that came with the kit. If you
could come up with an alternative to plastic that's commercially available that
would help too.
You have several options at this point. I took a quick
look at the
Micro Fasteners site and didn’t see anything larger than 1/4 x 20 nylon
bolts. But, you should contact them anyway because they may have 5/16 and
just don’t list it.
You can chisel the wing bolt blocks or plywood plate out and
replace it if necessary. If that's not an option then you can try drilling
them out and plugging the holes with a dowel and then redrilling the holes for
the bolts through the dowels.
You can also try using blind nuts on the underside so that you
can still use 1/4” bolts. The blind nuts need a larger hole to go into so
that may resolve the problem.
Top
|
|
|
|
 I
need some advice. I have just bought a Graupner 40 trainer with servos, .61
engine (supplied loose), tank etc. I am new to this sport and a little stuck as
to what I must do to mount this engine. Could you tell me what I need to
address to mount the engine? I
need some advice. I have just bought a Graupner 40 trainer with servos, .61
engine (supplied loose), tank etc. I am new to this sport and a little stuck as
to what I must do to mount this engine. Could you tell me what I need to
address to mount the engine?
Also, how do I go about determining the centre of gravity on
this bird? She is 15 years old and needless to say I have no instructions.
A safe starting point for the CG is 30% of the chord width
measured back from the leading edge. I'm assuming the wing is a rectangular
planform and am speaking about trainer-type aircraft only.
Whenever new guys get confused about engine mounting, it's
normally because the mount is a plate, not a firewall mount.
I know that trainer, but I can't place the name. It might be
called the "Solo". You might want to try contacting Graupner to see if they can
help you out with a set of instructions for the model. They're a good company -
long established and well respected in Europe.
To answer your question, your plane is designed for what's
called a "break-away" mount. The engine is mounted to a separate plywood plate
that is then bolted to the existing plate seen in the photo.
Cut a plate from high quality aircraft plywood. I
would use 1/4". Actually, what I would do is lamination two pieces of 1/8" ply
under a lot of weight. The reason being that first, it will be flat, and second
it will be harder and resist crushing better. The plate ends up with more
laminations this way.
Cut the plate to fit the entire area in the nose on top of the
existing plate. Drill the new plate to match the holes in the existing plate.
Next, remove the plate and cut it out for your engine. I
would use about 3 degrees of Right thrust. In other words, the front of
the engine should point slightly to the right when viewing the plane from above
and looking forward.
After the cut-out is made, drill the plate for the engine
mounting holes. Use good quality bolts with lock nuts. Put a flat
washer under the head of the bolt and between the nut and the plywood.
Be sure to fuel proof the mount well. I would drop the mount
in a can of clear solvent-based polyurethane - the same stuff used for
furniture. Let it soak for an hour and then hang it up and let it drip and dry
for a few days in the sun.
Finally, sand the polyurethane flat, but try not to take off
too much paint. If you go through the paint, then brush on a final coat.
Top
|
|
|
|
Is it just me or are the kits that are being made now a days
of less than top notch material?
No, it's not just you. It's the market. More
people want cheap kits than want quality kits but they still want some quality.
The little guys in this industry always seem to try harder so check out some of
the offerings from less well known companies such as
JGRC
Models and
BMJR Models.
Top
|
|
|
|
What is the best way to join
plastic cowl halves together? I am referring to the Extra 300 S .60 kit
built model from Great Planes.
Plastic cowls are far inferior to
fiberglass cowls.
The problem with plastic cowls is that
the seam will always show eventually. The only way to prevent it is to
glass the outside of the cowl and that still may not work unless you use heavier
fiberglass or several layers of light fiberglass.
More often than not a plastic cowl that
is glued together using strip of plastic to join the halves will start to crack
along the edges of the plastic strip. If it doesn't crack, it will still
bend and show where the plastic strip is. All of these things seriously
detract from the appearance of the model.
Before I join the halves I make sure they
mate very well. I also rough up the inside of the cowl using 220 grit
paper.
What I do is join the halves without the
plastic strip. I use a thin glue for plastic models such as Tenax.
Any good plastic glue will work.
Once that has dried, I handle the cowl
carefully because it is still very weak. Now I glass the inside of the
cowl. The reason I rough up the inside of the cowl is because epoxy does
not stick well to ABS.
From there I fill the seam either using a
putty for plastics or epoxy and micro-balloons. No matter how well the
seam is filled, vibration and flexing will cause the seam to open slightly which
will show through the paint.
My ultimate suggestion is to not buy kits
having cowls made of ABS. Frankly, they're junk. If you really want
the kit, then look for an after-market fiberglass cowl.
Top
|
|
|
|
I have been out of modeling for at least 8 years, and I have
finally gotten the bug and want to have a go again. I have 3/4 finished
building a workshop in a spare room at the back of my kitchen (I even have the
blessing of my wonderful wife!!) and it's to a point where I have a good flat
workbench, and basic tools.
I have a plan that I want to build (Flair's 'Puppeteer') and
I have a good stock of materials, wood, radio gear, engine, etc. The
problem is I have not picked up a piece of balsa in such a long time I am a bit
scared. Where do I start?
I have sat in my rapidly progressing workshop a few times
now with the plans in front of me and sat there...and sat...not knowing where to
start. I know what to do, but just can't do the 'wood' bit'.
I used to build quite nice models so I'm told. Should
I start with an easy bit like the tail feathers or jump in and start cutting
formers and making sides for the fuse? I think I need someone who knows a
lot more about models to tell me 'to get on with it'. (or kick me up the rear.)
You sound like me when I'm between projects and don't have any
custom builds. Whenever I'm in a position where I can start on anything I want,
it's like I have too many choices and it's hard to decide what to do next.
What you might consider doing is purchasing a newer kit that
is laser cut. My experience with the handful of these type kits that I've built
is that they tend to be easy to assemble and the parts fit well. A far cry from
die-cut to be sure.
If you have your heart set on building the Puppeteer from
plans, then I suggest you start by cutting the "kit." Cut parts for the whole
plane and get it over with. By the time you've finished cutting everything out
you will be intimately familiar with each and every part. At that point
your question of where to start will probably answer itself.
By the way... Get on with it!
*kicks dude in the rear*
Top
|
|
|
|
Reading your build of the
Herr Pitts prompted me to buy one. I have 3 questions:
1. How thick should the material
be for the aluminum landing gear?
2. I was thinking
of using Hi tech 81 servos with 33oz of torque?
3. Do you think the Norvel .074 is
too small for it?
I’m not sure how thick the gear should be. Anything that can
support a .15 size plane should be fine. Check the Sig website. A carbon fiber
gear might be a better choice because you really want to keep the weight down.
As far as the Norvel goes, I wouldn’t do it. The plane will
fly, but performance will be less than spectacular. In fact, I think mine with
the O.S. CV-A could use a little more power, but again, that’s more weight.
If you go with a larger engine, the plane will probably be
nose-heavy as mine was. Don’t mount the servos until you’re about ready to
cover. Then check the balance with everything installed but the radio. You may
find that the servos need to be in the rear and battery may need to be in the
fuse behind the trailing edge of the lower wing.
If you get the balance right and sand all the sheets before
you start building, yours will come in at a good weight.
The HS-81’s will probably be fine if you use the .074 and
maybe even a .15. It’s not a torque issue as much as a gear train issue
with those servos. I would probably use HS-85’s with the .15, but a lot of
that depends on how much you stress you put on the plane when you fly. The
structure can handle just about anything you can do to it. Choose your
servos accordingly.
Top
|
|
|
|
I am considering building a Herr Pitts Special
— from what I have gathered it is a pretty good kit.
I have only built ARF's to this point and would like to build something from a
kit, but I do not want to build something I am not really interested in and that
is usually what people suggest
— for instance a Sig 4*.
Every one says they are easy to build but, they just do not
do anything for me so I do not want to waste my time and money on one. Is
the Herr Pitts easy enough for me to try for a first kit build or should I try
something else? I read your review and would probably incorporate some of
your suggestions as to the landing gear, motor and servo placement. How
far back would the servos have to be moved ?
The Herr kit is very easy to build. Everything fits and
aligns well. It was my first laser cut kit and I was really impressed with
it. If you modify the kit for a dural gear, then try to find a small gear that
puts the wheels at about the same place as the original gear. It will be
heavier than the stock gear, but should work better. Of course you will
also need to add a plywood mount under the fuselage. The stock kit has a
balsa underside.
Where you put the servos really depends on where the Center of
Gravity ends up. The .15 I used is one of the heaviest .15’s available.
A Magnum .15 is lighter. If I were to build another of these, I would
still use the O.S. .15 CV-A because it is a power house and honestly, the plane
could even handle more power than that. But I do not suggest using a
larger engine, because this plane really needs to be as light as you can make
it. The Magnum is a lightweight in power compared to the O.S., but it’s
also half the price.
The plans show how to mount a .15 engine and I suggest you
follow them. To help balance the plane, I would use HS-85 BB Nylon gear
servos mounted as far back as I could get them.
Another thing I would do is remove any weight I could.
Sand the ribs to half their thickness, drill holes in them or both. I
don’t remember the kit well enough at this point to give specific suggestions of
where weight can be eliminated, but most of the reason mine was over-weight was
because of poor planning on my part which resulted in having to add a lot of
lead to the tail.
Top
|
|
|
|
I have a new in box kit of the Sterling Stinson Reliant.
I was going to build it this winter and was given two articles out of old flying
mags stating that it can do a wing
tip stall even if the speed is kept up on a climb after take-off or when
landing. The two authors ended up repairing and making their models hanger
queens. I was wondering did you every fly this model and have any wing tip
stall problems?
Sterling kits are known for their heavy wood which in turn
builds into a heavy airplane. Additionally, my kit ended up getting
damaged by termites while it was in government storage during the time I was in
the service. I have not built my kit yet, but when I do I expect to
replace most of the wood either because it is damaged or was poor quality to
begin with. Essentially I will be using the supplied wood as patterns to
cut a new kit.
The Stinson Reliant does have narrow
chord wing tips which may make it more prone to tip stalls. However, a
simple fix is to set both
ailerons so they are slightly up to give the wing some
washout. That should significantly reduce any tendency to tip
stall.
Of course, building light and straight will also help, so I
suggest that you replace any wood in the kit that you feel is too heavy.
Top
|
|
|
|
I have been very interested in RC Planes now for some time.
I have been learning to fly on a trainer aircraft and still have a bit to go
before I am a master at it. I am looking for a plane with a bit more
character and has a nice feel too — something like a
Cessna 182, Cap 232... anything with a sporting feel to it, but at the same time
scale like features as well.
Because I am only still a learner at all of this, I really
need advice as to what sort of kit to build for the first time. The winter
is coming in, so flight times are going to be scarce, and it is the perfect
chance for me to build my own plane and watch it progress into something
amazing.
As for tools and supplies, what would you suggest?
I really hope you can help me, as I am in need of some
serious advice.
What I gather from what you have written is that this will be
the first Radio Controlled airplane you will build and the second plane you have
flown. I perfectly understand your desire to build a model that has more
"character."
While it may be possible for you to build a respectable
scale aircraft at this point, I suggest you put that idea on the back-burner
for now. I look at flight-training and kit-building as a
three airplane process.
The first R/C plane is the primary
trainer such as you are already flying. The second plane should be a
shoulder wing model that is less stable and faster. There are several
great choices in this category. The Sig Kavalier is my first choice as a
second trainer. A
Stik model is also a good choice. The third model is a
low or
mid-wing aerobat. In this category you need to be careful to stay away
from models that
snap roll at the slightest provocation. Instead look for something
relatively stable such as a Sig Kougar or Cobra.
Please keep in mind that the idea here is not only to learn
how to fly, but to learn how to build. The sequence of kits above will
teach you the fundamentals you will need to build high-quality models for the
rest of your life.
These pages have been posted to help you learn how to become a better
builder.
Refer to the
Tools pages for information about how to equip your shop. Keep in mind
that there are many more tools available than what I have listed. These
are the tools that I have that work for me, but you may find many other tools
that fit your building style better than what I have presented.
Any model can have character if you personalize it.
For example, I have take the standard Stik concept and added a few touches to
it that will certainly attract a lot of attention and make it stand out from
all other Stik clones. You can find ways to personalize your own kits
too.
As for a good choice for a first scale model, I am going to
refer you to an expert to ask for advice.
Top
|
|
|
|
The kit that I will build using
magnetic jigs is a
Bridi Utter Chaos.
Do think that is a good Kit for me to build not having a lot of experience in
building? I have built two kits and two ARF's. The kits I have built
are a Piper Cup and a Midwest Aero Star 40 for my first plane.
I have not purchased a Bridi kit since the early 80's.
At that time they were some of the best kits on the market. Unfortunately,
I have no experience with his current kits so I can not say anything about the
quality, but I have no reason to believe that they wouldn't be as good as kits I
built.
Because this is a aircraft intended for precision aerobatics,
you really want to take your time to ensure it is as straight and light as
possible. I do not think it will be difficult to construct, but taking
your time and checking your work frequently will pay-off big when it comes time
to fly.
Top
|
|
|
|
I noticed you had built 2 Sig Kougars. I just acquired one
in a trade that needs a little work done to the tail. I wanted to know if
you had any suggestions/mods you could share with me.
The Sig Kougar is a good airplane as designed. It is
not the lightest model of that type due to the foam wing construction and the
robust fuselage. I built both of mine per the plans and was pleased with
them. The only modification I would consider making would be to add
retractable landing gear. It may be worth the effort to lighten the
model wherever possible, but if you only make a small change here and there
such as using a built-up tail you will not see much of a difference in flight
performance. In other words if you want to see a noticeable difference
then cut up the wing cores into lattice-work, build up the tail, replace kit
supplied wood with lighter woods, etc.
Top
|
|
|
|
|
|
|
|
Back to Mail and FAQ
Airfield Models Home |
|
|
|
Copyright © 2003-2007 Paul K. Johnson |
|
|