|
|
|
|
Mail
and Frequently Asked Questions about Fiberglassing and Finishing Techniques
These are questions I have received from visitors
regarding fiberglassing, finishing techniques and related issues. Other
Mail and FAQ Pages
Also see
|
|
|
|
I looked over your “How
to Fiberglass a Model Wing” article and wonder if the techniques outlined in
this article would hold true working with a foam wing?
I have a Byron “Pipe Dream”
I’d like to glass and I believe the wings are made of the injected molded type
foam.
Yes, it all still applies.
However the foam won’t absorb the resin like wood will so be sure to squeegee up
the excess so you don’t end up with a thick coating. Also do not
use fiberglass resin which will melt through foam like solvent. Use epoxy
finishing resin or epoxy laminating resin only.
Top |
|
|
|
I am finishing construction of
an old Sterling model of a Cessna 180, 45 inch wing span kit. I wish to
add the ribbing (name??) to the control surfaces and have not thought of an easy
way.
It is to be a flying model
which needs to be light in weight. I wish to use a gloss covering material
(Monocot etc) to simulate the high gloss painted aluminum. I am also
considering simulated rivets if I can do them without too much mental stress.
I would appreciate any helpful suggestions you might have for both the ribbing
and rivets.
I think it’s called corrugation, but I’m
not sure. I’ve never done it so I can’t tell you what will work. All
I can tell you is what I would do and hopefully it would work.
I would probably fake it by using strips
of wood glued on top of the surface. Before gluing the strips on I would
round their edges. I think covering it with iron-on would be a lesson in
misery though. I would probably only use this technique if I were going to
glass the surface or use
silk, tissue or silkspan.
I have never seen a rivet technique for
plastic film that I liked and haven’t got any suggestions for you if you want to
use film. I do have another idea about the corrugation but this is only if
you paint the model.
What I think I would actually do is use
lightweight silkspan and dope to cover the model. To make the corrugations
you could fake it using heavy silkspan cut into narrow strips and doped in
place. They would stand proud to give a decent effect I think. For
the rivets you simply use very small drops of white glue applied with needle,
toothpick or syringe. The rivets are put on last thing before the color
coats.
Top
|
|
|
|
I am building the GP Extra
300S kit and am planning to sheet and glass the entire airplane as opposed to
leaving the open framework. I would like to put a fiberglass finish on the
sheeted tail surface and I am concerned about warping. The surface is
framed up with 3/16 sticks and sheeted with 1/16 balsa. I used carpenters
glue to adhere the sheeting which caused a slight warp of approximately 1/32
over about 12".
I wet one side and dampened
the other and then clamped it upright between a number of magnetic fixtures
which brought the surface back straight. It looks good right now but I am
concerned that when I apply the glass cloth and resin, one side at a time, the
warp may come back. Am I getting worked up over nothing? Do you have
any suggestions regarding my predicament?
Perhaps I should rebuild the
stabilizer and start over using Ambroid cement instead of wood glue. I
debated the choice of glue for quite some time. What do you think?
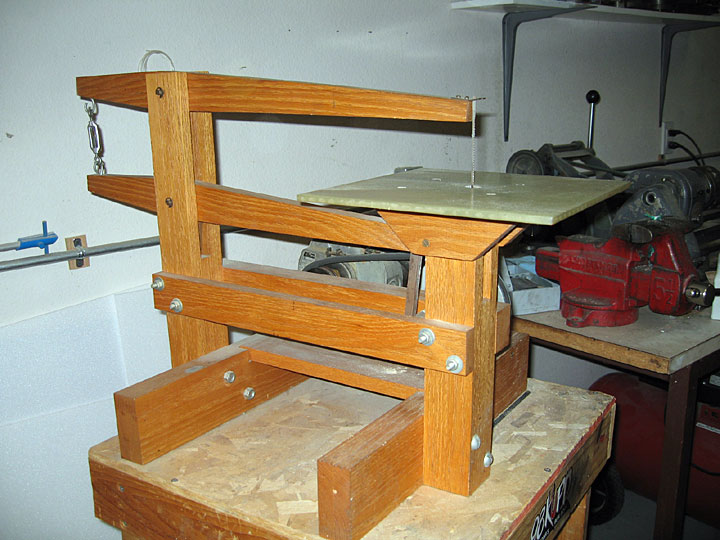
By the way, I built a
walking beam scroll saw many years ago and it has served me pretty well.
If you are interested I can send a photo. The design is easy to copy and
it was constructed predominantly of 1x2 and 1x3 oak.
The last stabilizer I glassed didn’t warp
but it bowed over an inch. When I glassed the other side it bowed back the
other way about half that. I did what any builder does — freaked out. Then I
built a jig to weight the stabilizer to straighten it. Basically it held
the stabilizer so that it wasn’t warped but was slightly bowed in the opposite
direction past where I wanted it to end up. I used a heat gun from a fair
distance to warm it. That helped a little but didn’t fix it.
Finally I set it aside to work on other
things. Every 24 hours I would flip the stabilizer over. It kept bowing up
no matter which side of the stabilizer was up. That led me to believe it
was the climate in my shop causing it because my fiberglass technique doesn’t
completely seal the wood.
By the time I got to the point of priming
the stabilizer had flattened itself. It took about a week and a half and
all I did was keep flipping it over on my glass bench. I did nothing else.
The stabilizer was for the
big DoodleBug I just finished. The stab has a span of over 30” and is
3/16” balsa.
I’m not familiar with the kit you’re
building. If you want your plane to be light then you have to be willing
to replace wood that’s excessively heavy. Normally ribs are ok. It’s
sheets and blocks you have to pay attention to.
Wipe up excess glue, use it sparingly and
use
clamps so you can use minimum amounts.
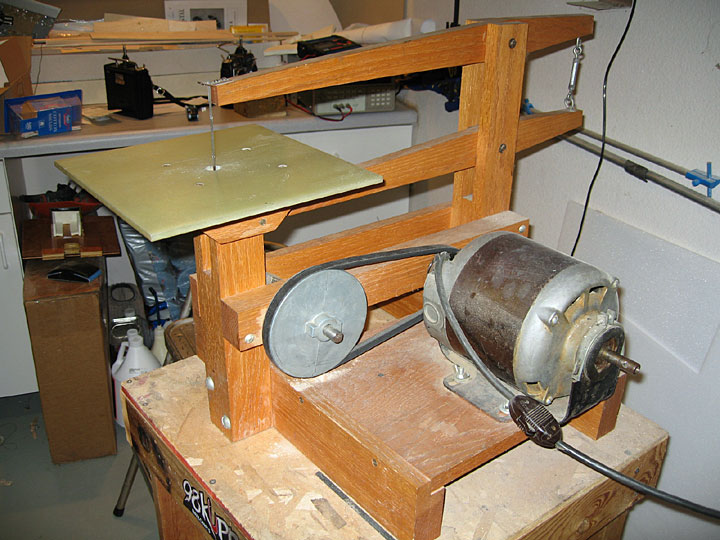
I’d love to see your scroll saw. I
like home made tools.
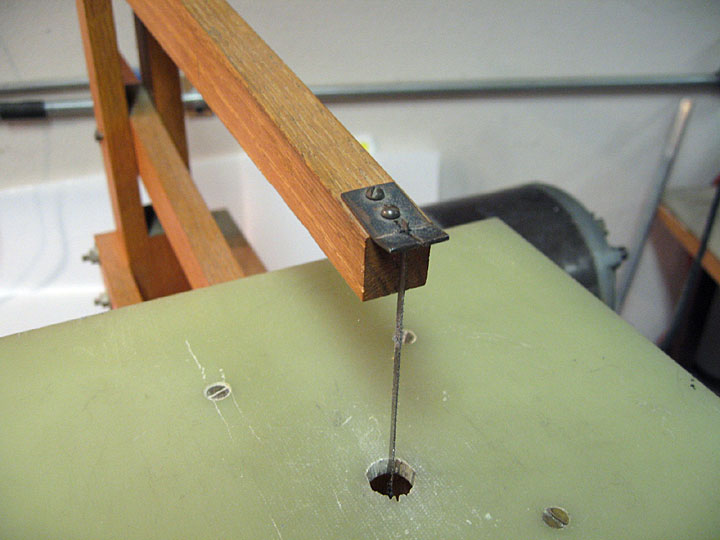
Here are a few pictures of my scroll saw. It is
nothing fancy but it has come in handy over the years. It uses standard
coping saw blades. Using a metal cutting blade, I have cut quarter inch
aluminum. The table is fixed so there is no built in angle cutting
capability. The lower arm is attached to an eccentric via a 3/16” square
pushrod. The motor is from an old washing machine.
Top
|
|
|
|
I am looking for an easy way
to make a full-chord wing fairing at the fuselage joint on an airplane having a
removable wing. This is for scale effect. A removable belly pan is
also involved so there needs to be a break at the leading edge.
Do you have a system for
adding this feature on my small 1/12th scale P-47? I can envision starting with
the waxed paper over the wings and using epoxy/microballoons and shaping it
while it's in a putty stage of cure.
There are several ways to go
about it. The lightest way is the most difficult. That is to cut triangle pieces
of sheet and then sheeting that with thin balsa.
The heaviest way is to use a
putty – most commonly epoxy and micro-balloons. It is done just as you have said
but I would use plastic food wrap or the clear backing from iron-on covering
rather than waxed paper.
One way I’ve done this is to put
plastic on both the wing and the fuselage. That allows me to remove the fillet
after it’s cured and shape it separately. I add chopped fiberglass to the
epoxy/micro-balloon mix to strengthen it somewhat.
Another way is to cut a thicker
sheet of balsa to match the airfoil and glue it to the fuselage. Carve to shape.
Pick your poison.
Top
|
|
|
|
Just purchased a 2 year old Hangar 9 J-3 Cub in excellent
condition. It was flown only 5 times and has a gas engine. It is an ARF covered with Cub yellow WorldTex.
The previous owner did not spray a sealer on it before
flying. What is the best way to clean this airplane? I would like to
clean it well and put a sealer on it. What sealer would you recommend?
I would also like to change "N" numbers. Can the numbers on it be removed
without leaving an image?
The first thing I would try is soap, water and a sponge or
gentle scrub brush. If that doesn’t work then I would try cleaning an
inconspicuous place with alcohol to see if it damages the finish.
If the finish were new you could simply spray a coat of clear
fuel proof paint that is compatible with the covering. I've used clear
epoxy with good results. You may also want to try Top Flite's Lustercoat.
I've never used it and have heard good and bad things about it so you should
test before committing your model to it.
However, a lot of birds can be killed with one stone in your
case. Instead of using clear, just paint the model with fuel proof Cub yellow.
You won’t have to remove all the stains which may be impossible at this point.
All you need to do is get the surface clean and degreased. You also won’t have
to worry about any image left behind by the N numbers which probably will leave
a brighter color underneath.
Top
|
|
|
|
After putting on the fiberglass what do you recommend for
filling small nicks that appear?
You can use a glazing putty (available in most auto parts or
refinishing centers) or epoxy and micro-balloons to fill small imperfections.
If you’re asking about filling the weave then you should use primer for the
paint you intend to use.
Top
|
|
|
|
I purchased a tired looking Sig Kadet Lt-40 a couple of
weeks ago that needs to either be re-covered (it's now covered in Monokote) or
patched.
If I choose to recover, I'm considering silk and dope.
Do you think this is the proper covering for this size and weight of airplane?
In your opinion, is silk easier to apply than ultracote or Monokote?
As a beginning modeler, I would like to work with a material
that does not look like plastic and will hold up well over time.
Should I expect any warpage when silk is drying? This
airplane will be flown as an electric.
I wouldn’t suggest that you use silk on your trainer. It’s
not a durable
covering and can explode on impact. If you’re set on using a painted finish
then I suggest you use Sig Koverall for the wing and fuselage and just use silk
on the thin surfaces.
Either of these coverings can cause severe warps if you’re not
careful.
For this model my real suggestion is just to use a plastic
covering so you can get in the air faster. Reserve paint for your best models
and use plastic for your every day models.
Top
|
|
|
|
Do you use the clear overcoat on Klass Kote? I'm
getting ready to order some KK and I'm hoping I don't have to use the clear to
get a magnificent glossy finish. At $12.95 for a 1/2 pint it ain't cheap!
A clear coat isn’t necessary unless you need to seal decals or
paint that isn’t fuel proof. I don’t use a clear coat unless necessary. All
the Klass Kote epoxy paints are fuel proof. Catalyst comes as glossy or flat.
You can mix the catalyst to get any amount of semi-gloss that you want.
Top
|
|
|
|
I'm new to fiberglass and such for finishing sheeted
surfaces. Can I use polyester resins used to fix scathed corvettes as
found in auto parts stores for this application?
One gallon of resin (bluish green) costs about $20.00 vs.
hobby resins (amber colored) that costs $25.00 per quart? Also, I saw in a
magazine that a guy finish-painted with Rustoleum paint —
a Home Depot item. Is this a good choice?
I’ve had bad luck with polyester resins. I can’t ever get the
right number of drops. It is very climate dependent. One time I’ll use 6 drops
and the stuff starts setting up in 5 minutes. The next time I’ll use 4 drops
and the stuff never sets up.
Polyester melts through foam like a hot knife through butter.
I’m sure a lot of guys have used it for sheeted foam wings and it is probably
safe. I would not be concerned about that part. If you like the resin, then
apply it sparingly and be sure there are no open seams in the sheeting for the
stuff to go through.
I know epoxy costs more, but if you buy it from somewhere
online in a larger quantity it’s not as bad. Plus a gallon of this stuff will
last many years. If I use more than 4 ounces of resin on a plane I’m using too
much (up to a 60 or so size plane).
I don’t know if Rustoleum is fuel proof or not. It’s probably
exhaust proof since exhaust should only contain hot oil. The best thing to do
is buy a can, finish a piece of scrap the same way as the model, spray the
paint, give it a week to harden and then rub raw fuel on it. If it holds up to
that, then wet the paint with raw fuel and let it sit for a couple hours. If it
holds up to all that then it’s probably fine.
I use
Klass Kote epoxy paint which is expensive, but again, it works and I don’t
have to worry about it. I did all my experimenting years ago and found stuff
that works so I don’t play around with various other formulas any more. I’d
rather pay the money than mess around testing stuff with each project.
Top
|
|
|
|
I am an ARF Builder. How do I secure the decals and
make them stick down the road after fuel contact from everyday flying.
It’s unfortunate that manufacturers aren’t honest about
decals. No decals are actually fuel proof. The ink used to print the
decal may be fuel proof and the plastic decal itself may be fuel proof, but fuel
or oil will get under the seam and the decal will eventually begin to lift.
Once that happens, I don’t know of any way to save the decal.
If the plane is covered with plastic I don’t use decals at all
unless a customer specifically asks me to. If the plane is painted then I can
spray a clear coat over the decals.
A way to seal the decals on plastic films is to paint clear
around the edges, but the paint is usually easily seen and doesn’t look too
good. You won’t see decals on my plastic covered planes because I haven’t found
a good way to protect them.
Pressure sensitive decals are the hardest to put on and the
thickest. The way I put them on is to first thoroughly clean the area where the
decals goes. Then I spray window cleaner in the area. The decal is carefully
positioned and I spend however much time is necessary using a squeegee to work
the window cleaner out from under the decal. When the decal will stick down on
it’s own and all the bubbles are out I let it dry. It takes days for the decal
to actually “set” using this technique so I don’t fly the plane for at least a
week after the decals are in place.
If the plane is painted, then I try to use water-slide decals
because I think they look better and are much thinner.
Water slide decals are easy to apply but take some patience.
Soak and apply decals one at a time. Basically you soak them only as long as
necessary for them to release.
Slide the decal slightly on the paper so you can grip the
paper with a tweezers or your fingers. Align the decal and hold the end down
with a Q-tip and then pull the paper from beneath the decal. Blot the decal
with a soft cloth. When the decal is dry, wipe excess glue up with a wet soft
cloth. If the decal goes over a bumpy surface then a decal setting solution
will “melt” the decal slightly and allow it to perfectly conform.
I spray clear on a test decal to ensure that the paint or
solvent in the paint doesn’t eat the decal. If it does, then I try again but
with lighter coats. Eventually I can almost always clear coat a decal even if
the paint isn’t compatible. It just means spraying several very light mist
coats and allowing each to dry thoroughly. Once the decal has a good coat then
I spray a second heavier coat.
Another way is to avoid decals altogether and paint insignia
or whatever.
Top
|
|
|
|
I read you article on fiberglassing because I am going to
fiberglass a pair of 42" floats. My main question at this point is what to do
about the screw holes? They are already drilled into the top of the float for
the mounts. How do I keep from resin from getting in the T-nut threads?
You can stuff some clay in the holes which will prevent
the resin from going in. When you thread the bolts in later, the clay will fall
inside the float.
Another way is to thread in a piece of dowel and then
back it out while the resin is curing. That might mess up the cloth a little,
but shouldn’t cause any real problems.
Top
|
|
|
|
I have a Jet Hanger Hobbies
RAM 500 Cougar painted white, orange and black using gloss K&B Superpoxy.
What is your opinion on
Klass Kote epoxy paint to seal the decals?
I suggest you finish a scrap
piece of wood the same as your cougar and test the clear over a spare decal
before committing to your model. My experience has been that you can put
anything over anything as long as you spray very light mist coats which is
sometimes easier said than done. It’s tempting to spray a wet coat, but
that could easily eat your decals or cause them to curdle.
The solvents in Klass Kote are
fairly hot, so I wouldn’t even think about spraying them over anything that I
was concerned about without testing. I did spray it directly over an ABS
cowl in a wet coat and it didn’t cause any problems, but I would not do that
with decals.
If you want an absolute flat
finish you can use the Klass Kote flat catalyst. If you want semi-gloss then you
can mix some gloss catalyst with the flat and mix the result with the Part A
(paint).
Top
|
|
|
|
I recently bought some plans
for a 40 size Victa Airtourer. This was an Australian designed 2-seater
aircraft of the 60's. The Aus. Government wouldn't give any support to the
manufacturer who, incidentally, made lawnmowers, and so he sold the design to
New Zealand.
They then proceeded to produce
the CT-4 Airtrainer, which was a variant of the 4-seater Aircruiser, and sold
vast numbers of the CT-4 to the RAAF as a basic trainer, no doubt making
squillions of dollars in the process...anyhow, back to the question...
The plans call for a
balsa/plywood engine cowling, but I'd like to make a fiberglass one. I've
looked on the web for articles on how to do this, but so far had no luck.
Given that you use fiberglass a fair bit, could you give me some pointers on how
to do this, or point me in the direction of a good "How To" article.
I've received this question so
many times that I've added an article covering the topic.
Top
|
|
|
|
I am final sanding all my assemblies before putting them
together and I'd like to try using Sig Koverall and Stix-It. I've never
used a fabric before and have no idea where to start. My project is the
Great Planes Extra 300 S .60 so it's a fairly large plane.
How much of the Koverall do you think I might need and how
much Stix-It? Do I need to start working with the Stix-It right away or
doesn't it matter?
I read an article where they said that you need to use water
on silk, does Koverall need it too? I also read where it shrinks quite a
bit and it's advisable to be careful on thin corners etc. Heck, this whole
Great Plane has lots of thin spots. Cheap balsa, you know the drill.
Still, as I said I'd like to try it anyway, it seems to be fairly simple.
I just haven't done it before.
Any type of covering on an open frame work structure needs to
be shrunk tight. Sig Koverall shrinks with heat after it is applied. Water is
used to shrink silk and other natural fiber or paper coverings such as silkspan
or tissue. These coverings are pulled smooth when wet and they shrink tight as
the water evaporates.
I have never attached Koverall with a heat-activated adhesive
such as Stix-It, Balsaloc or Balsarite. I’ve always used dope. Koverall is a
fairly heavy covering by the time it’s finished though. It’s not just the
weight of the covering but the amount of finish it absorbs. Personally, I
wouldn’t use Koverall on anything smaller than a .90 to 1.20 size plane.
In fact, I think it should not be used on anything smaller than large scale
models.
That being said, here’s basically what you do:
First, finish building the plane. When you’re done, spend a
lot of time sanding it. Make sure all the joints are flush, no glue blobs are
on the outside, etc. Fill any gouges or wide seams between the wood.
Tip!
A good way to fill large seams and cracks is to cut a sliver
of balsa from the edge of a sheet the same thickness as the sheet that needs
to be filled. For example, if the seam is in leading edge sheeting that
is 1/16” thick then cut the sliver from 1/16” balsa.
Cut the sliver about 3X the width of that needs to be
filled. For example, if the seam is 1/32” wide, then cut the sliver about
3/32” wide (3 x 1/32”).
Now run a round knife handle over it to flatten it. Cut the
sliver to length and check that it can go into the seam. Rub some
Titebond in the seam and then push the sliver down in it. The water base glue
will make the sliver expand and it will totally fill the seam. After it’s
dry, sand it all flush. It will be hard to see after it's all done.
Once you are satisfied with the wood work you apply the
Stix-It. It should be brushed only on the areas where the Koverall will be
attached. Cover from bottom to top, rear to front. For example, the first
piece applied to the fuselage goes on the underside from behind the wing to the
tail.
If the wing saddle is not on the bottom of the fuselage then
you can probably cover the whole underside with one piece. Each piece
should overlap sides about 3/8”. In this case, the bottom piece should
overlap onto the sides about 3/8". The sides in turn will overlap onto the
bottom by the same amount.
You will need to go back over the edges of each piece with
more Stix-It so that the next piece can be applied. Because I've never used
this method, I'm not sure how the excess Stix-It that doesn't get covered will
affect the rest of the finish. You might be able to put some lacquer
thinner on a paper towel and wipe up the excess being careful not to get any
thinner where it will cause the covering to come loose.
Go back over the edges and make sure they are sealed well
after the whole structure is covered. Use a heat gun and go over the whole
thing to shrink the covering, but be careful near the seams. If one pulls loose
you’ll have no choice but to remove it and put on a new piece. I don’t
know how much heat Stix-It can take so you need to be careful.
Another thing to be aware of is that Koverall has a powerful
shrink. If you aren’t careful, you can actually shrink Koverall to the extent
that it crushes the work. However, the covering will be tight long before
that happens, so it’s nothing to worry about unless you just keep pouring on the
heat after the covering is already tight or if you are covering a particularly
delicate structure.
When you are finished shrinking the covering it needs to be
sealed with clear dope. I usually brush the first couple coats and then sand
lightly. When the fabric looks well sealed, I spray on a couple more coats and
sand again. Now you can paint with whatever you like.
Do not use polyurethane paints such as Formula U. They peel
off dope. I would either continue with colored dope or use an epoxy paint such
as
Klass Kote. Personally I would probably use dope from start to finish.
It’s been a while since I’ve used Koverall and don’t remember
how much comes in a package. I think it’s about 47” wide. I would think 2
yards would cover your plane, but get 3 just to be sure.
Now I'll tell you how I would actually finish this plane.
I would
finish it with film such as Oracover.
Great Planes kits are already heavy and Koverall will just
make it heavier. Heavy aerobats get retired quickly because they don’t fly that
great.
For planes that I think should be covered in fabric, such as
Golden Age bipes, I usually use SolarTex. It’s also a heavy covering but
not any heavier than Koverall and it's a lot less work to apply. In fact, if
you have your heart set on a fabric finish for your Extra, I would use SolarTex
there as well.
Top
|
|
|
|
I am trying to remove the
Monokote from a plane. How can I do it? I have pulled some off but
it left the colored adhesive. Can I use Acetone, lacquer thinner or alcohol
to remove the remaining covering glue/adhesive?
Iron-on coverings are a pain to
remove as you've found out. What I've found is that using heat is usually
a bad move. It turns the adhesive gooey and leaves more of the adhesive
behind.
Removing the covering takes a
while, so get your mind straight before you start. Find a comfortable work
location, get a pair of decent tweezers and an X-Acto.
I peel the covering off the
structure as you have done. The covering can remove wood with it, so don't
pull straight away from the structure. Instead, pull the covering back
over itself. The slower you go, the better the chance of removing larger
pieces. No matter how small a piece is, try to pick it off.
Once you've gotten all the
plastic off, I suggest you get a medium grit sanding block to remove the
remnants of the covering. I've tried lacquer thinner, but because the
pigment is in the adhesive, melting it makes it soak into the wood. If you
plan to use an opaque covering then that may be ok, but some coverings aren't
very opaque and discoloration may show through.
Besides all that, the structure
will need to be sanded anyway because removing the covering will leave the wood
in too poor of shape to simply recover. I've found that I can remove
almost all of the left over-over adhesive using only sandpaper.
If you discover any new tricks
while you're at it, please pass them along. This is a job I have to do
every so often and am always looking for a better way. A couple weeks
later I heard back from the person who sent me this question. This is what
he had to say: I contacted you a couple of weeks ago about
removing Monokote. Well here are my thoughts on the process.
-
You better go into it with the right attitude just like you
suggested. I suggest in front of the TV (assuming your spouse does not
care) because it will take a while.
-
I ended up using the my covering iron (totally trashed a new
shoe, it did clean up pretty good). I would heat the covering and pull it
up slowly with tweezers or needle nose pliers as you suggested using to prevent
burning my fingers. This is the only way I could get it to come off in
larger pieces.
-
I did clean the model with acetone to get the bulk of the
adhesive off. I am going to recover in a very similar color so the color
bleeding into the wood was not a real issue. I was more concerned with the
acetone "eating" the glue joints than the color bleeding.
-
I sanded it like you suggested.
Last night I finished cutting the new hinge slots for the
elevator and rudder and brushed on some sanding sealer from the trailing edge
area of the fuse to the firewall. I plan to give it a final sanding this
weekend and start the re-covering process with Worldtex covering (I was able to
buy a bunch from a friend real cheap!). I hope to have it flying by next
weekend. Thanks for your help. Top
|
|
|
|
I am building my first kit — a
small balsa framed aircraft. The wings etc. are to be covered with tissue
paper. Could you give me some advice on how to go about this? For
example do I need to glue the tissue to the balsa and what ratio of dope to
thinner best?
The model is a 26" wing span
AeroGraphics Curtiss JN-4 'Jenny'.
Everybody has their own technique for a
dope finish. They all work for the most part, so it's simply a matter of
doing it a few times and finding what works best for you. For example, a
lot of guys use Nitrate dope as a base (which isn't fuel proof) and then use
Butyrate dope for subsequent coats. I've never used Nitrate dope, so I
can't speak about its properties or advantages.
The way I apply tissue is fairly
standard. First, pour a couple ounces of dope into a new container that
you can seal and store. A glass jar is a good choice. Thin the dope
about 100% (50/50 dope/thinner) using dope thinner. You may also want to add retarder if you
live in a very humid climate to help prevent the dope from blushing (turning
white).
Brush two coats over the entire balsa
frame wherever the tissue will adhere. Sand lightly between coats using
fine paper to remove the fuzz that comes up. Of course before you do any
of this the frame should already be sanded smooth, joints leveled, etc.
Now you can do one of several things.
I normally cut my tissue a couple inches over size all the way around. Lay
it over the frame and use a spray bottle to slightly wet the tissue. Pull
the tissue smooth and remove all wrinkles. If you can't remove all the
wrinkles this way they will never come out.
The thing to do in that case is use
smaller pieces instead of one larger piece. After the tissue is in place
and still wet, brush the thinned dope on the tissue only where the tissue
contacts the perimeter of the frame. Do not dope any of the tissue
inside the perimeter areas.
Once that is thoroughly dry, brush on
another coat around the perimeter. After that is dry, brush on a couple
more coats of the thinned dope over all the tissue. This can all be done
with Nitrate or Butyrate.
Now brush on a couple coats of dope that
isn't quite so thin. Sand lightly between coats being especially careful
not to cut into the tissue. Now you can put on the color coats. Thin
the color dope so it brushes well or so you can spray it if you choose to do
that. If you aren't using color, then do the same but with clear instead.
If the plane needs to be fuel-proof then
you will have to do the final coats with Butyrate dope or another fuel proof
paint. I recommend dope because it is light and easier to repair than
something like polyurethane over dope.
Also be sure to check RC Universe for
more information. I'm sure there are a lot of threads that discuss tissue
finishes in detail.
Top
|
|
|
|
I have just covered a trainer with Solarfilm. I
covered the wings and tail plane in white Solarfilm, and then where I wanted to
introduce another colour for effect, cut the area carefully out from the white
film and removed it. I cut a piece slightly oversize to this area in the
new colour, and ironed into place.
Prior to covering, the whole model was sanded and given a
coat of Balsaloc. I have been told that any edges in film covering should
be overlapped (done that) and overlapped in the direction of the rear of the
plane (not every joint!) to help prevent the film lifting due to air/fuel
passing over the edges.
One model shop suggested running a thin bead of CA along
each joint, although this does not seem wise as CA is dissolved by Nitro (I
believe), and it 'blooms' on plastics. Having covered the plane do you
know of any product which can be applied to the seams or for that matter brushed
over the whole covered plane to help prevent the ingress of fuel?
Nitro does dissolve CA, but you shouldn’t have raw nitro on
your finish. The only thing that gets on your finish is exhaust which
should contain only oil. The fuel and nitro are burned in the engine.
Even so, I think using CA to seal the seams is a bad idea. It will look
horrid.
I don’t know of any way to seal the edges of the film.
The only places where I’ve had problems with the covering lifting is in the
immediate engine area. Normally I coat those areas with epoxy whether or
not I plan to cover them with film.
The best thing you can do is turn up the iron as high as it
will go without melting the film. Then use just the tip to seal the
overlap area. Avoid placing the iron where it will shrink the film and try
to make it pull the seams apart. For those areas, turn the iron as low as
it will go and still shrink the film. Be careful and watch the seams.
Another thing you may want to try is using auto wax. I
don’t know how well it will work and I doubt it will last long as the cleaners
we use will most likely remove it. If the seams do come up then the wax
will inhibit getting it to iron down again. In this case, use lacquer
thinner or acetone to really clean the area before trying to iron it down.
Both of these solvents will remove the adhesive and pigment
from the film, so don’t get it on the underside. Just clean the area that
the overlapping piece will iron to.
The best way, of course, is to use a painted finish from the
beginning. Then none of these problems exist. It’s more time and expense though,
so I only use paint on my best planes.
Sorry I can’t give you a better answer. I don’t know
that there is one.
Top
|
|
|
|
What paint is really fuel proof? I hear glossy
Rustoleum is. What about the clear? What can you paint on what?
Any help would be appreciated.
A lot of people tell me that Rustoleum is fuel proof. I
haven’t used it so I don’t know for sure. Many years ago I used Sears enamels
for a few things including painting some spinners and had no problems with it.
I believe the paint was actually Rustoleum with a Sears label on it, but I don’t
know that for sure.
What I do know is that Klass Kote epoxy is fuel proof.
It is basically the same thing as the old HobbyPoxy and K & B
SuperPoxy paints.
Dope is also fuel proof to a certain extent. But
do not let raw fuel sit on the finish or it will eat it. Dope holds up
fine to exhaust in my experience.
Polyurethanes such as Formula U are fuel proof, but
they also peel off dope as I learned on a couple projects many years ago.
Formula U can not be used to attach covering so it must be applied over dope or
another substrate. I just don’t use these paints any more.
The only paints I use are epoxies or dope. When using
dope, I use dope the whole way because it’s hard to repair a hole in the
covering if you use another type of paint over dope. If you finish your
model with something other than dope over a dope base and then need to make a
repair, then you have to use dope to apply a patch. The problem is that
the dope will often eat the underlying paint which creates a big mess.
Another paint that people have told me is good are the Nelson
water-base epoxies. I haven’t used these either.
Auto paints work well but require a clear over-coat using the
2-part urethane clear. These are very fuel proof, but also very hazardous.
Top
|
|
|
|
I need some help on using Sig Koverall on my planes.
I am so tired of iron-on coverings. I am proud of my planes before I cover
them.
Do I apply the Koverall the same way you show on
fiberglassing a plane? I was told that Koverall is a great all around
covering that is good for open and sheeted structures.
I bought a good
airbrush and compressor and am looking
forward to some really cool paint jobs. All my planes are in the 25 to 46
class.
Sig Koverall is not applied like fiberglass. It is either
applied with dope or the structure is painted with a heat activated adhesive and
then the Koverall is ironed down. From there, it is sealed with several coats of
dope and then painted.
By the way, Koverall is a heavy finish for planes the size
you’re talking about. Personally, I would use silk. The silk we buy through the
hobby industry is way over-priced. Somebody told me a good place to buy silk is
Thai Silks.
Silk through the hobby industry is upwards of ten bucks a
yard. Thai silk is $2 to $3 for the same quantity (so I’ve been told). I
can’t remember what type and weight he said to buy though. You might want to ask
in one of the forums.
You can get dope from
Aircraft Spruce.
Top
|
|
|
|
I want to fiberglass my latest project. The problem is
that the wing (or fuselage) has open bays. How do I fiberglass it?
This has been the most asked question about fiberglassing.
Answer: Open bays can not be fiberglassed.
You must either sheet the wing or use a different finish.
If you want to paint, then use a doped on fabric such as silk, silkspan, Sig
Koverall or use an iron-on fabric such as SolarTex or Coverite.
Top
|
|
|
|
What type of epoxy resin do I use to apply fiberglass cloth?
I use epoxy finishing resin. It is much less
viscous than normal epoxy glue. This allows it to spread easily and
penetrate the cloth quickly. I do not use normal epoxy glue to apply glass
cloth.
I buy the resin I use from
Aerospace Composites, but there are several other companies that sell the same items.
Aerospace Composites calls their resin EZ Lam. The 30 minute type
is the best to use. It has plenty of working time but does not take days to
cure before it can be feathered so the next piece of glass cloth can be applied.
Fiberglass resin is not the same as finishing resin.
Fiberglass resin is polyester resin. It is the stuff that comes with
a small tube of MEK Peroxide catalyst. Many people, including Dave Platt, use
fiberglass resin because it dries very hard and sands better than epoxy.
I do not use polyester resin because I have a very bad
reaction to it when it gets on my skin and it smells horrible. However, it
works well, so there is no reason not to use it from a finishing stand point.
Top
|
|
|
|
I want to fiberglass a Top Flite Corsair 60 kit. What
do you recommend me doing with the rudder and stabilizers. These parts are
not fully balsa sheeted. Finally what kind of weave filler would be
appropriate after glassing? I saw another website
that uses epoxy mixed with micro balloons to fill in the weave, what do you think
about this?
The Corsair isn’t the best choice of planes to do your first
glassing job on. I would suggest you build a simple Stik type plane and glass
all the solid areas to get familiar with the technique before attempting it on
something that you put as much work into.
Any plane that has a D-Tube wing with cap strips can be fully
sheeted with no parts modifications. Simply glue a skin together and sheet
the whole wing instead of using the cap strips. Other good choices of
planes are the Sig Kougar and King Kobra. Both of these planes build
quickly and are fully sheeted and would be good choices for a first glass job.
The Corsair can and, in my opinion, should be glassed.
However, as you have realized, there is a problem with the open bay areas. Most
guys use Sig Koverall or a similar cloth covering to handle those areas. As you
know, the full scale Corsair also had cloth covered areas.
After the glassing is complete and the open bays are covered
and doped, the rest of the finish is applied to all areas. The only filler I’ve ever used is primer
— usually epoxy type. I don’t see
the point in home-brew fillers when there are products made that work well. I’m
not saying the home-brew types won’t work, but I can’t say anything about them
because I don’t use them. As modelers, we have enough problems to solve
without making our lives more difficult ignoring solutions that already exist.
For paint, I recommend an epoxy such as Klass Kote. These
paints are flexible, 100% fuel proof and easy to apply.
Another option is to use a good automotive primer followed by
automotive urethanes. Urethanes are extremely toxic, however, but they will
give you a first class finish. You must give the entire model an overcoat of
the two-part clear to seal it as most of these type paints are not fuel proof,
but the clear over-coat is. The clear coat is available in gloss, flat or
anywhere in between. Before you spray the clear, be sure to test it on extra
decals that came from the same sheet that you used on the plane to ensure the
paint won’t eat them.
In most cases, if the paint causes a bad reaction with the
decals it can still be used, but you have to spray very light mist coats and
allow each to dry. Repeat until the model has a good coverage coat, and then
spray on one or two more sealing coats.
Top
|
|
|
|
I plan on glassing two of my models. One is a Trainer
40 and the other is a .40 size jet. I have sheeted the wing for the
Trainer 40.
How much material (resin and fiberglass) should I buy?
Two square yards of fiberglass is more than enough for any
typical .40 size model. Use 0.5 ounce fiberglass. You will only use
about 4 ounces of resin for this size plane and most of that will go to waste.
If you do it right, only 2-3 ounces of resin will remain on the plane.
That is less than the smallest quantity you can buy.
Top
|
|
|
|
I am building a twin. Should I cover the wing before I
mount the engine mounts or after?
Usually it is easiest to fiberglass the major components
before they are glued together. Remember, there’s a lot of sanding to do
afterward and anything that’s in the way makes it more difficult.
Top
|
|
|
|
I recently received as a gift an A10 from Combat
models. It is pretty much all foam construction. I have never worked
with this. I am used to building with wood and Monokote.
The instructions stink and attempts to contact the
company produce no results. Obviously, I need to fiberglass the foam.
Do I have to sheet it first, or can I fiberglass right over the foam?
If I sheet it, what type of glue holds the balsa
to the foam. I am assuming after reading your
article that .5 mat and EZ Lam are the correct products. Any benefit to
using carbon fiber mat on whole plane instead?
This will be a twin DF and weight is probably
going to be a factor. Thank you for any input you can provide.
I don’t know anything about this model, but I just visited the
website. In general, any time you see a foam model that is injected molded it
is not intended to be sheeted. Injected molded foam is denser and therefore,
heavier than expanded styrene foam which is usually sheeted. In this case, you
simply fiberglass directly over the foam.
You’ve probably seen their site, but in case you haven’t,
here’s the link:
9-17-2011: The following linked page appears to have vanished.
http://members.aol.com/cbmjets/homepage/A10.html
The site specifically recommends .75 ounce cloth, so that is
what you should probably use. EZ Lam epoxy will work, but use the 30 minute
variety.
I do not see that using carbon fiber mat would be of
significant benefit.
By the way, most people use epoxy, polyurethane glue or
water-based contact cement to adhere balsa sheeting to foam cores.
Top
|
|
|
|
I am looking into fiberglassing a kit for the first time, and
I have been looking all around for as much information as I can get. I have
a few questions about the process that I couldn't get from your text.
First, what weight of glass would you recommend for a first
time trial? .56 oz or .75 oz?
Although you mention that using the lighter weights is more
difficult, is there much of a difference between the two? The plane I am
fiberglassing is a 60 size Chipmunk.
Second, you mention that you start with the bottom of the
fuselage, then the sides and finally the top(s). That makes sense, but I
wonder how you would go about covering a circular fuselage? Same way but
feathering the seams?
I would go with the .56. I over-stated the problem with using
it. It’s really not that bad. It will catch on your nails and glue on your
fingers, so you have to be careful. You also need to use very sharp
scissors. There’s not a lot of difference between the two weights.
Also, I talked about using 1 hour epoxy. That is really
too slow and it soaks into the wood more than faster epoxies which means
more filler is needed. I won’t buy it again. 30 Minute laminating epoxy is
perfect and what I actually recommend. I have noted that on the
fiberglassing page.
As far as fuselage shape goes, it makes no difference. Even
when I cover in pieces as I mentioned, each piece overlaps. In other words, the
bottom overlaps onto the sides about 1/4”. The sides overlap onto the bottom
about 1/4”. I feather each piece after it cures before adding the next.
It all feathers together and you never see it. After using
fiberglass one time you’ll see what I’m talking about.
Top
|
|
|
|
I am doing a project this quarter redesigning a child's
ride-on toy, and I am currently in the process of making a full scale model - a
mini helicopter with wheels for them to hop inside and Flintstone power
themselves around. My partner and I are making the first full scale model
out of PS blue foam around a PVC endoskeleton. I had suggested making the
final model wrapped with a fiberglass finish, then painted.
My question to you is if the resin will dissolve the foam or
do we have to make it out of something else? We plan to make the refined
pieces out of high density yellow modeling foam but this is only if the PS foam
will melt. What do you suggest would be the best application approach and
if this is even feasible? Thanks for the helpful hints on the website.
Epoxy resin is safe for foam – at least all the types I have
used are. It’s best to test on a scrap though. However, fiberglass resin
will dissolve foam instantly.
The only problem you may have is durability. You should
probably use several layers of heavy fiberglass or perhaps an outer Kevlar layer
to improve puncture resistance.
Check out
Aerospace
Composites for materials. I have used their EZ Lam epoxy laminating resin
with good success.
I thought of something else. You might want to use fiberglass
for a concept model, but not for production due to liability. Fiberglass has
sharp edges and unless you find a way to ensure a child will never come in
contact with an edge you may have a problem there. I realize this is a class
project but it’s still something to think about.
Another approach may be to build your Flintstone Copter in a
manner similar to bike helmets – foam covered with high-impact ABS plastic.
Top
|
|
|
|
|
|
|
|
Back to Mail and FAQ
Airfield Models Home |
|
|
|
Copyright © 2003-2007 Paul K.
Johnson |
|
|