|
|
|
|
Finishing
and Covering Materials
There are a variety of
covering materials
for flying model aircraft and display models that require a covering.
If you want a classic
doped
finish, you can use
tissue,
silkspan,
silk,
Sig Koverall or Stits fabric.
-
Tissue is for use on very small models or larger, fully sheeted models.
-
Silkspan is available in several weights and can be used on small through
large (.60 size) models.
-
Silk can be
used on larger models and is strong enough to do the job.
-
Sig Koverall and Stits fabrics are extremely strong and can be used
on the largest R/C aircraft.
While a good doped finish can't be beat
for beauty, any painted
finish is expensive.
An excellent painted finish requires a lot of skill, time and patience.
All modelers who have attempted to paint their models have suffered through
poor finishes. This is mostly due to lack of patience, believing the hype
of manufacturers ("Get an award-winning finish with absolutely no work
whatsoever!"), or lack of knowledge.
Those of us who want our models to have good painted finishes stuck with it,
learned what we needed to and have found techniques that we do best. I'm
not claiming that my finishes will win awards, but they don't embarrass me
either. Even so, people who paint their models are a decided minority.
Many years ago someone discovered that plastic can be applied to models as a
finish and
iron-on films
have since been the most popular finishes. A variety of brands are
available and each has unique properties such as flexibility, weight, color
intensity, sagging in direct sunlight, etc.
- Top Flite Monokote
- Oracover (also sold by Carl Goldberg Models as UltraCote)
- SolarFilm
There are many others and often the same film is sold under different names
or as store brands.
They look good when they
are first applied, but forever look like plastic. They also tend to start looking
ratty by the end of a flying season or two.
Films have a lot of advantages over other finishes. Arguably, films are
the most economical way to finish a flying model aircraft. As I've already
mentioned, almost anyone can put a respectable finish on their models using
film. Additionally, they are consistent in weight so you know before you
start how much weight the finish will add.
Conversely, until you have a lot of experience with paint, you don't really
know how much it will weigh until the model is complete.
That films are lighter than paint is a myth. They may be lighter when
compared to poorly executed paint jobs, but when a painted finish is properly
applied it can weigh the same or less than film.
Another advantage to films is that they are easy to patch. Films are
easily punctured. For example, if your plane runs through weeds, they can
whip over the top of the wing and put numerous holes in the covering. Film
finishes can be patched in a matter of minutes and the aircraft is ready to fly
again. The downside is that a patch always looks like a patch.
A painted finish can be made to look like new again, but usually that means
sanding, applying a patch, sanding some more, priming, more sanding, color
coating, sanding, more color, sanding and rubbing. In the end it will look
like new but it's not going to happen in an afternoon.
If you want a plastic film covering to stay looking good longer,
then you need to ensure seams are sealed well before you ever fly the plane.
Take the time to go over each part after you think you are done and re-seal the
seams. If oil starts to get under a seam then it will be nearly impossible
to seal it down again, so take care with this.
Do not ever use paper towels to clean your models. They
are abrasive and will degrade the finish over time. I use cloth diapers
and find my finishes tend to last longer than they used to.
Iron-on fabrics are similar to plastic films in
ease and speed of application. They are heavier, but more durable than
films. Some fabrics will stain and must be painted if this bothers you.
All the iron-on fabrics
that I am aware of are fuel proof without paint.
The next most popular way to finish and aircraft is to cover it with
lightweight
fiberglass cloth and resin (epoxy
or polyester). This is the most expensive finish there is. The cloth
is expensive. The epoxy is expensive. The primer and paints are
expensive. All in all, it is the most durable and long-lasting finish
which may make it the most economical in the long run (assuming the plane is not
destroyed in a crash or by movers).
Heavier weights of fiberglass are used to mold parts or used as a tape to
join wing panels.
|
|
|
|
Paints
The variety of paints for flying model aircraft has been
extremely limited over the years.
Back in the day, modelers used
banana oil (whatever that is). I've never even seen it, so all I know
is what I've heard about it. Apparently it is a type of paint that
smells like bananas - not actual oil from a banana.
The most prevalent of paints has been airplane dope. In fact, it is still
widely used because it works, is available and is fuel proof. Like
anything, dope has its drawbacks.
First, it smells really bad. Whenever you hear the word, "dope" or any
derivative of it in reference to drugs ("doped up", "dopey", etc.) it comes from
this type of paint. The solvents in it will affect you and kill lots
of brain cells if you don't use adequate protection for your respiratory
system. That means charcoal mask at minimum.
Additionally, dope has a high rate of shrinkage. Many coats are
required to fill the wood grain or fabric weave. Lots of coats means
just that. A really good finish can require upwards of 20 coats, lots
of sanding and lots of rubbing.
Most modelers do not enjoy applying a finish. They have sought out
finishes that are easier to apply and give good results in fewer coats and
with less work.
Other paints that have been marketed to modelers include polyurethanes
and enamels. Both of these type paints go on heavier with less shrinkage
which equates to fewer coats required for a comparable finish to dope (as
far as coverage goes). Even though they are heavier, the finished
weight should be comparable due to the fewer number of coats.
I have used both polyurethanes and enamels in the past, but I don't use them
any more for very good reasons.
First, if the model has open framework, then the fabric must be applied
with dope unless an iron-on fabric is used. Neither of these paints
adheres well to dope and will peel off - usually after only a few months.
Second, if a repair is needed, then the patch must be applied with dope.
While polyurethane or enamel can be applied over dope, the reverse is not
true. Dope will react adversely with either of these paints.
This adverse reaction causes the paint to curdle and behave in other
undesirable ways. Repairs are already difficult and this type of
nonsense makes them even more so.
Either enamel or polyurethane go well over a fiberglass base, however.
Even so, I've found that both of these types of paint are not always fuel proof.
Additionally, enamels and polyurethanes can take ages to dry. Overall,
I consider them to be some of the worst choices for model aircraft finishes.
A very high quality paint that some modelers have used is automotive
urethane. These paints are very fuel proof, durable and have
outstanding coverage characteristics. The downside is that
automotive urethanes are extremely toxic.
Most guys are not going to invest in the
proper equipment to protect themselves and they will pay for it later when
they begin to have neurological or respiratory damage. If you aren't
willing to buy the proper equipment then don't use the paint. There
may also be laws that preclude the use of these paints in your neighborhood
(which is probably where your shop is located).
In addition to being extremely toxic, automotive urethanes are very
expensive. And good luck getting a half-pint of
that custom color mixed. The smallest quantity most companies will mix
for you is a quart which can cost upwards of $100.00 and is enough for
several airplanes.
I don't know about you, but one Neon Purple plane
is enough for me — I don't want a hanger full of
them. Most of that quart of paint will go to waste on the shelf.
Because it's a 2-part paint, a quart of color yields a half-gallon of paint.
Many years ago there were two outstanding paints marketed to modelers.
These were Epoxy Enamels, K & B SuperPoxy and HobbyPoxy. As modelers are
prone to do, they divided themselves into camps claiming one brand was
superior to the other. In actual fact, the paints were nearly
identical and perfectly compatible with one another. I could never
tell a difference between them.
Unfortunately, something happened and the paints were taken off the
market leaving many of us scrambling for a substitute. In all these
years I had yet to find anything that even came close to replacing these
excellent paints.
I am very happy to report that this problem has been solved. I recently discovered
Klass Kote epoxy paints
and am very pleased with them. I recommend that you try them.
They require fewer coats than dope, are relatively (not entirely) safe, and
absolutely fuel proof.
- See the Model Flight
website for charts regarding the weights of various covering materials,
chemical compatible of paints, etc.
|
|
|
|
Paint Colors
I don't know why paint manufacturers do it, but it appears as if they
operate on the assumption that we don't know how or don't want to mix our
own colors. It could be a problem with the technology of the type
paints we use, but other types of paints, such as artist colors, acrylic
lacquer, etc. do have primary colors. In fact, the only paints I have
come across that do not have true primary colors are those marketed to
builders of flying model aircraft.
No color is absolutely pure, but some are so close that unless you are a
very demanding artist, you probably won't notice.
Instead of offering us a primary yellow, red and blue, hobby
manufacturers offer a small selection of colors which usually include a
variety of "dirty" primaries (primary colors having small amounts of other
color mixed in) as well as military colors, etc.
Any color under the rainbow can be mixed with primaries, white and black.
But the way things are now, that isn't possible. If the primary we use
isn't clean then when we mix colors together, the resulting color is often
wrong and usually isn't pleasant either. It can have a "muddy" or
"dirty" look to it.
For example, let's say the closest color to primary yellow a company
sells is actually a golden yellow. Golden yellow is yellow with some
red mixed in. It's just on the yellow side of orange. Now if you
want to make a green you have to add blue.
What you end up with is all three colors - red, yellow and blue - which
makes brown instead of the green you wanted. Or maybe you just get a
dark, forest green. You don't know until you mix.
One way to find out if a color has other colors mixed in is to get a good
color chart from an art store. Compare the color you have to a primary
color and see how it looks. When colors are placed next to each other,
they don't look the same as when taken on their own.
For example, if you place orange next to yellow, the orange looks closer
to red. If you place the same orange next to red, the orange starts to
look more yellow.
So why is it important to have primary colors? As I mentioned
already, you can mix any color you want. With existing colors, there
are many colors you simply won't be able to mix no matter what you do.
Second, you can keep less paint on hand. You don't have to buy
every color in the line even if you only need to small amount for trim.
If you know you'll need a lot of a color and consistency is important, then
you can buy the pre-mixed color. But if you need 1/2 ounce of beige
for some detail work you don't need to buy a pint of the stuff. You
can mix what you need.
|
|
|
|
Paint Storage
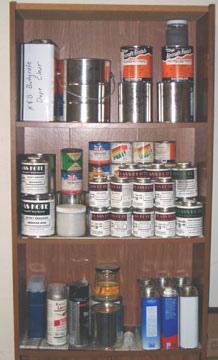 |
A variety of paints and solvents. On the top shelf is Aircraft Dope.
On the middle
shelf are epoxy enamels (HobbyPoxy, K & B SuperPoxy and
Klass Kote Epoxy).
On the lower shelf are Finishing
Resin, Polyurethanes, Lacquers and a variety of solvents.
I keep solvents in
quart cans for convenience, but I purchase them by the gallon. The
quarts are refilled as needed. Gallon cans are kept in the cabinet
below the shelves.
I
stock primary colors, white, black, clear and primer.
The other paints were purchased for specific projects and are left-over.
This is not a
great way to store paint. It is cheap shelf that I dragged around with
me in the Army and is now pretty much junk.
From a safety
standpoint, the paint should be in an enclosed, fire-rated cabinet.
Additionally, the tops collect dust which must be completely wiped off
before opening the cans to keep the dust out of the paint.
|
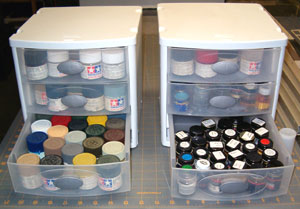 |
I actually have 4 of these cabinets full of paints for
plastic models. I like Model Master enamels and Tamiya
acrylics, but there are other good brands that work well. I
have a terrible time brushing acrylics. I have no idea what I'm
doing wrong, but it sprays beautifully which is how I apply it.
Enamels, on the other hand brush and spray very well. I also buy
chalk pastels and grind them up on a piece of sandpaper. The
dust is stored in 1/2 oz. bottles so that they are ready when I need them.
Pastel chalks are used to represent dust and dirt on my display models.
Therefore, earth tones are the best choices. |
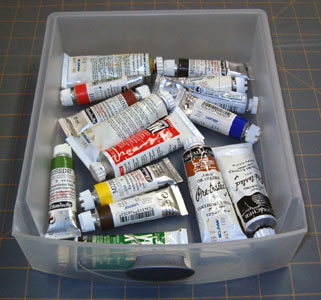 |
A small selection of oil paints will make washes for
a life time to weather your models. A wash is simply a little bit of paint mixed with a
large amount of thinner. It is applied to the model to represent
shadows, oil drips, grime, etc. One small drop mixed with 1/2 oz
of thinner pretty much does it, so you can see how a tube will last
forever.
Generally earth tones and primary colors are all you need. For
example, if you want to highlight panel lines on a subject that is painted
blue, then use a blue wash that is several shades darker than the base
color. If you use black, it won't look natural. Also see
|
|
|
|
|
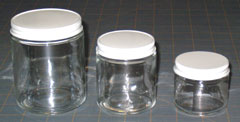
Paint Containers
 I
am probably not the only modeler in the world who has struggled to find
appropriate jars and bottles to mix and store paints. I've found a good source
for small jars through Micro
Mark. They carry
1/2 oz. and
1 oz. jars that are perfect for small quantities of paints used for painting
plastic models or trim on larger models. They also happen to fit my
Aztec airbrush which is a huge bonus. I
am probably not the only modeler in the world who has struggled to find
appropriate jars and bottles to mix and store paints. I've found a good source
for small jars through Micro
Mark. They carry
1/2 oz. and
1 oz. jars that are perfect for small quantities of paints used for painting
plastic models or trim on larger models. They also happen to fit my
Aztec airbrush which is a huge bonus.
The jars come six per box. At first I bought a couple boxes, but at the
rate I was going through them I ended up ordering about 10 boxes of the 1/2 oz.
size and 4 boxes of the 1 oz size. Now I have enough.
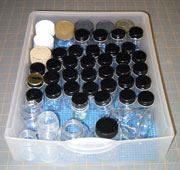
 These jars are much too small for painting my flying models, however. I
save glass jars in sizes from 4 oz. to 8 oz., but I never have enough. I
finally got fed up and searched the internet for a source of jars figuring I
might as well buy them and end my frustration. The other problem this
solved is that the jars are consistent in size and easier to store than random
size jars that used to contain food. These jars are much too small for painting my flying models, however. I
save glass jars in sizes from 4 oz. to 8 oz., but I never have enough. I
finally got fed up and searched the internet for a source of jars figuring I
might as well buy them and end my frustration. The other problem this
solved is that the jars are consistent in size and easier to store than random
size jars that used to contain food.
I
purchased jars from SKS Bottle. Unfortunately, the solvents in
most paints will melt the liners in the lids that come with the jars.
They carry lids that work, but you can't buy them in the same quantity as the jars. Jars come in boxes of 12 or 24.
You have to buy 72 or 144 lids, depending on size, whether or not
you buy the lids at the same time as the jars.
The lids that work are foil lined.
I had a very good experience with a company that makes bottle caps. I'd love to tell you who they are but I
don't want to punish them for their good deed.
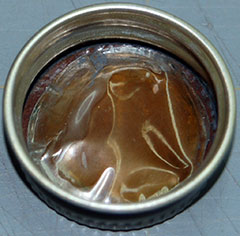 |
The bottle caps that come on small paint jars (Testor's, Floquil, etc.)
can get glued on by dried paint. When you manage to wrangle the cap free —
sometimes with pliers — the cap can be damaged such that it doesn't seal or even screw
back on.
Sometimes the inside seal peels apart which ruins it.
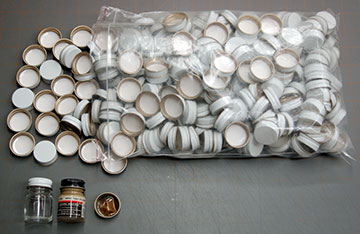
I recycle my jars and now have many more jars than caps due to ruined
caps. I did some research and found a company that makes the same caps that come on the paints I use.
I gave them a call and this is how the conversation went:
|
 |
Nice bottle cap lady: Hi! May I help you?
Paul: Yes, I need to purchase some bottle caps for hobby paints I use.
Nice bottle cap lady: Sure.
How many do you need?
Paul: A couple hundred should hold me for a long time.
Nice bottle cap lady: Well, they
come in cases of 3,600 caps.
Paul: Ok, how much is that?
Nice bottle cap lady: Well the
problem is that one case doesn't meet our minimum order.
Paul: Ok, how much is your minimum order?
Nice bottle cap lady: How many did
you say you need again?
Paul: A couple hundred.
Nice bottle cap lady: I'll just send
them to you as a free sample.
Paul: Really?!?? Wow! Thanks! Will you
marry me?
(I'm easy — not cheap) |
So that's why I'm not going to tell you who the company is. I don't think it would be cool for me to send
everyone on the net to them to ask for free caps and I don't think too many people will want to buy their three-case
minimum (almost 14,000 caps).
Also see
|
|
|
|
|
|
|
|
Back to
Construction Materials
Airfield Models Home |
|
|
|
Copyright © 2002-2009 Paul K.
Johnson |
|
|

