|
|
-
Use a lot of sandpaper. Be
sure to buy the correct type for the task(s). I have seen many people use Wet or Dry paper for general
sanding tasks. It is not designed for sanding wood. It is designed
for sanding non-porous materials such as paint and metal. I do use very
fine Wet or dry paper when sanding soft balsa blocks, wing tips, etc. because
it does not fuzz the wood as much as garnet paper. 3M makes excellent
sanding papers in many grades. I usually buy boxes of each grit to save
money over purchasing individual sheets.
-
I find sanding to be a very cathartic process. What I mean by that is
when it comes time to do the final overall sanding, I will gather up all the
components I intend to work on, find a comfortable lawn chair and spend an
afternoon extracting the diamond from the rough. It is almost like playing
a musical instrument.
Every component has a unique resonance that you can
feel when you are guiding the block over it. This is when I am rewarded
with beauty of my work — and the last time, because the next process is applying
the finish. I have to admit I hate covering my wood work. It is
almost depressing.
-
I have noticed that I consistently sand about the same
amount of wood from a component when I am sanding it flat. What I am
referring to are built up or sheet balsa tail surfaces. Normally I remove
about 1/16" (1/32" from each side) of material which makes the finished surface
thinner than it was designed to be. That is just how much wood I have found
needs to be removed to get all the joints flush and the surface flat.
I
compensate by building the surface from thicker wood so that when it is sanded
it is the right thickness. What that means is that I usually put the kit
supplied pieces in my stock and replace them with appropriate sized wood.
-
For the life of me I can not sand
the edge of a thin stick without rocking the block and ending up with an angle I
don't want or a rounded edge. When I sand sticks, I sand them in groups of
2 or more. If I only need one stick, then I pull out a scrap that's the
same size and use it. It is much easier to keep the block square this way.
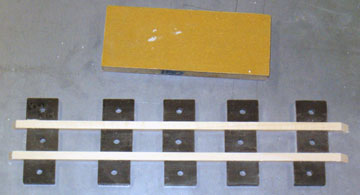
The farther the sticks
are placed apart, the easier it is to sand them flat. I normally space
them about 2/3 the width of the sanding block.

If the magnets are
lower than the height of the sticks, then they keep the sticks upright and help
prevent movement while sanding.
-
To sand a nice taper on a control surface, I glue a
piece of music wire to the edge of a piece of flat particle board to use as a
sanding stop. I then spray the board with a very light coat of spray glue.
Let the glue dry thoroughly. We are not trying to glue the surface to the
board. We just do not want it to slide around.
Instead of sanding one
surface to finished size, I flip the part over when the taper is half the
finished size to ensure that both sides are tapered identically. Flipping
the part is only important if you do the hinging in advance or there is some
other reason why the surface needs to be tapered from both sides.
Another
example would be a surface that has a core with ribs on it. Otherwise it is optional.
Sometimes I glue a stop for the leading edge of the surface as well, but usually
I just sand to a line drawn on the front of the leading edge.
-
Sunny days are the best time to finish sand because
blemishes and the actual shape of parts stand out better. Generally, I
let the weight of the sanding block do the work and I simply guide it over the
structure. After I am finished sanding, I spend the next few days working
on last minute details before applying the finish. This is also a good
time to clean dust out of the shop. I like to have a little time to
admire my handiwork before it all gets covered up, so I am usually in no hurry
to get started on the finish. Maybe I am just weird, but being a builder,
this is the holy grail for me.
-
Before sanding, go over the structure and look for
blobs of glue and cut them off with an X-Acto. Also, vacuum the structure
to remove any particles. These kind of things will come loose and put all
kinds of gouges in the wood when they get trapped between the sanding block and
the structure.
Also, you should check your sanding block to ensure there
is nothing caught in the grit that will gouge the surface.
-
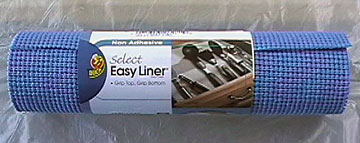
I have found that "sticky" rubber shelf-paper is great for
two purposes. First, it really helps prevent gouges in my work.
Second, it helps hold parts in place while I sand them. The stuff can be
washed because it will quickly lose its tack due to sawdust sticking to it.
-
If you are having problems with the wood sanding away
and leaving a hard ridge of glue, then use coarser sandpaper. Coarse paper
does not care what it is sanding. I usually use 80 grit to do initial
shaping and it pretty much rips away wood, epoxy, plywood or whatever all at the
same rate.
Of course you can not sand too much wood away because when you
switch to a finer grit, you are going to remove a lot more wood removing the
scratches the 80 grit left. With a little experience, you will know when to
stop.
-
The general rule is to sand with the grain of the
wood. However, if I am trying to sand something flat, then I initially sand
in a circular motion. Sanding wood is just like sanding primer on a metal
surface such as a car. You can tell if there are low spots because they
will have a different tone than the parts that have been sanded.
Tilt the
part in the light to check for low spots. I also sand cross grain when I
want to remove a lot of wood fast, such as when sanding blocks to rough size
after initially planing them. You just have to stop while there is still
enough wood to remove the scratches without sanding the part too small or too
thin.
-
When sanding the trailing edge sheeting of a wing with cap strips, it is
easy to gouge the caps. I put masking tape the full the length of the
wing to protect the caps while I sand the rest of the wing. If I start
to sand through the tape, I replace it. Once the sheeting is sanded
even, I remove the tape and then sand the caps to fair into the sheeting.
-
An air-compressor is great for blowing dust from
inside structures and dirt from engines. It is also good for drying parts
quickly and a myriad of other tasks.
-
Buy a shop vac to remove dust from your model using a
brush attachment. Wiping the dust off with a tac-rag only removes surface
dust which is not good enough. When you use a vacuum, parts that you
thought were ready to cover will show more blemishes that were disguised by the
smooth feel of the dust (that is a good thing because now that you are aware of
the problem you can fix it).
As a bonus, iron-on coverings will stick
better and stay down longer.
-
Iron-on plastic covering wrinkles. That is all
there is to it. Every manufacturer implies that their film coverings do not
wrinkle in the sun. I have never known that to be true, and as soon as the
climate changes the covering will wrinkle on any sheeted surface. After
you shrink the covering a few times, it wrinkles faster the next time.
Eventually, there are zillions of little wrinkles that never come out again and
the edges of the covering starts peeling up. If you really want an
aircraft to last a long time, either use fiberglass, resin and paint or a doped
fabric finish. In spite of their shortcomings, I do use plastic
coverings, particularly on aircraft that I want to be light.
I
usually end up recovering these airframes a few years later if they are still
airworthy.
-
If you are planning on using transparent covering do
everything you can to keep dust and wood particles out of the structure. I
use an air compressor to blow out as much dust as possible and especially aim it
into all the little holes and openings in the structure. Then I vacuum the
model thoroughly.
Also it is best if you cover the model in a location
other than your shop. When the liner is pulled from the covering static
electricity makes any dust in the air attach itself to the covering instantly.
After you cover one side of a structure, vacuum the structure again to remove
any dust that stuck to the inside of the covering you just put on.
Be
sure to wipe fingerprints from the covering on the inside of the model before
covering the other side. Once both sides of the structure are covered,
anything inside the covering will be there forever for everyone to see.
-
When I cut open the covering to reveal the hinge slots
a small amount of covering is left to flop around and it is hard to tell when the
hinge is aligned correctly. It is also difficult to iron this covering down
around the perimeter of the hinge slot and it tends to end up looking messy (not
that anyone closely examines hinge lines).
Now I use my soldering iron to
melt the covering away. This technique creates a very small "molten" lip
rather than a sharp cut that can tear later. Use a tapered tip and lightly
touch it to the covering and it will melt away quickly. Be sure to wipe
the tip on a wet sponge every once in a while so you do not ruin the iron when it
bursts into flames.
|
|

