![]()
|
|
|
|
|
|
|
|
|
|
|
|
|
|
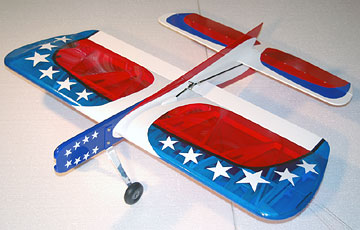
Solving the fuel-proofness problem often causes other problems. Most paints that have the chemical properties to resist model airplane fuel are also highly toxic and require expensive equipment and spray booths. The average modeler doesn't have the shop space, know-how or money to finance a paint shop specifically for model airplanes. Most guys want to rig something up quickly in their garage or their yard, spray their paint and have a finish that looks like it was done by a pro. Many years ago two excellent paint brands became available that solved many of these problems — HobbyPoxy Epoxy Enamels and SuperPoxy Epoxy Enamels. Both of these brands were relatively safe, although not non-toxic. However, the builder would be safe wearing a charcoal mask when using these paints. Expensive respirator equipment wasn't necessary. Additionally, these paints were extremely durable and fuel proof. Unfortunately, both of these brands of paint went off the market several years ago which was a disaster for many of us who like to paint our models. Ever since then we've been scrambling to find a good replacement. The one paint that has been around for years that provides a good finish is airplane dope. The problem with dope is that it can take upwards of 20 coats to achieve a really excellent finish. While a properly applied dope finish followed by a heck of a lot of elbow grease will provide an unbeatable finish, a lot of us want something that looks just as good, but is a lot less work. Only a few months ago someone brought Klass Kote epoxy paints to my attention. I visited the Klass Kote web site to read about them and was very pleased to learn that Klass Kote is compatible with the old K & B and HobbyPoxy brands. One article in particular on the site sold me. Dave Platt reviewed these paints and subjected them to a variety of destruction tests. His word is good enough for me, so I did not bother with all the testing. I applied it just as I would have applied the brands I've used in the past and had no problems with it. Klass Kote paints are highly pigmented epoxies. What that means is a few thin, light coats will give excellent coverage. Thick, wet coats are not necessary and will only add unnecessary weight to the model. These paints are toxic, however. At the very least you should purchase (and use) a charcoal respirator to protect yourself while using them. The model I painted for this review is a DoodleBug 330 control line airplane. The fuselage and tail surfaces were fiberglassed in preparation for paint. The wing is covered with Oracover Lite iron-on film. The paint comes in round cans that have a screw-on cap in the center. While I didn't find it easier to dispense the paint from these cans than paints from typical cans having pry-off tops, the design makes it very easy to clean the can. Cans that have pry-off tops are very difficult to clean. I think it's a safe bet that anyone who has ever used paint with those types of lids have had a few bad experiences with them due to the lid not sealing properly because of dried paint in the groove. With the Klass Kote cans, a paper towel with a little lacquer thinner cleans the threads quickly. This may seem like a minor point but it's something I really appreciate. The downside is that I often need to spoon out a small quantity and the small top makes that more difficult. I mixed the paints according to the directions and let them set up for about 45 minutes to an hour before adding reducer. This setup time allows the chemical reaction to begin. During the wait time I stirred the paint occasionally as well. After adding the reducer, I thoroughly stirred the paint and allowed it to sit for a few minutes more before spraying it. In speaking to a company representative, it was recommended to me that I wipe down the model with Klass Kote reducer before spraying to prevent any adhesion problems due to oils on the surface, etc. I did not feel that was necessary because I go to great pains to degrease my models using Tri-Sodium Phosphate (TSP) and keeping the spray area sterile. Nevertheless, I did wipe down the model with the reducer to ensure the recommendation did not cause any problems such as fish eyes. No problems were noted. Immediately after wiping down the model, one coat of primer was sprayed. Ideally the primer should be allowed to dry at least a week before sanding because it will probably continue to shrink somewhat. I was way behind schedule on this model, so I elected to sand the next day. The primer has excellent sanding properties. Another coat of primer was necessary due to some areas not being completely filled. The primer has good coverage and fill characteristics. There was one area where my experiences did not concur with Dave Platt's. He mentioned that he mixed one part paint with one part catalyst with one part reducer for spraying. I found that 2 parts of reducer were necessary to thin the paint for it to spray properly. There is nothing wrong with that and is likely due to differences in equipment used and climatic conditions. Once the paint was reduced properly, it sprayed beautifully through my Badger 400 touch-up gun and through my Aztec airbrush using the heavy flow tip assembly.
In an area where I had partially sanded through the primer, more coats of yellow were necessary to obtain even coverage. The point being that an even base will allow you to spray less paint and keep the weight down. Additionally I have since been informed that Klass Kote makes a yellow primer specifically for use under their yellow paint. After allowing the paint to cure overnight, it had hardened enough to allow handling. I used a combination of artist's frisket, Tamiya masking tape and electrician's tape cut in to thin strips to mask for dark red trim. One coat provided good coverage. There was no bleed under or any problems with the tape lifting the paint. Immediately after I finished spraying, I removed the masking to allow the edge to round over. Unfortunately, it cured so fast that it still left a slight edge. This could be sanded and rubbed smooth in the future if desired. A clear coat would also help. Because these paints are true epoxies, once they are mixed they will continue to cure even in a closed container. I made the mistake of leaving a jar in my shop here in Florida which was not climate controlled at the time. The paint had cured almost all the way through by the next day and had to be chipped out of the glass jar. Often times when painting a model you will find that you will be using the same color over a period of several days. If you have leftover paint, you can close the bottle and place it in the refrigerator. If you live with other people, be sure to clearly mark the bottle with skulls and crossbones or something. The cool temperature of the refrigerator will reduce the cure rate long enough that the paint can still be used a day or two after it is mixed. However, before you attempt to use it, allow the paint to reach the ambient temperature. Spraying cold paint is always a bad move. The DoodleBug hit the scales at 21.1 ounces ready-to-fly with a Fox .19 engine installed. That happens to be the weight recommended by the designer, "Wild" Bill Netzeband. I assume his was covered with an iron-on film, so the paint did not add appreciable weight to the airframe. I could not be happier with this paint. It provides a quality finish in very few coats. Most importantly, it is very fuel proof and should never peel off a properly prepared base. You can expect to see more painted aircraft in the Gallery in the future. If you are like me and have been looking for a good paint that is truly fuel proof then I recommend that you give Klass Kote a try. Also see
|
|
|
|
|
|
|
|
|
Copyright © 2004 Paul K. Johnson
|
|