![]()
|
|
|
|
|
|
|
|
|
|
|
|
|
|
|
|
|
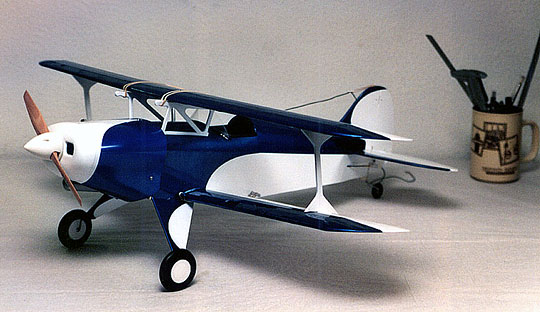
About the Herr Pitts SpecialI like models that fly like models and I have always been particularly fond of small model aircraft. When I first started flying Radio Control aircraft, small radio equipment was hard to come by and expensive. Mini servos did not have nearly the power as their modern equivalents and if micro servos were available, I was not aware of them. Radio equipment has come a long way making it easier than ever to fly small R/C planes. At the time I built the Herr Pitts, I was stationed in Germany. Most of my workshop equipment was in Army storage someplace in the U.S.. Therefore, I was looking for a kit to build rather than trying to scratch build something. Unfortunately, Germany has the same problem as the United States regarding lack of kits in local hobby shops. There was very little to choose from. I came across this little plane and it seemed to be just the ticket. The Herr Pitts looked like it would be a lot of fun to fly. I had never built a laser cut kit before and by all accounts, they are far superior to die-cut kits. I also knew I would be coming back to the U.S. and wanted something that would be easy to box up and have some chance of surviving movers. I question the model's "scale" appearance. Some people have told me the Herr Pitts does resemble a full scale version. Others have told me that this model is purely a fantasy of the designer. I have never seen photos of a Pitts that looked at all like this model, but that does not really matter to me. Myself and other pilots think this is a really cute little bipe.
|
|
|
Construction
The plans and instructions are clear and easy to follow. The wood quality is excellent. The laser-cut parts fit couldn't be better. The fuselage is essentially a box and formers that uses tabs to align everything. I deviated from the plans in a couple areas due to personal preference. First, I did not glue in the cabane struts when called for in the plans. Instead, I left them removable so that they would not be in the way when applying the finish to the fuselage. The cabanes were painted separately then epoxied in place after the model was finished. The motor mount box is similar to what is used on large r/c aircraft. In fact, I have never seen this method used on model this small before, but it works well. The plans show how to trim the parts depending on what engine is going to be used. The downside of the motor box is that it limits the size of the fuel tank that can be used. Because I used an engine at the high end of recommended power, flights tend to be short and almost always result in a dead-stick landing.
As it turned out, the pieces get trimmed precisely where the plans indicate. The plans call for the engine mount to be on the firewall centerline which puts the propeller to the right of center. I ignored this and mounted the engine so that the back of the propeller would be on the centerline instead. There is too much right thrust called for in the plan. A lot of left rudder trim is necessary to counteract it.
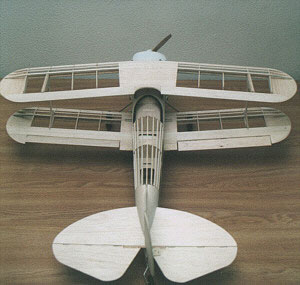
I do not like the landing gear arrangement. The 3/32" music wire legs are stabilized by balsa gear fairings. The fairings are attached to the legs by wrapping covering around the wire and ironing it to each side of the fairing. The music wire is too flexible on its own, so the fairings are then attached to the lower fuselage using silicone adhesive. In theory this results in a shock-absorbing gear and will prevent the bottom of the fuselage from being ripped out in a crash. In practice what ends up happening after a few flights is the covering attached to the fuselage pulls loose which results in springy landing gear. My Pitts has been flown only from grass fields. After two or three flights I have to peel off the silicone, iron down the covering and replace the silicone. The process of removing the silicone, ironing down the covering and replacing the silicone is time-consuming, annoying and only lasts for a few flights. In fairness, I am using a heavy engine and the finished weight of mine is more than intended. Perhaps at the recommended weight the landing gear will hold up better. I am skeptical. If I were to build another of these kits then I would probably discard the stock gear and replace it with a small dural gear. That would require replacing the balsa sheet under the forward fuselage with a plywood gear mounting plate. The other thing I did not like is the cowl made from three pieces of vacuum-formed ABS. The cowl is difficult to fit and has a wavy surface that requires hours of wet sanding to smooth out (if you care to do it). The instructions state that the cowl must be flexed when mounting it on the fuselage. This flex is a guarantee that the cowl will crack eventually. In fact, the cowl started cracking before it was ever mounted to the aircraft for flying. The cowl has never been on the aircraft during flight and it is cracking anyway. I am not sure if anyone makes an after-market fiberglass cowl, but if it fits properly and the quality is decent, it is probably worth purchasing. The tail feathers are simple balsa sheet surfaces. I used small Dubro pinned hinges, but I think Monokote hinges would have been a better choice. The wings are very straight forward and can be built in a couple hours. Both wings rubber band to the fuselage. The interplane struts are press fit into the wings for flight and have been very reliable. In fact, this arrangement will prevent a lot of damage in a crash because they pop out and do not take any of the wing structure with them. Because of the press fit, take extra care when setting up the lower wing dihedral. The top wing is flat. For a model this size, the radio compartment is huge. Standard servos could easily fit, but weight is an issue, so I recommend using small, light servos having a minimum of 20 oz/in of torque. I used Hitec HS-85's which are more than powerful enough. Construction was completed in about twenty-five hours. The remaining hours were spent battling with the Monokote finish. I am pleased with the way the finish looks but applying it was a miserable experience. Monokote was the wrong covering to use on this model due to it is weight and stiffness. A lighter, more flexible covering, such as SolarFilm, would have been a much better choice for this model. The cabanes and interplane struts were painted with epoxy appliance paint which is neither epoxy nor fuel proof. It holds up fine to exhaust, but I also used it on the cowl and raw fuel turns it into a gooey mess. Always test before committing the model to any type of finish. The finishing touch is a pair of Golden Age wheels by Williams Brothers. I did not even attempt to use the included wheel pants which are also made by joining two vacuum formed halves. I generally fly from grass, and did not think they would survive the first take-off run and personally, I think the model looks better without them. My model turned out extremely nose heavy due to the larger engine. I moved the radio battery aft of the lower wing and still needed to add lead to the tail. Because of this, my model ended up weighing half a pound more than the recommended flying weight. I used 1/16" music wire pushrods which helped a little with the nose-heavy condition, but also added to the overall weight of the model. Because the fuselage is fairly wide almost all the way to the tail, several ounces of weight could have been saved by moving the servos to the rear of the fuselage which would eliminate most of the pushrod weight and some or all of the lead in the tail.
|
|
|
Flying
Because of its small size I thought I was going to have a difficult time flying it. This did not prove to be true. Conversely, the control throws suggested by the plans are actually very tame. I learned that a blue and white color scheme on a small aircraft is a bad idea though. I have come dangerously close to losing the plane due to disorientation which happens at least once during the course of almost every flight. At this point, I always enlist the help of a spotter whenever I fly it. With the O.S. .15, the model is fast and can get away from me quickly. The idea is to keep the model close and never fly past the sun (which is a good idea with any model). I have found the rudder to be as effective as the ailerons in rolling the aircraft. Knife edge flight is pretty much out of the question. I use a computer radio and never could get the roll-coupling mixed out. In fact, I never even got it close. But the model really is not intended for precision aerobatics. I like a faster roll response than can be had with the ailerons even when they are deflected as far as mechanically possible. However, they are effective enough to fly the model, perform rolls, etc. I asked one of the better German pilots to do the test flights, but he could not use my radio because American and European radios have the sticks reversed. I elected to hand launch the model due to concern that the Pitts would flip over on the grass runway before it ever came up to flying speed. Another flyer hand launched the Pitts which turned out to be a very tricky proposition. The gentleman who performed all the launches on the first day did a wonderful job. He would run a few steps and gently launch the aircraft nice and level. From there the Pitts would lose a couple feet of altitude while gaining flying speed and then climb out with no problems. After getting the plane trimmed for straight and level flight, it was very stable. The next time I went to the field, the story was different. The man who had launched my Pitts previously was not there so I enlisted the help of another modeler. I handed my assistant the aircraft and gave him the go-ahead. He then proceeded to run... and run... and run... and run... He had run fifty yards and was still running. Right then I should have shut down the engine because I had my doubts that he knew what he was doing. Eventually he reared back as far as he could and threw my new plane straight into the ground. Fortunately, he felt really bad afterward which is all I really ask. The Pitts is really a difficult aircraft to hand launch. The fuselage must be grasped well behind the center of gravity which promotes an unstable release. After the crash, the landing gear was bent ninety degrees rearward and the engine had punched through the firewall. I built a new firewall, bent the landing gear back into place, readjusted everything and set out to try it again. The next time there was still another person who volunteered to launch my Pitts. He had seen what happened before so he knew I wasn't going to be happy if it happened again. He threw the plane side-arm which put it into knife-edge flight immediately upon release. The right wingtip was pointed straight at the ground and it was nosing down fast. I gave the model a second to gather speed and then fed in left rudder and aileron. I was sure my Pitts was going to crash, but I wanted the wings level because the torsion from impacting on a wing tip probably would have destroyed the plane. Somehow the plane managed to roll level, but now it was headed for the ground at too slow of a speed for the elevator to be effective and it was also headed for the trees. I pulled in full elevator and not ten feet from the trees it suddenly pitched straight up. As it reached the top of the tree line it ran out of momentum and stalled. Some rudder was kicked in to do a stall turn and now the Pitts was heading straight for the ground again. Once it picked up speed, I eased in some elevator and headed out to where I was supposed to be flying in the first place. That was my all time greatest save and I am pretty darn proud of it. The flight continued normally after this anxiety producing "take off," although my knees did not stop shaking until the Pitts was safely back on the ground. The next flight I did it to myself. I was flying around trying to wring her out and see what her capabilities were. I did rolls, snap rolls, loops etc. Next I rolled the Pitts into inverted flight. It started nosing down so I fed in more down elevator. Eventually, it was about 20 degrees down from level flight even with full down elevator. Realizing that I did not have enough elevator to maintain inverted flight, I made the worst choice possible. Instead of rolling upright and continuing on, I cut the throttle so it would maneuver more tightly and pulled full up elevator. That would have been fine if I had twenty more feet of altitude. It dove in hard to the farmer's field adjacent to our flying field. I saw parts flying everywhere and thought the model would be a total loss. When I arrived at the crash site, this little plane again proved its durability. The parts I saw flying were only the interplane struts. The ground it crashed into was freshly plowed, so the dirt was soft which probably saved the model from total destruction. The engine was full of dirt as expected. The landing gear was bent straight back again. The leading edge on the lower right wing was cracked in three places, but the parts fit back together well, so I simply glued them back together and gave them a light sanding to smooth the glue joints. Other than disassembling the engine, the entire repair took under an hour. All of these flights were made without the cowling which most likely would have been destroyed in either incident. For those flights that I choose to land on the wheels instead of the spinner, landing is easily accomplished. With its wing loading the Pitts is no floater, however. Approximately one-third throttle is required to maintain altitude. Anything less than that brings it down fast. I just keep it flat and under power to touch-down. Since those first days of hand launching, I have started taking the Pitts off from the ground. I have to hold full up elevator during the take-off run to prevent it from flipping over and the grass has to be recently mowed. I have had many enjoyable flights since my first mishaps with no further damage being done even though it ground loops with annoying regularity. I have found that having someone hold the model and starting it off at about 1/2 throttle helps prevent ground loops. The rudder is effective almost immediately and the plane tracks pretty straight on take-off. Even using this method (on grass) I still hold full up elevator until the plane breaks ground and then I neutralize it. It is not "the book" method of taking off, but using a normal take-off method results in about one take-off for every four attempts - the other three ending with the model on it is back and the interplane struts scattered to the wind. At this point my Pitts is semi-retired and hangs from my ceiling. It still looks good and I want to keep it that way. Every flight results in the landing gear becoming just a bit sloppier and uglier. Drawing on my experience with this model I think I could do a much better job on another which would resolve most of the problems - mainly the weight.
|
|
|
|
|
|
|
|
|
Copyright © 2002 Paul K. Johnson
|
|


 Although
this model is not recommended for beginning pilots, anybody can build it.
I found it to be a very enjoyable project.
Although
this model is not recommended for beginning pilots, anybody can build it.
I found it to be a very enjoyable project.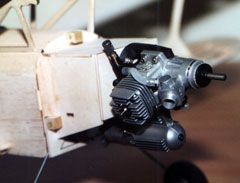 Because
the CV-A has a remote needle, the engine can not come back as far on the engine
mount as an engine with a conventional needle arrangement. I mounted the
engine back as far as it would go and then checked it against the plan to
determine where to trim off the motor mount box pieces.
Because
the CV-A has a remote needle, the engine can not come back as far on the engine
mount as an engine with a conventional needle arrangement. I mounted the
engine back as far as it would go and then checked it against the plan to
determine where to trim off the motor mount box pieces.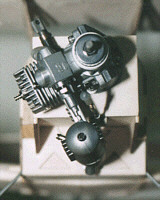 I
rotated the engine downward approximately 45°
so that the muffler exits underneath the fuselage to direct exhaust oil away from the airframe.
I
rotated the engine downward approximately 45°
so that the muffler exits underneath the fuselage to direct exhaust oil away from the airframe.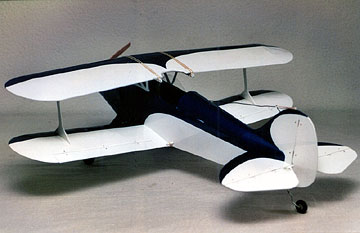 The
model is designed for .049 to .15 glow, but I think it would be a marginal
performer on anything below a .10. In fact, I think it is just right with
the CV-A which is more powerful than a sport .15.
The
model is designed for .049 to .15 glow, but I think it would be a marginal
performer on anything below a .10. In fact, I think it is just right with
the CV-A which is more powerful than a sport .15.