Airfield Models - Model Building Tools

Miscellaneous Model Building Tools

December 19, 2021


Home
About
What's New
History
Models Gallery
Model Building Safety
Articles
Mail & FAQ
Site Map
Site Feedback
Contact
Add to Favorites
Comments
Search Airfield Models

Back to Model Building Tools


Airfield Models (http://www.airfieldmodels.com)Miscellaneous Model Building Tools

This page picks up the leftover tools that didn't fit into another category.

Also see


Metal Working Tools

If you are a scratch builder then you will undoubtedly have to do some metal work.  For sport models, metal work is usually limited to fabricating landing gear, soldering various fittings and bending brass fuel lines.  For scale aircraft models, any number of fittings may need to be fabricated in your shop.

A bench vise is sufficient for bending dural aluminum gear.  If it does not have smooth jaws you can pad the jaws with scrap hardwood or aluminum.  If you are bending music wire gear then the bench vise is not a good idea.
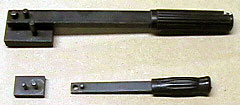
Wire benders work much better than a vise. Music wire is tempered and will crack if the bend radius is too sharp.  For that reason I recommend using a dedicated wire bender.  I use the K & S Mighty and Mini wire benders and have had good success with both of them.

Wire benders have two steel dowel pins one holds the wire in place and the wire is bent around the second.  The K & S models come with a bending lever.

I use a moto-tool with an emery cut-off wheel to cut music wire.  Do not attempt to use side cutters to cut music wire.  The wire is too hard and will ruin the cutters.  A scroll saw with a fine metal cutting blade and plenty of oil will cut aluminum plate.  I normally draw the cut lines on the aluminum with a Sharpie fine point marker and then put a piece of clear packing tape over the line.  The packing tape becomes a lubricant and protects the line.

My soldering iron is a 25-watt model that has performed very well.  It is nothing fancy.  I think I paid about $15 for it many years ago and it is never given me any problems.  A heavier duty iron with a bigger tip is better when soldering larger areas such as wire wrapped landing gears.

The problem most people run into with their soldering irons is that they do not tin the tip properly.  You need a wet sponge to wipe the tip on while you are soldering.

Melt some solder on the iron tip after the iron is hot to put a shiny plating on it.  If the tip will not take the solder then it is not clean.  Wipe tip on the wet sponge and try again.  Repeat until the tip will take the solder.  For particularly stubborn tips I dip the hot iron in a tin of paste flux and let it sizzle for a few seconds.

A small butane torch is good for times when the joint to be soldered is too big for an iron.  The trick to soldering is to two-fold:

  • The metal being soldered must be cleaned.  Use fine steel wool or very fine wet or dry sandpaper to remove tarnish and give the metal a little "tooth."

  • Heat the work, not the solder.

The solder will flow beautifully when the metal is hot enough.  Do not heat the work any longer than necessary.  Get it heated quickly, apply some flux, apply the solder and then let it cool.

Allow soldered joints to cool naturally.  Do not cool solder joints by dipping them in water.

A solder joint that is cooled too quickly will crack.


Scraping and Puttying

Acid brushes (aka Epoxy Brushes) can be purchased from a local welding supply for a much lower price than through the hobby industry.  They are cheap and disposable and a much better alternative to ruining your good brushes when you can not get epoxy cleaned out of them.  They make horrible paint brushes though.

Dental picks and scribes.

The four items at the top of the image shown at the right are used for shaping putty.  The fifth item is a plastic scriber marketed by Squadron.  It is used for scribing panel lines in plastic models, etc.  Frankly it was too expensive and it does not work.

What does work is the needle from a compass (available at art or office supply stores) chucked into a lead holder.  A lead holder is another drafting tool used to hold (surprise) lead.

The last four items are dental picks.  Dental picks are a great tool for manipulating items in hard to reach areas.  They are also good for removing plastic flash in tight areas such as between the fins of engines, etc.  Basically they're sort of like duct tape they come in handy for all kinds of things they were never intended for.

This is a cheaply made set that I hope a real dentist would never put in my mouth.  They are fine for the work I do however.  I bought mine at an army surplus store (they sell them to soldiers to use for cleaning their weapons).

Putty Knives and Spatulas I'm not real impressed with putty knives and spatulas I've seen in hardware stores or art stores.  Generally they are stamped and chromed sheet metal.

I have a small, wood-handled putty knife I inherited from my grand-dad (fourth from the top).  The blade is spring steel that tapers from the shank to the tip becoming about as thin as a razor but isn't sharp.  It flexes quite a bit and has excellent "feel" to it.  It is one of my little "treasure" tools that gets frequent use.

I managed to chip the tip somehow before this photo was taken.  A fine stone bit in a Dremel followed by a buffing wheel in my grinder made it as good as new but about 1/16" shorter.  I hope to never do that again because I've never seen a spatula of this quality anywhere and I don't want to ever have to replace it.

At the bottom of the photo are paint stirrers by Tamiya.  I don't use them for stirring paint my scroll saw handles that task now.  These stirrers work very well as spatulas although there was a burr on the flat end of both of them when new.  I used some #0000 steel wool to remove it.


Irons and Heat Guns

A household iron is too big and unwieldy for applying iron-on coverings.  There are several brands of irons made specifically for this purpose.  For years I used a Royal covering iron and it worked fine for many models.  Eventually the Teflon on the shoe was so scratched that I decided to purchase a new iron.

Coverite 21st Century Iron and Trim Sealing Tool.  Covering irons are indispensible to modelers who use thermally applied coverings.I use the Coverite 21st Century iron to apply heat-sealed coverings.  I thought it was an excellent tool until I dropped it and the handle shattered like glass.  It's the most brittle plastic I've ever seen.  The shoe was always loose in the handle and there's no way to tighten it.  Frankly, I've never found a covering iron that I thought was of very high quality.

When I tried to buy a new handle I was told I couldn't by "hobby services" which I think is a part of the HobbiCo Mafia.

Their trim seal tool is just as cheap but it gets into hard to reach areas.  Unfortunately, it doesn't get very hot.  For example, when I use it to join covering on my glass workbench, it doesn't get hot enough to make the coverings even begin to bond to each other.

The max heat setting on the handle is 305º.  The film I used is to be applied at 225º.  When using the regular covering iron I have to set it at 350º to get the films to adhere.

Coverite claims the iron can hold it is temperature within 3º.  I have never tried to confirm this through temperature measurements but it seems to hold its temperature well which is good enough for me.

Almost any heat gun will work well for shrinking thermally applied coverings.  I used Royal heat gun for years.  It never quit working and I still have it, but I have purchased a bigger gun just because it was the manly thing to do.

Note that a hair dryer does not get hot enough to shrink covering, but a heat gun does get hot enough to start your head on fire.  In other words, these two items are not interchangeable.


Previous —
Next —

Disk Sanders for Model Building
Kentool Sup-R Sander Tungsten Carbide Sanding Blocks

Comments about this article


Back to Model Building Tools
Airfield Models Home


Copyright © 2002-2007 Paul K. Johnson