![]()
|
|
|
|
|
|
|
|
|
|
|
|
|
|
|
|
|
About My Stik 30In many years of Army moves, every sport/performance airplane I had was destroyed. All I had flying were Gonzo, Great Gonzo and my Herr Pitts. While they are all good airplanes, none of them are good, expendable aerobats. In fact, Gonzo and Great Gonzo can perform only the most basic of aerobatic maneuvers — loops and (sort of) rolls. Expendable means a plane that will not reduce me to tears in front of the other pilots if I snap roll it into a telephone poll (if you cry at my club, they take you out back and beat you with chicken sticks). What I was looking for was a reliable sport model that I could get into the air fast and be fun to fly. I also wanted a plane that would be a test bed for new or repaired radio equipment and engines to make they work. It is a bad idea to put unknown or questionable equipment into a project that has a larger investment of time or money.
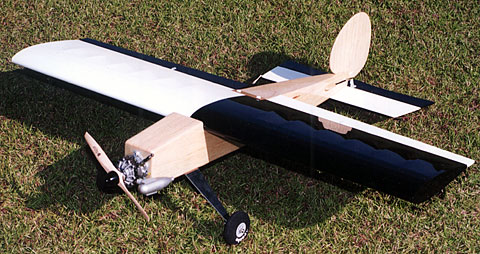
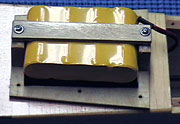
As a nod to this classic model, the fuselage and tail look like a Stik, but in fact, this model is not a Stik. The areas, moments, airfoil and wing aspect ratio are different which pretty much make it a different plane. I wanted to use a variety of power plants for my model - most notably my O.S. Wankel .30. I had never run it and thought this would be a good model for it. However, if the Wankel did not work out for any reason I also wanted to be able to mount any engine I might have from a .25 to a .40. Because I was using the Wankel, the engine installation was more difficult than I anticipated. There is not a lot of leeway when hooking up the throttle linkage. The muffler and carburetor are related differently than a standard two stroke which complicated things. The needle valve for the Wankel sticks out a fair amount. It is clearly visible in the image above. I did not want it pointed down where it would be broken off if the model nosed over. This left only two mounting positions - one of which pointed the muffler straight down the top of the fuselage and virtually guaranteed that the entire model would be covered in exhaust gunk. The remaining position meant that I would have to mount the other engines inverted to get the exhaust on the same side of the airplane and away from the radio switches and antenna exit. I decided I could live with an inverted engine, so that is how the model was set up. I later discovered the needle valve assembly can be rotated which would have made mounting the engine much simpler. It pays to study the equipment before assuming you have to use it as it comes out of the box. I was in such a hurry to get this plane in the air, that I did not spend a lot of time thinking about the design. As a result I had conflicting goals with the model and in some respects, no defined goals at all. The result is a design that can be significantly improved. In fact, this plane is so far from being what I wanted that a second prototype would be a new beginning, but would probably require a third prototype to dial it in. Had I been a little closer with this model, then the second would have gotten me a lot closer. In any case, I do not plan to further develop this model, so I have to take what I have got.
|
|
|
ConstructionThe basic construction for My Stik 30 was completed in four days using traditional construction techniques.
The wing is typical construction having full span spars and strip wood. It is built in a single piece and is very light and strong. No wing joiners or glass tape were necessary in the center section. This model as survived some very violent flying including locking all the controls in one direction at full throttle and flying the model like this for extended periods.
The fuselage has 3/16" balsa sides and a slab of plywood from the firewall to the rear of the wing saddle. I did this thinking I may want to put floats on this plane one day. Because of the strange moments and the beefy construction, the fuselage is the main reason this aircraft came in as heavy as it did. Simply extending the tail moment and being a little more judicious in my selection of materials would have significantly reduced the flying weight. The empennage is typical slabs cut to more or less resemble the classic shapes of the Ugly Stik. Both are hinged with Robart Hinge Points. The construction looked pretty good so I decided to use a finish I had used on a set of floats many years ago with good results. I covered the fuselage, fin and rudder with lightweight fiberglass cloth using epoxy finishing resin. The entire process used about 1/2 ounce of resin. After a light sanding to smooth it out and feather the seams, I airbrushed two light coats of regular solvent based Minwax polyurethane. Each coat was sanded and a third light coat was sprayed. The polyurethane was thinned approximately 30%. I used less than one ounce of polyurethane altogether. The polyurethane makes the fiberglass virtually invisible. In order to see the weave of the cloth, the model has to be closely examined and tilted into the right light. I really like the way this finish looks and I am pretty sure it is lighter than even an iron-on film such as Monokote. If you decide to use this type of finish, you should know that this polyurethane is not nitro-proof. It will stand up to exhaust oil, but raw fuel will eat up the finish. The reason I know this is because it is the same paint I used on my field box. The area under the fuel canister has bubbled and lifted pretty badly. If you do get raw fuel on the finish, wipe it off immediately and it will be ok. I planned to use clear Monokote on the wing, but the local hobby shop did not have any, so I just used colors that I had on hand. The clear wing may have been difficult to see in the sky anyway, so it was probably for the best. The project was completed in eight days.
|
|
|
Flying
While he was checking her out, I was taking flight shots and not paying much attention to how she flew. I knew Mike's assessment would be accurate. He landed her, gave me the transmitter and signed her off. I would like to thank Mike for his valuable feedback and taking the time to check her out. A few changes were made after the first day of flying. The first was to replace the Wankel with a Webra Speed .32. The Wankel is powerful, runs fine and is reliable, but the flight times are too short and the engine leaves the model covered with more exhaust oil than any other engine I have ever owned. Both the Wankel and the Webra have power enough to take all four pounds of the model straight up, although the Webra is definitely more powerful. Either engine provides more power than necessary. Unfortunately, the Webra had a poor transition from idle due to the idle mixture being too rich even when fully leaned. This behavior caused a lot of hairy moments such as the time I did a touch and go and then hit the throttle and pointed the nose straight up. The engine flamed out and the plane pancaked in from 50 feet. The only damage was a splattened landing gear. That left me with trying to decide how to power the aircraft. I liked the Webra's power and wanted at least as much as I had and certainly no less. My old and tired O.S. .28 and K & B .35 (70's vintage) are the only engines I have in the range the plane was designed for and they were immediately ruled out. My choices were to put the Wankel back on, use a less powerful engine or go up to way more power than any rational human being would ever put on a model this size. I did the manly thing and went with a brand new O.S. .46 FX that was sitting in my glass cabinet. To balance the plane with the .46, I had to add nearly 8 ounces of lead shot and epoxy in the tail.
My Stik 30 tracks well and can do just about any standard aerobatic maneuver except knife-edge flight and 3D. On low rates, the roll is quick, but not twitchy. I originally set up the flaps to drop as far as mechanically possible, but I almost lost the plane because of that. With the flaps fully deployed, I was unable to steer her and it ended up so low I had to set it down on its present course off in the boonies. I did not want to hit the throttle because I was afraid the plane would roll into an attitude that required aileron to recover from. I also did not want to raise the flaps because it was flying so slowly that it would have fallen out of the sky. Fortunately, the plane landed on its feet with no damage. It was pure luck that the plane wasn't damaged because it had to fly between several power poles and under power lines to end up where it did. That experienced prompted me to reduce the flap throw to about 25º total while keeping 45º aileron throw. Now when I fully deploy the flaps, I have aileron control if I switch to high-rate aileron. With enough altitude to recover, I have fully deployed the flaps and put the plane into several stalls to determine if it will snap. It just drops the nose and loses about 25 feet of altitude before gaining enough airspeed to return to level flight. My Stik 30 is much more sensitive to gusty winds when the flaps are down. Our field is surrounded by trees that cause the wind to whip around wickedly when the plane descends below the tree line. The low aspect ratio of this design makes it particularly susceptible to roll due to wind, so I do not use the flaps except in very light winds.
|
|
|
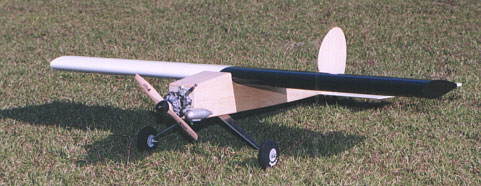
Character BuildingThis plane did not last long. Exactly a week after I finished construction, I was shooting touch-and-goes with the model. I was trying different types of landings (slowed to crawl, hot, etc.) On one of the hot landings, the model came in nicely and ran down the grass field for a short length before taking off again. As I turned to keep my eyes on the model, which was now hauling along at full throttle at a foot or so of altitude, I was shocked to see that it appeared to be heading straight for a barrier that separates the pilots from the flying field (you can see the barriers in the photo of Mike). At the time, there was no one at that end of the field, or I would have immediately chopped the throttle and stuck the model into the ground.
In retrospect, the model probably wasn't heading for the barrier at all, but when it came into my peripheral vision I panicked and made the wrong decision. Parts flew everywhere. The fuselage was broken in two pieces, each of which had several cracks. Strangely, several of the largest of the cracks were extremely clean as if cut with a sharp razor. The cracks were more cleanly cut than any die-cutting I have ever seen. They were not splintered as you would expect. This led me to believe that the wood was defective. When I selected the wood from my stack, I noticed it had what looked like stress cracks running across the grain. I bent the wood at those locations and they did not open up, so I assumed they were just scratches. The wood I built the fuselage from was chosen because I had purchased it in Germany (metric sizes) and I wouldn't be able to use it in most of my other projects. I am not blaming the wood. I just thought the cracks were interesting. The model hit the ground pretty hard and any model would have been pretty badly torn up. The wing survived with one broken turbulator spar and two dented wing tips. It was still bolted to the fuselage. The minor damage really surprised me. I checked the wing thoroughly to ensure the primary spars had not been damaged, but amazingly, they were unscathed. The wing was a ten minute repair job. I decided to build a new fuselage due to the severity and type of damage it had sustained. Because I was building a new fuselage anyway, I made a few more changes to the design. I felt the airplane should make better aileron turns. I suspected that the long nose-moment created too much turn-resisting inertia. I shortened the nose and moved the landing gear rearward to the leading edge of the wing. Also, after the first day of test flights with the first model I found the fuel tank had a bad stopper and the radio compartment had become fuel-soaked. Learning my lesson, the new fuselage is fuel-proofed to the rear of the wing saddle. I will also never use a Hangar 9 fuel tank again. Screw on stoppers are a really bad idea. The PresentIf repairs, modifications, hangar rash and the effects of time give a model airplane character, then this model has plenty of it. My Stik 30 underwent serious weight reduction in March 2004. The weight gain came from many factors. The main reason is that the fuselage moments are such that it comes in nose-heavy even with engines in the range it was designed around. If I were to build another one, I would shorten the nose by at least an inch and extend the tail moment by about 4". Now that I have finished Rustik, I still do not have an every day plane, so I decided to put a lighter engine on and pull out the hammer and chisels to remove some lead from the tail. I did not get it all out, but over 6 ounces were removed. To get at the lead, I had to cut off the horizontal stabilizer which meant building a new one. This is the third horizontal on this fuselage. It was replaced twice before to change the area. I also removed some weight by using smaller main wheels and swapping four Futaba S3002 servos for an equal number of lighter Hitec HS-225 servos.
Even with these changes, the plane was still nose heavy. The only thing left that I could do is move the battery rearward. My Stik 30 was first flown following the weight reduction on March 13, 2004. What a difference! The plane flies beautifully now and I am very happy with it. It is a whole new airplane again, so to really get the plane dialed-in it will take months of trimming, but the bottom line is that this plane is back to being what it was originally intended to be. As before, the Wankel is still very thirsty. With an 8 ounce tank, flights are limited to 6-8 minutes with 8 minutes almost certainly ending in a dead-stick. But I have learned that it is better to have 6 minutes of fun than 15 minutes of flying a dog. Also see
|
|
|
|
|
|
|
|
|
Copyright © 2002 Paul K. Johnson
|
|


 What it came down to was I needed a
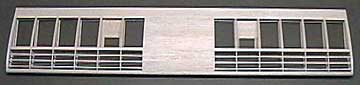 To save weight, I did not use leading edge sheeting on the wing.
Instead the wing has turbulator spars on both the upper and lower wing surfaces
between the leading edge and the main spar. I do not think I would put
turbulators on the underside of the wing
again.
To save weight, I did not use leading edge sheeting on the wing.
Instead the wing has turbulator spars on both the upper and lower wing surfaces
between the leading edge and the main spar. I do not think I would put
turbulators on the underside of the wing
again.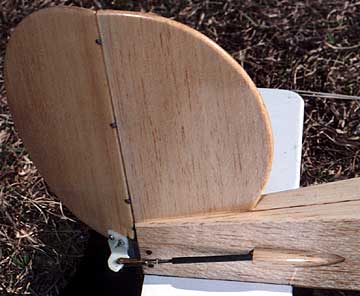
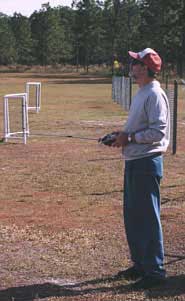 Test flights were performed by our local pilot extraordinaire, Mike Phillips.
He is generally acknowledged as the best pilot in our club and I personally
think he could be competing at a national level.
Test flights were performed by our local pilot extraordinaire, Mike Phillips.
He is generally acknowledged as the best pilot in our club and I personally
think he could be competing at a national level.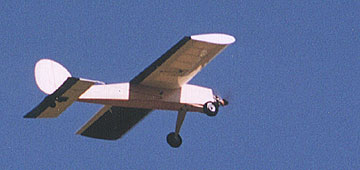 Other
than having a high wing-loading, the plane flies fine with no bad traits or
tendencies. A few weeks of dialing in the trim settings were required
while making small adjustments to the thrust line and locating the CG.
Other
than having a high wing-loading, the plane flies fine with no bad traits or
tendencies. A few weeks of dialing in the trim settings were required
while making small adjustments to the thrust line and locating the CG.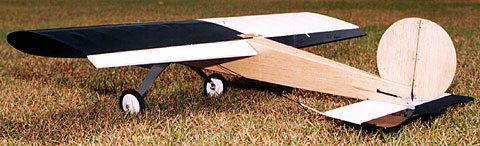
 Instead, I over-corrected using aileron to turn away from the barrier and
stuck a wingtip in the ground. The plane cart wheeled about seventy-five feet
across the field.
Instead, I over-corrected using aileron to turn away from the barrier and
stuck a wingtip in the ground. The plane cart wheeled about seventy-five feet
across the field.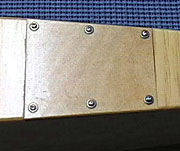
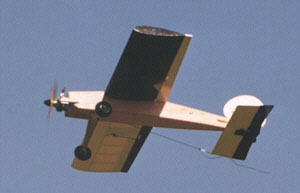
 Replacing
the .46 with the Wankel not only removed several ounces of weight, but the
Wankel is also significantly shorter so the weight that is there is closer to
the CG.
Replacing
the .46 with the Wankel not only removed several ounces of weight, but the
Wankel is also significantly shorter so the weight that is there is closer to
the CG.