Jigs and Fixtures
The difference between a jig and a
fixture is that a jig moves and fixture doesn't.
A Jig or Fixture is a device used to hold and align a structure while it is being
built. There are not many jigs made for model-builders simply because
of the variety of models we make. It is difficult to make something
universal and nobody would buy a jig specifically for a single kit unless
the kit itself was extremely expensive and the jig was relatively small
expense.
One of the great benefits of making molds is consistency - each item coming
from the mold will be identical to the last. That's why a lot of model
builders make molds. For example, the average modeler could carve nine
cowl bumps for a Golden Age biplane in a few hours. Making the mold
and casting the pieces will take much longer than that. But they do it
anyway because they would rather all the bumps be identical than save the
time and have inconsistent parts.
Anyone who has ever worked in a factory can tell you that setup is
important. In the above example, if the mold is wrong everything that
comes out of it will be wrong. The same goes for setting up your jigs
and fixtures. Take the time to set things up right and then test it.
For example, when I'm cutting a bunch of duplicate parts on my
table saw I
do some test cuts first to ensure I'm getting what I want before I start
ruining the actual parts I'll be using.
This is especially important if the parts already have work done to them.
If they get ruined then you have to start all over again and repeat the
steps you already completed. It's far better to ruin some wood making
sure the setup is right first.
 |
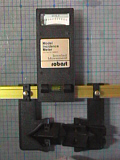
These are tools I made to help me make
magnetic fixtures. When orders were coming in slowly I made
them just as shown in the article in the above link.
A scroll saw works for a
small number of fixtures but for mass production it's very inefficient.
On the left is a sanding fixture. Because the magnetic fixtures
are thin
aircraft plywood they are difficult to hold while finish
sanding. Now I can sand
them in pairs and they are held securely.
At the top of the photo is a sled for my
Microlux Table saw. I should
have made one of these years ago. It does everything better than the
cheap miter gauge that came with the saw and it reduces tear-out.
Note the extension arm for cutting larger magnetic fixtures to the correct
length.
At the bottom of the photo are jigs for sliding the fixtures through
the table saw. There is one for each size fixture. On the
bottom is a plywood strip that fits in a runner on the saw table. |
 |
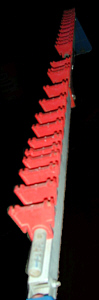
This jig ensures that every fixture is identical.
Sandpaper glued to the jig helps prevent the part from slipping and
being ruined. I can cut out hundreds of fixtures
in a very short time now. In fact, I can cut an entire set in the
time it would have taken me to cut two or three fixtures using my scroll
saw.
If I had built the fence higher I could cut more than one at a time
so that's something I will probably do.
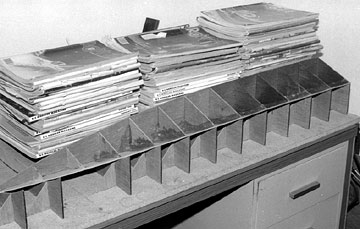
Several of the operations are done on multiple fixtures at one time
such as drilling and making the cut-outs for the
vertical presses. |
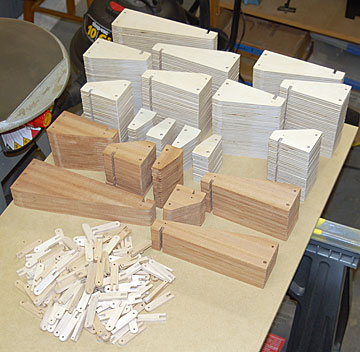 |
Making these
fixtures requires nine separate sawing operations, three drill press
setups and multiple sanding operations. There are over 400
fixtures in this photo and about 150 vertical presses. Everything
shown here took about three days. In the past, cutting this many
fixtures would have taken me about two weeks.
Now I have to block sand
every piece and finish them which is the most time-consuming part of
making these fixtures. Cutting them out used to be the long part
but it's pretty quick now that I've tooled for it.
Note that I always cut extra fixtures to account for rejects.
Having to go back and set everything up again to cut and drill one
fixture isn't very efficient. By the way, if you're wondering if the
Microlux table saw can do what you need, keep in mind that I've had mine
for years as of this writing and it's still going strong. I'm on
my third carbide blade, but it still has the original belt.
Overall the saw is showing no signs of deteriorating after thousands,
possibly hundreds of thousands of cuts including hardwood up to 1" thick
(which it doesn't like very much). |
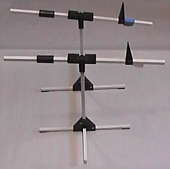
 There used to be a great
wing jig on the market called the A-justo-Jig.
The company name was the same as the product name. This jig was comprised
of two halves that hinged together in the center allowing the builder to
construct a wing six feet long in one piece. The hinge allowed for built-in
dihedral. There used to be a great
wing jig on the market called the A-justo-Jig.
The company name was the same as the product name. This jig was comprised
of two halves that hinged together in the center allowing the builder to
construct a wing six feet long in one piece. The hinge allowed for built-in
dihedral.
Two 5/32" music wire rods were strapped to multiple rib stations
that could be adjusted individually as necessary.
Ribs were
drilled for the rods and slid into place. Once it was all set up, a wing
could be built perfectly straight. The entire jig could be rotated 360º.
Additionally, there was a fuselage attachment. I had both these items,
although I was never too successful with the fuselage aspect. On my jig
the two halves of the wing jig did not align very well so I took it apart and
made a three foot fixture. I could only build half a wing at a time, but
it was a marked improvement over building on a board. In spite of these
short-comings it was a great jig. If you can find one I suggest you purchase it if
the price is reasonable.
Please note that the Ajusto-Jig is no longer in production. I do
not know where you can get one, but there are probably a lot of them sitting
around collecting dust. Try asking folks in your club or checking on
E-Bay.
Download instructions
for Ajusto-Jig (1.6 Mb zipped)
This image is from a
site I came across while
looking for images of the Ajusto-Jig. Click the image to go the site
and see the Ajusto-Jig being used to its fullest capabilities
—
including
the fuselage jig attachment. |
There are a couple generic wing jigs on the market now. To be honest
I am not real impressed with them. They are basically two 1/4" rods clamped
into supports on either end. There is no built in way to make sure the
ribs are spaced properly or perpendicular.
This type jig is the sort of thing that
you could build in an hour or two using stuff you have around the shop and I see
no point in buying one.
The one thing this kind of jig allows that can not
be done with the Ajusto-Jig is the wing can be entirely sheeted while still on
the jig. There are no rib stations to interfere with the sheeting.
On the Ajusto-Jig, the wing can be sheeted completely on side and partially on
the other side. The wing must be removed from the jig to complete the
sheeting.
The downside to a wing jig is that the finished wing will only be as straight
as the holes drilled in the ribs. If you stack the ribs and drill the
holes at an angle the finished wing will be correspondingly twisted. You
can either drill the ribs individually or use a drill press which is probably
the best option. The ribs must still be stacked exactly in relation to
each other.
The reality is that setting the jig up takes a lot of time to
do properly. However it will ensure a straight structure making it well
worth the additional work in my opinion.
The fuselage must be straight and symmetrical as well. A warped
fuselage can not be corrected with trim adjustments and the plane will never fly
straight throughout it is entire flight envelope. For a box fuselage (Ugly
Stik) I draw a centerline and former stations on the building board. Then
I align all the parts, clamp them all together and measure a few times until I
am absolutely satisfied it is as good as it can get.
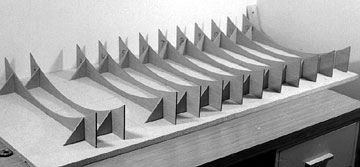
For more complicated fuselages, I used to cut triangles from cheap 1/8" interior
plywood and hot glue them to a particle board base. Building a straight
structure is too important to try to take short-cuts. Think about it this
way — the extra time involved getting the structure straight while building it
will be insignificant compared to always having a plane that does not fly right.
 |
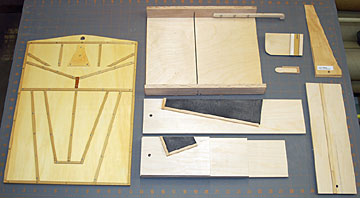
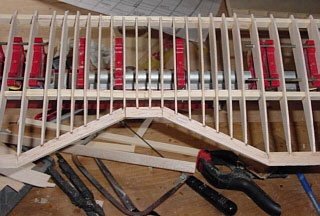
This is a fixture I made to build the hull of
Marsh Hawk.
The fixture pieces are made from the cut-offs from the hull formers. They
are glued to a piece of particle board. |
 |
Without a fixture of some type, this hull would have been
impossible to build straight. |
Because I am building with
magnets now, I can make
triangles of any shape and bolt magnets to them. They are accurate, stable
and secure. Additionally, they can be removed from the board without
damaging it unlike the hot-glue method.
Most jigs are not permanent fixtures. When joining straight wing panels,
for example,
the blocks put under the wing tips for dihedral combined with a
straight-edge used to make sure the panels are aligned correctly is
considered a jig.
I have never had to do this but I have seen some modelers actually build truss
assemblies to build a fuselage in. These are usually for scale
fuselages that had unconventional shapes such as flying boats.
|


 You have to have something that is absolutely
square.
This will be your yardstick for building things that are aligned properly.
Do not trust your eyeballs.
You have to have something that is absolutely
square.
This will be your yardstick for building things that are aligned properly.
Do not trust your eyeballs.