Building Williams Brothers 1/4 Scale Spandau Machine Gun
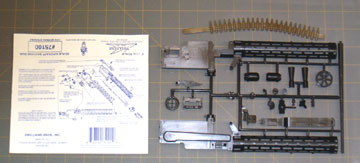 The kit comes on a single sprue and includes a vinyl ammo belt
as a separate piece. I began as I always do by reading over the
instructions which in this case wasn't real helpful. I then washed the parts using
Tri-Sodium Phosphate as a
degreaser. The sprue was placed in a dish drying rack to air dry. The kit comes on a single sprue and includes a vinyl ammo belt
as a separate piece. I began as I always do by reading over the
instructions which in this case wasn't real helpful. I then washed the parts using
Tri-Sodium Phosphate as a
degreaser. The sprue was placed in a dish drying rack to air dry.
The entire gun was assembled using
Model Master liquid cement except as noted.
I removed the gun halves and did normal clean-up work on them to remove excess sprue. I also sanded the edges
that join using a sanding block.
Sanding removes the alignment pins but alignment pins are almost always
worthless so I never make a special effort to save them.
After the dust was removed I
airbrushed
the inside of the cooling jacket halves, the forward cooling jacket piece and the gun barrel using Testor's Model Master magnesium metalizer. When that was dry I sanded the
joining edges lightly to remove paint. The sliding parts of the cocking mechanism were glued into the right half
of the gun and made non-functional.
The first gun I built had a nylon bolt built in. The head had a flat cut on one side so that it would fit
inside the gun. The bolt was then glued in place before the gun halves were joined using thin cyanoacrylate (CA) and micro-balloons.
The second gun was joined and some of the lower breech was cut away. A hardwood block was glued inside the gun.
After the halves were joined I spent a good amount of time filling the seam on the cooling jacket using medium CA as
a filler. There isn't
much holding the gun together along the jacket and the join failed in several areas while I was working on the seam.
After being re-glued several times the gun stayed together. The seam was filled and sanded until it was
smooth.
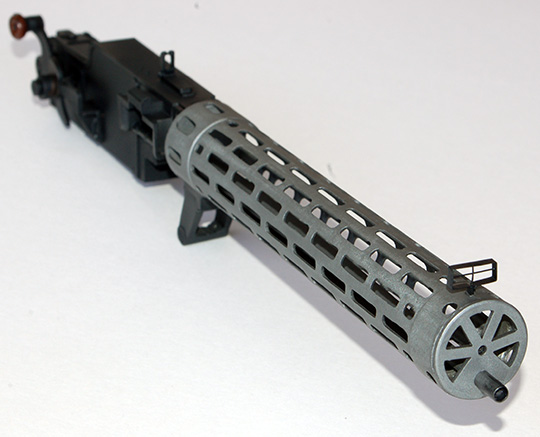
The outside of the cooling jacket was sprayed using the same magnesium metalizer as the inside.
I hollowed the gun barrel approximately 3/16" deep using a
drill bit smaller than the finished hole. The hole
was enlarged using a round burr bit in a
Dremel tool.
The inside of the hollowed gun barrel was painted with flat black enamel. The gun and forward cooling jacket piece were
glued on at the same time and allowed to dry.
The cooling jacket was masked off and the rest of the gun was assembled. Everything but
the cooling jacket was sprayed with 80% gray. The knob on the handle was
brushed using a dark brown. I have
no idea what material the knob is or what color it should be. I assumed it was made of wood.
After the gun was completely painted I allowed it a week to dry. I then applied a black
wash overall and
allowed it another week to dry. The dark gray areas of the gun were
dry-brushed using lighter shades of gray
oil paint
followed with a very light white dry-brush application to just hit the highlights.
The metalizer didn't dry-brush well using light grays and I ended up using a fairly heavy application of white before
the edges stood out.
The forward gun sight was then glued into a notch I cut before joining the gun halves. The sight was brushed
with the same dark gray and then dry-brushed.
The ammo belt was sprayed with Model Master leather enamel. The casings were brushed with Model Master brass
metalizer. The rounds were painted with Model Master aluminum metalizer. The belt was allowed to dry for a
week and then clear coated using
Klass Kote clear epoxy and
satin hardener.
The belt was given a black wash. When the wash was dry the belt and brass were dry-brushed using a yellow
ochre.
I normally would have clear-coated the gun about a week after the last of the paint was applied but I had other items
I was building that weren't ready so the clear coat was actually applied about a month after the gun was complete.
The gun and ammo belt were cleared with satin Klass Kote. |


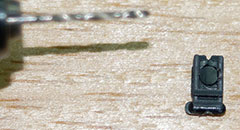 The rear gun sight is molded "closed." I drilled several small holes around the inside perimeter and then
joined the holes with careful use of a sharp razor knife. A small tapered flat file was used to clean up the
opening.
The rear gun sight is molded "closed." I drilled several small holes around the inside perimeter and then
joined the holes with careful use of a sharp razor knife. A small tapered flat file was used to clean up the
opening.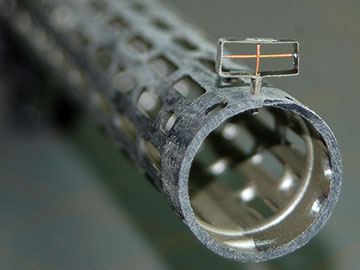 Fabricating the sight isn't difficult but even at 1/4 scale it's fairly small.
I used magnifying glasses as needed.
There are probably several ways to make the sight. Probably the easiest is to slice off a piece of rectangular metal
tubing that is close to the correct dimensions. Drill a hole centered on each side to pull a small wire through.
Fabricating the sight isn't difficult but even at 1/4 scale it's fairly small.
I used magnifying glasses as needed.
There are probably several ways to make the sight. Probably the easiest is to slice off a piece of rectangular metal
tubing that is close to the correct dimensions. Drill a hole centered on each side to pull a small wire through.