Airfield Models - Wing Construction Example

Sheeting a Built Up Model Airplane Wing

December 18, 2021


Home
About
What's New
History
Models Gallery
Model Building Safety
Articles
Mail & FAQ
Site Map
Site Feedback
Contact
Add to Favorites
Comments
Search Airfield Models

Back to Wing Construction Example


Airfield Models (http://www.airfieldmodels.com/)Sheeting a Built-Up Model Aircraft Wing

Gluing a wing skin to a built-up structure always gets my anxiety level up.  While it seems simple, it is also one of those things can ruin the whole wing.  There is a lot of glue that needs to be applied and I have to work fast to get the sheeting in place before the glue starts setting up.

If I find I made a mistake after the glue has dried then removing the sheeting and trying to save the wing is probably more difficult than starting over with a new wing.  Fortunately I have never had this happen.

What I suggest is that you call up a friend and have them give you a hand.  You can each start at one end of the wing applying glue and work your way to the center.  The extra hands will be nice when setting the sheeting in place as well.  I ignored my own advice here.

Lastly, I would not even attempt to use CA for this step — even the slowest drying variety.


Magazines make excellent weights to hold sheeting in place due to their ability to confrom to the airfoil. There are not a lot of steps to gluing on the sheeting.  First I did a dry run and as usual found a couple of problems.  The magazines did not allow the sheeting to conform to the forward portion of the rib.  The sheeting did not even make contact with the sub-leading edge.

The trailing edge of the sheeting was kind of wavy.

Both problems were easy to fix.

First I applied glue to the full chord of every rib, the main spar, the trailing edge and the sub-leading edge.  I have to work very fast because there are a lot of areas that need glue and it will start to set up before the sheeting is in place.  A syringe with the needle removed speeds things up dramatically as well as being more accurate and less messy.

After aligning the sheeting and setting it on the wing I put a few magazines along the rear of the wing to hold the sheeting in place.

I used pins along the forward portion of the sheeting to hold it to the sub-leading edge.

Adjustments are necessary because the magazines do not fully conform to the wing. If you look carefully in the "tunnel" created by the magazines at the leading edge you can see how I inserted the pins through the over-hanging sheeting into the sub-leading edge.

The magazines at the rear of the sheeting were moved forward and the straightedge was placed directly over the trailing edge.  More magazines were stacked on top to provide weight.

The goal is to ensure the sheeting fully contacts every piece that it should.

This sheeting is applied properly as evidenced by it making full contact with every rib, the spars, leading edge and trailing edge. I left the sheeting to dry for 24 hours.  Here you can see that it is contacting all the ribs.

The wing is still very flexible at this point and a warp could be built into it if you are not careful.  When the second skin is glued in place the wing will be considerably stiffer.  When that time comes the wing will be jigged back on the board.

The bottom of the wing. This is what the bottom of the wing looks like now.  Maybe you can visualize what it will look like with a glossy clear coat of polyurethane on it.

This step took 29 minutes

Elapsed time 2 hours 16 minutes


D-Tube Variation

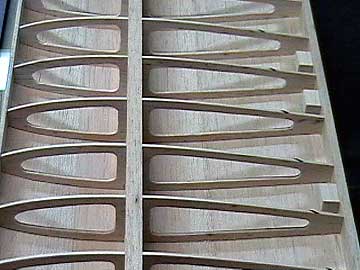
The rib set for this wing is identical to what would be used for a D-Tube wing.  If you are building a D-tube then the process is actually more tedious, but less stressful.  Be sure the wing is pinned securely to the board.  If the wing warps now the warp will be very difficult to remove.

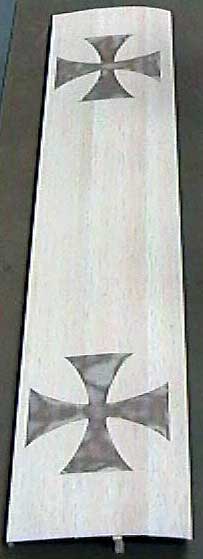
Trim one edge of the leading edge sheeting so that it is straight.  Lay a piece of masking tape down the main spar covering the rear half of the spar.  Spread slow-drying glue along the exposed part of the spar, the forward portion of every rib and the sub-leading edge.

Carefully align the straight edge of the sheeting on the spar and pin it securely in place.  If the sheeting you are using is particularly stiff then you may want to run a wet sponge over it to allow it to bend more easily.  This is hardly ever necessary though.

Do not pin the sheeting to the sub-leading edge at this point.  Chances are the sheeting will not be making full contact with the ribs.  Instead, use your hands to push the sheeting against the ribs starting from the spar and working your way forward.  Criss-cross pins through the sheeting midway between the spar and the sub-leading edge.  Start at the center rib and work your way outward.

When all the ribs are pinned, push the sheeting against the sub-leading edge.  Push pins through the overhanging sheeting into the front of the sub-leading edge.  That should do it.  Look from the end of the wing underneath the sheeting and make sure it is contact with the ribs.  If it is not then more pins may be necessary.

At this point you should remove the masking tape and wipe up any excess glue from the back edge of the leading edge sheeting.

If the trailing edge sheeting does not sit on a spar, then make a mark on the ribs at each end of the panel that represents the width of the sheeting.  Lay a straightedge across these marks and then mark the rest of the ribs.  Add glue to the ribs and the trailing edge if it is already in place.  Pin the trailing edge sheeting in place.

Now cut and fit all the cap strips.  I like to cut them ever so slightly over length and jam them between the trailing edge sheeting and the leading edge sheeting.  Usually I can get away with one pin holding the cap strip down in the middle.  At most you should need three pins for each cap strip — one at each end and one in the middle.

Also see


Previous —
Next —

Miscellaneous Model Aircraft Wing Details
Servo Mounts and Hatches

Comments about this article


Back to Wing Construction Example
Airfield Models Home


Copyright © 2003 Paul K. Johnson