Airfield Models - How To

Repairing Thwing!

December 18, 2021


Home
About
What's New
History
Models Gallery
Model Building Safety
Articles
Mail & FAQ
Site Map
Site Feedback
Contact
Add to Favorites
Comments
Search Airfield Models

Back to Model Aircraft Repairs


Airfield Models (http://www.airfieldmodels.com/)Repairing Thwing!

This article details the repair of Thwing!.  The damage occurred on the second flight immediately after launch.  The electric motor was running at nearly full throttle during the initial climb out when it pulled out of the mount.

We heard a loud THWACK! and the plane pitched down violently.

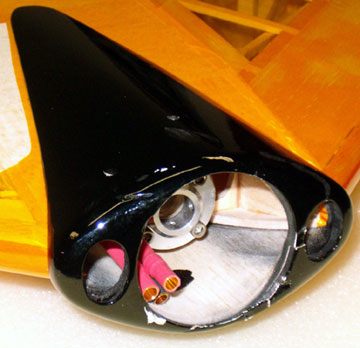
The motor hung on by the wires and did not part company with the aircraft which would have made the plane uncontrollably tail-heavy.  Mike let the plane dive long enough to gather airspeed and then leveled the aircraft and landed it straight ahead in tall weeds.

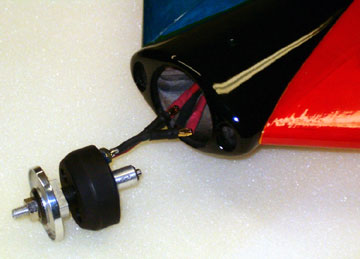
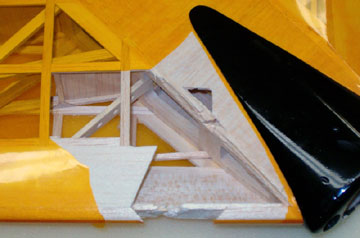
When we got to the model we could see the right wing near the root was chewed up.  The motor was underneath the airplane.

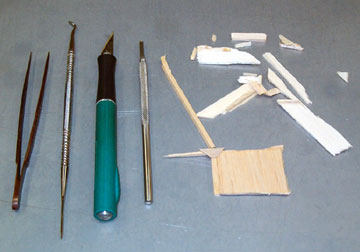
I had invested a lot of hours in building this model so I did what I have always recommended to others.  I took everything home and set it aside until I was prepared to look over the model objectively.  That took about three weeks.

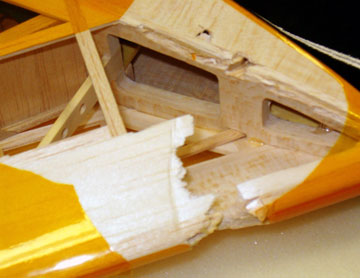
Damage is almost never as bad as it looks at first.  Usually just cleaning the model will make it look a lot more repairable.

The thing that concerned me the most was that a lot of wood needed to be spliced in and a splice can't be made invisible.  This is important due to the transparent covering.  
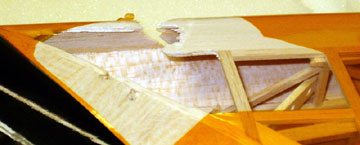
If the model had opaque covering, the only thing that would give the repair away would be the covering patches.  But even then the model can use trim pieces instead and nobody will be the wiser.

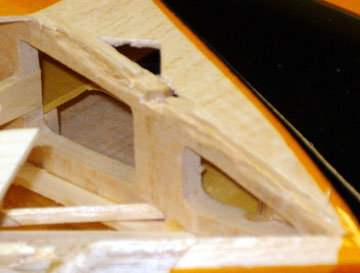
That wasn't an option for Thwing! so I made the joints fit as well as possible.  If I can't hide them I may as well make them neat.

In this series


Surveying the Damage

The motor shown as it looked after it pulled out of the mount.

This photo was taken after the repair was complete.  This is how the motor looked after it pulled out of the motor mount.

The only thing holding the motor on were the three wires coming from the speed control.

Had the motor parted company with the aircraft, making a repair would not have been an option.  The plane would have been destroyed on impact.

I've never had a model shoot itself down before.

The propeller caused a lot of damaged when it sliced through the wing. The line on this photo indicates where the propeller sliced through the leading edge of the right wing panel.

The covering is peeled back to retrieve loose pieces from the structure.

The transparent covering presents a problem.  A lot of sanding will be necessary during the repair, but I don't want dust to fill the structure and attach to the inside of the covering.

Throughout the repair I kept the shop vac close by and the air compressor tank filled.

Sanding was performed slowly and gently to prevent the creation of billowing clouds of dust.  The structure was vacuumed frequently during the sanding process.

Tools used to retrieve loose pieces from inside the wing. These pieces were loose inside the airframe.  I kept them in a small container to keep them safe and so I wouldn't toss one out thinking it was a scrap.

As it turned out the only usable piece was the shear web and the vertical upright brace attached to it.  The rest of the pieces were discarded after the repair was complete.

The micro knife to the right is one of my favorite tools.  The chisel blade is especially useful.  All the blades for this knife are extremely sharp.

This is not a good knife for general construction because the blades are very small, but when delicate work with a small knife is necessary, this is the first tool I reach for.

Remove pieces that can't be repaired in place. I used the micro knife to chisel the rest of the broken top spar from the root rib.

The leading edge is completely separated.  On this wing the leading edge is a critical component.  Although the wing is relatively stiff, a warp can be introduced into the wing if the repair is not done properly.

In this case, the wing is still aligned correctly.  I simply have to take care not to change the alignment during the repair.

The leading edge is cut in half with pieces missing. Here you can see that most of the spar assembly is intact.

This spar is not critical to the strength of the model so I don't have to make a special effort to increase its strength as I would if it were a main spar in a more conventional wing.

Note that if you do break a main spar, it should be reinforced with plywood on both the front and rear of the spar with pieces of plywood that extend for several inches from the break in both directions.

Clean up the edges of existing parts with a knife or sandpaper so that new parts can be fit. I've started trimming the edges of various parts so that new pieces can be spliced in.  Note that the leading edge is cut at an angle on each side of the break to lock in the new piece.

The sheeting is also cut at an angle which will help strengthen the splice.  This is not enough of an angle to really make much a difference, however.

The repair is complicated because there is no lip left on the root rib to attach new sheeting to. This was the most troublesome part of the repair.  The root rib is actually three ribs laminated together.  The inner and outer laminations are smaller all the way around so that the sheeting would be flush with the center lamination.

The outer lamination is so chewed up and ragged that it won't be possible to lay new sheeting in place properly.

The cowl is a battered mess, but repairable. This photo makes the cowl look less damaged than it is.  There are dings, dents and chips all over it.  It looks like it got pounded on all sides when the motor came loose.

The good news is that because the cowl is painted, it is the only part of the aircraft that can actually be made to look brand new.

Overall you can see that there isn't a lot of damage, but there are a lot of small pieces that will need to be replaced or added.  To stay focused and not feel overwhelmed take things one step at a time.

In this series


Previous —
Next —

Repairing Rustik
Rebuilding My Stik 30

Comments about this article


Back to Repairing Model Aircraft
Airfield Models Home


Copyright © 2004 Paul K. Johnson