|
|
|
|
Basic
procedure for applying fiberglass cloth to a model aircraft
This is Part 3 of a multi-part article describing how to apply
fiberglass cloth to a model aircraft.
-
Part 1 of this series describes
advantages of using a fiberglass base and recommended cloths to use.
-
Part 2 describes resins and squeegees.
|
|
|
|
Before you start
Some people will tell you to use
spray glue to hold the cloth in place.
The idea is to spray a very light mist coat onto the part to be glassed to
help keep the cloth from moving around. Spray
glue can actually make it much more difficult to apply the cloth and makes it
near impossible to smooth out if too much is used.
Spray glue is absolutely unnecessary, adds expense and complicates the job.
It's a solution to something that isn't really a problem, but can make it
one. I suggest that you don't use spray glue.
Before you start, gather up all the necessary items. Finish sand the
parts you plan to glass and then vacuum them if you have a vac with a brush
attachment. Otherwise, use a bench brush to wipe off as much dust as
possible and then use a
tac rag to remove the dust that is left. You can also use
compressed air to blow the dust off.
Lay out plenty of newspaper and put on old clothes that you do not mind
getting glue all over. A pair of latex gloves will help keep the glue
off your hands.
It is difficult to apply cloth with the part flat on the table. The
excess cloth needs to hang down so that it will adhere to edges of the
component.
I use scraps of wood with double stick tape to provide a handle for small or
awkward parts. This handle also provides a little space for the cloth
to hang.
Keep some alcohol handy for clean up, but again, do not use it to thin the
resin.
Let's get started...
|
|
|
|
Applying fiberglass cloth
As is standard for most finishes, fiberglass is applied in several pieces
from bottom to top, rear to front. For example, the
fuselage is
covered in five pieces. Using a shoulder wing aircraft as an example,
I would apply the cloth in this order allowing each to cure long enough to
feather the edges before applying the next:
- Bottom
- One side
- Other side
- Upper decks
(front and rear)
Actually, the order is not critical with glass cloth because all seams
will be feathered into each other and they can not lift, so in essence you end
up with a seamless finish. Regardless of this, that is the order in
which I apply all finishes, so for me it is ingrained.
I learned the hard way that mixing up a large batch of resin thinking I would
do several parts at once is a bad idea. The more resin you mix, the
faster it cures. In larger quantities, it can get so hot that it melts
the plastic mixing cup — I have seen it happen.
I usually do one large component (stabilizer, fuselage side or wing) or a
couple smaller components, such as
control surfaces, with one batch of epoxy.
By the way, the resin in the pot is not a good indicator of when
the epoxy has cured. It will cure faster in the cup than in a thin
film. To check if the resin is cured you have to touch the excess
cloth on the component. If it is hard, then the resin is cured.
If it is rubbery and flexible, leave to cure some more.
As you read through this article, you will see that I have used the term
feathering a few times. I was asked to explain what that means.
Feathering is simply sanding the edge of a part so it fairs smoothly into
the base. In this case it means sanding the edges of the glass cloth
after the resin is cured so that there is a seamless transition over the
edge of the cloth. You shouldn't feel any bumps or ridges if it is
feathered properly.
|
|
|
|
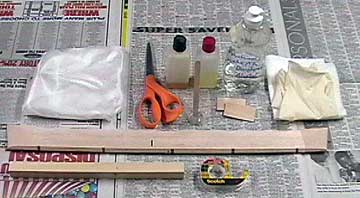 |
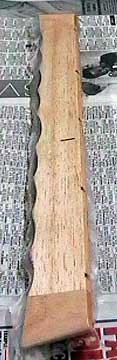
Everything needed to apply the glass cloth:
- The component to be glassed
- Fiberglass cloth cut about 1" over-size all around
-
Resin
-
Newspaper or drop cloth
- Scissors
- Mixing cup and popsicle stick
- Squeegees
- Alcohol and paper towels for clean up
-
Latex gloves
- Holding stick(s) and double-stick tape
|
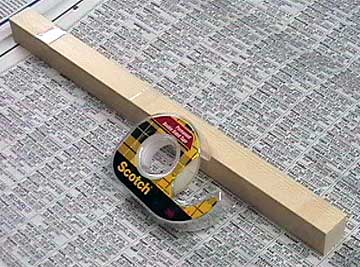 |
Prepare everything before you get started so that once
you begin applying the glass cloth you do not have to stop in the middle
to fiddle around with anything. Small items should be attached
to something to make them easier to manipulate. Ensure that the
part can not come loose while you are working on it by actually tugging
on it after it is in place.
If the part comes loose in the middle of the job then you will have a
really messy situation. |
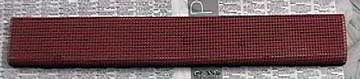 |
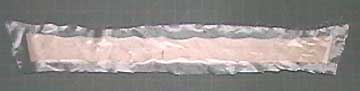
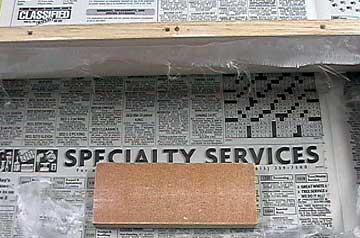
For medium-size items, a piece of sticky rubber shelf
lining attached to a board will help keep it from sliding around.
Wipe resin drips from the lining with some alcohol before it sets.
The stabilizer was set on this piece and while it did not prevent all
movement, it did hold it well enough to prevent problems. |
 |
The shelf lining is stapled to the back of the board. |
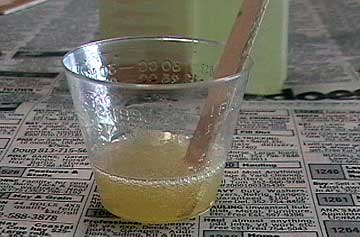 |
Resin should be allowed to begin its chemical reaction
before using it. After mixing it according to the manufacturer's
directions, stir it thoroughly and let it sit for a few minutes while
you cut the cloth. After this time passes, stir again and it is
ready to use.
This is more than twice as much resin as is actually needed for the
part being glassed. It is better to have too much because it is easier to spread out initially and
you do not want to run out in the middle of the job.
|
 |
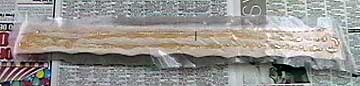
Lay the cloth over the component to be covered and gently
smooth it. Ensure that the glass hangs over all edges. It is
very difficult to reposition the cloth without the weave pulling apart
after the resin is applied. |
 |
Pour a liberal amount of resin over the cloth. You
want enough so that it is easy to spread, but not so much that it is
dripping all over. |
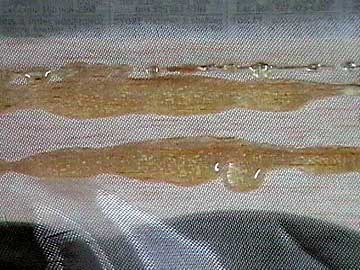 |
Finishing resin will saturate the cloth immediately
because it has low viscosity. It is very easy to spread and is the
best resin to use to apply glass cloth. |
 |
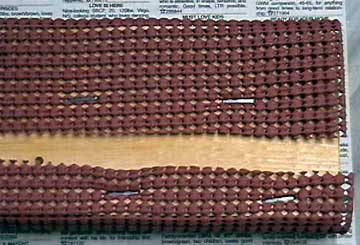
Always work from the center towards the edges.
Wrinkles do not happen frequently, but when they do they are easily
worked out. Trouble spots are normally where the cloth drapes
at a corner or where it drapes over end-grain wood.
At corners it tends to lift. The fix is to cut up to the corner
with a pair of sharp scissors. This will get resin on the blades
which should be removed immediately with solvent. |
 |
End grain wood soaks up a lot of resin and sometimes
prevents the cloth from staying down. What to do is ensure
there is resin in the excess cloth so that it will have more weight to
hang down. You should also come back to these spots frequently and
squeegee the cloth back down if it has lifted.
Sometimes it is a lost cause and the cloth simply will not stay down.
The good news is that other than being annoying, it is not a problem.
After the resin has cured, put a little
CA in the area and rub it down.
The cloth will adhere instantly and the problem is fixed. |
 |
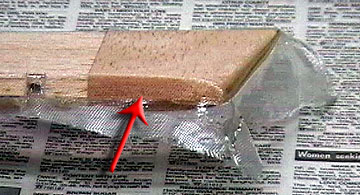
After the cloth is fully saturated, use the squeegee to
scrape up excess resin. Return the excess to the
mixing cup. In this image, the squeegee is being pushed toward
you. The resin removed is visible on the bottom edge of the
squeegee.
Besides preventing unnecessary weight, scraping off excess resin gives a
more uniform base. For areas where scraping is impractical, such
as the edge of a part, you can blot with paper towels or toilet paper. |
 |
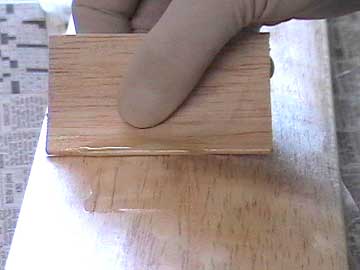
Give the resin plenty of time to cure. Excess cloth must be trimmed
and feathered before applying adjacent pieces. It only takes a few
minutes to accomplish this using 220 grit
sandpaper.
Using a block, feather the areas where
the cloth will overlap. The feathering does not have to be perfect
—
just pretty good with no hard, raised edges. Using 30 minute epoxy, you can usually trim and feather after about 4 hours and
then glass the opposite side. |
|
|
|
|
Finishing the job
My original statement which I am retracting:
A second coat of resin is often recommended, but it is really the wrong
thing to do. This second coat adds excess weight and makes finishing
more difficult. Use primer to fill the weave — not more resin.
My Current Stance:
What I have found repeatedly is that I have to apply several coats of primer because as I sand each coat pin
holes appear all over. I always assumed it was air bubbles in the primer and didn't have anything to do with
the resin.
At this point I'm fairly convinced that the air bubbles are coming from where primer isn't getting under the
weave. For my past couple projects I've used a second coat of resin and have been able to apply one normal
coat of primer and then touch up a few areas with another coat.
But... the second coat or resin is squeegeed into the cloth well and then squeegeed back off. I'm
applying a very thin coating and sanding off the excess.
I've seen glass jobs that look glossy and wavy which is a sure indicator that there is a thick coating of resin
above the cloth. That's what we're trying to avoid which is why I recommended against a second coat in the
first place.
Moving on...
Do not sand the actual cloth for at least 24 hours. Be patient and
allow the resin to fully harden. When all the cloth is applied and fully
cured, feather all seams and give the overall component a light sanding to
remove dust particles, glass strings, etc. All you are trying to do
here is knock off the bumpy crud — a couple strokes across the surfaces is
it all it takes. Then stop!
Do not sand into the cloth. The weave is not filled in this
process. It is not possible to achieve a glass-smooth finish at this time. The
weave must be filled with the next component of the finish — usually primer.
In general, the longer you wait for each coat to dry, the better the
finish will be. You may have seen planes at the field where the weave
of the glass cloth was clearly visible in the finish. This is due to not allowing
time for each coat of the finish to dry thoroughly. As time passes the
finish shrinks and sublimates into the substrate.
Primer may feel dry enough to sand after a couple of hours, but it may
actually take weeks to dry completely. Realistically nobody wants to
wait this long for each coat to dry, but now you know what will happen if
you don't.
|
|
|
|
|
|
|
|
Back
to Fiberglassing
Airfield Models Home |
|
|
|
Copyright © 2003 Paul K.
Johnson |
|
|

