Airfield Models - How To

Make a Fixture to True the Edges of Balsa Wood Sheeting

December 19, 2021


Home
About
What's New
History
Models Gallery
Model Building Safety
Articles
Mail & FAQ
Site Map
Site Feedback
Contact
Add to Favorites
Comments
Search Airfield Models

Back to How-To Articles


Airfield Models (http://www.airfieldmodels.com/)How to Make an Edge-Truing Fixture

Elsewhere on this site I mentioned that my method for truing the edges of balsa wood sheets is to trim an edge with a razor blade and then sand the edge with a long sanding block.

I have had good results with that method although it depends on holding the block absolutely square to the sheet while sanding.  If you build as much as I do, then you know how tedious this gets to be.

From time to time I have thought about making some type of fixture to ease my pain and simplify the process due to the large number of sheets I need trued in various projects.  For whatever reason I never got around to doing it.

A recent Model Aviation magazine article showed a method similar to what I was thinking of and provided me the motivation to get my act together.  The entire process took about 30 minutes.  Most of that time was cutting aluminum stock, strips of sandpaper and spray-gluing the sandpaper to the aluminum.


Making the Fixture

I have taken the basic idea presented there and 
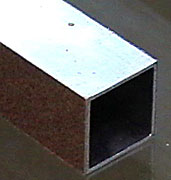
adapted it slightly.  Instead of using angle aluminum stock, I have used square stock because it is more rigid.  I have had problems finding absolutely straight angle stock.  It tends to flex easily which means a straightedge is needed to ensure it is bolted to a board or clamped down while keeping the sanding face true.  The fixture is so simple, it can be made in less than an hour.The rigidity of the square aluminum keeps it straight.

Another way to do it would be to route a lip on a piece of particle board and use wood screws to hold a piece of angle stock in place.  If the routed lip is straight, then the angle can be pushed against it to ensure it is also straight.

Use a good grade of sandpaper, such as the new paper made by 3M called Sandblaster.  Good sandpaper will mean you do not have to remove the angle as often.

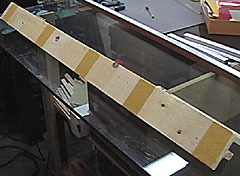
I often use 48" stock so I made the jig  5' feet long.  But it can be as long as you like.  I simply clamp the jig in place on my bench for use and when I am finished it can be put in a corner out of the way.

A sheet of sandpaper is cut into strips and spray glued to the aluminum.  Clean the aluminum with solvent or alcohol before applying glue.  Also be sure to spray both the back of the sandpaper and the aluminum.  Allow the glue to become tacky before adhering the sandpaper.

Alternatively you can use sticky-back sandpaper that comes in rolls.  I really do not like this stuff because it tends to be thick and wavy and does not like to stay down.  If the sandpaper is not flat on the block then it is not able to sand straight or flat.

A push block is needed to provide even pressure on the sheet stock so that it sands evenly.  Most sheet can flex easily across it is width so using your hands will probably result in a bowed edge rather than the straight edge needed.

What is not shown here is that the corners of the aluminum are rounded slightly.  The sheet will be radiused along the edge unless a board of some type is placed against the aluminum to raise the sheet up from the radiused corner.  I use a scrap piece of masonite because its smooth surface allows the sheet to slide easily.  A piece of smooth particle board would work just as well.

Caution!  Be sure that the bottom of your push block and the surface that you are sliding the sheet on is free of any grit that will gouge the sheet.

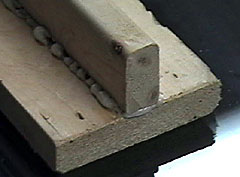
I tried using my T-Bar sanding blocks as push blocks but even with coarse paper they kept slipping.  My solution was to use a piece of scrap 1 x 4 with several pieces of sandpaper on one side of it to grip the sheet stock.  On the other side I used polyurethane glue to attach a 1 x 2 handle.  It is not pretty and it is not too flat either, but it does not really need to be as long as it can grip the sheet fairly evenly.

I tested the jig by sanding a stack of six 3/32 x 4 x 48 balsa sheets and I finished the whole stack in about the same time it would have taken me to do one or two sheets using my previous method.  All the sheets matched up extremely well.


Find a piece of straight extrusion.  This is important.  Don't try to force a warped piece to be straight. Use a piece of aluminum stock that is straight along its length, flat on the face and square to the workbench.  I recommend that you cut a sheet into strips and use spray adhesive.  It will be flatter and stay down longer.  You can also use sticky back sandpaper, but it is usually low quality and keeps peeling off.

Aluminum stock can be purchased in a variety of shapes in 8' lengths at home improvement centers.  I used 1" square aluminum and cut it to 5' so that it can handle 48" stock.

A pushblock is used to grip the balsa sheet and move it back and forth against the fixture. This ugly thing is a push block.  Use it to grip the balsa wood sheet and move it back and forth against the fixture.

If you try to use your hands to push the sheet, it will most likely bow the sheet giving it an edge that is not straight.  I made the base from scrap 1 x 4 and the handle from scrap 1 x 2.  The handle is attached using polyurethane glue.

Also notice how the glue has expanded from the joint.  This is a characteristic of polyurethane glues which is why I do not use it for general construction of my wood models.

Glue sandpaper to the bottom of the push-stick to grip the balsa wood sheet.

On the bottom of the 1 x 4 I have put several strips of sticky-back sandpaper to grip the balsa sheet.  Better would be to use several sheets of sandpaper to cover the entire bottom of the 1 x 4.  Use spray glue to attach it.


Previous —
Next —

How to Make a Pushrod Exit Drill Guide
How to Make a Good Fillet Sander

Comments about this article


Back to How-To's
Airfield Models Home


Copyright © 2003 Paul K. Johnson