Knight
Stik Wheels
Note: The main Knight Stik article and the Gallery are not posted yet
because the model is not complete. Clicking links on this page that
are supposed to take you to those non-existent pages will take you to the
home page instead. When the model is complete and the pages are posted
the links will take you to the correct page. Sorry for the confusion.
 The
variety of model aircraft wheels that are available to us is pathetic. The only
thing that has changed over the years is the tires have gone from being solid
rubber to being hollow rubber to being really ugly, but very lightweight foam. The
variety of model aircraft wheels that are available to us is pathetic. The only
thing that has changed over the years is the tires have gone from being solid
rubber to being hollow rubber to being really ugly, but very lightweight foam.
What irks me even more is that with the proliferation of lightweight park
flyers have come a zillion varieties of very light weight wheels for these
aircraft and those wheels are much more stylish than what is available to those
of us who build larger models.
So the new kids on the block get new fancy pants wheels while we die-hard, lifetime
traditional builders get a lifetime of traditionally butt-ugly wheels.
IT'S NOT FAIR!!!!!! (and everyone I talk to tells me their life is
fair and it's only me who life isn't fair to which isn't fair too.)
I don’t hear anyone else complaining about it so maybe nobody else cares or
they just accept that we have two wheel types to choose from and go on with
their lives.
We have balloon wheels, plastic WWI wheels and really ugly, razor-thin racing
wheels.
In addition there are some very specialized scale wheels available that are
not only expensive but usually only one very large size and they are made for
one specific kit.
I try to build really nice model aircraft and I do spend a lot of time
agonizing over small details. But wheels aren’t small details. They’re very
visible and make a huge difference in the look of the finished model.
So I’ve spent hundreds of hours building a model and then am stuck bolting on
ugly plastic wheels with really badly done spokes and generally no style at all.
I’m not a machinist so there’s not a lot I can do about it unless I’m willing
to pay a machinist a whole lot of money to make the wheels for me. And usually
the wheels will require actual development to get them right which means making
several sets of them. Not to mention that they wouldn't really be right
until molds were made so they could be cast in lightweight plastic. By
that time we've basically set up manufacturing just to get one set of wheels.
One of my co-workers, Joe, was a professional machinist in a prior life. I’ve spent many hours
talking to him about it because I’ve been considering buying a lathe and a
milling machine and I know nothing about them.
In the course of these conversations I generously inflicted on him my
thoughts about model airplane wheels. With all the empathy he could
muster, he replied, "So? You're building stupid toy airplanes."
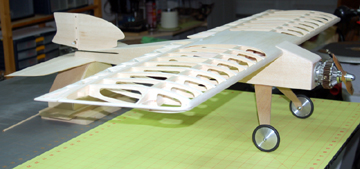
At the time I was in the middle of my Knight
Stik project and needed a set of wheels for the plane. I had planned to use
Williams Brothers WWI wheels which are ok but could be improved significantly.
The design has been around for a long time and they have never been updated.
I described to Joe how a stylized version of WWI wheels could be made. The
problem being weight and finding appropriate tires (O-rings with a larger
cross-section diameter than the average O-ring).
In the mean time, Joe had the itch to get back into machining. He was doing
a lot of research on Stirling engines and wanted to experiment with them. One
day he came to work and told me he had just purchased a monster WWII era lathe.
This is one of those machines that is so hefty and well built that it will last
a thousand years. Joe told me the bed way was really worn and needed to be
replaced but that the lathe came with a new one. Joe only needed to replace the
old one with it. The lathe also had well worn pulley wheels that he would need
to do something about because the belts were slipping.
Other than that, Joe received a lot of expensive tools and accessories with
the lathe and he got the whole package dirt cheap.
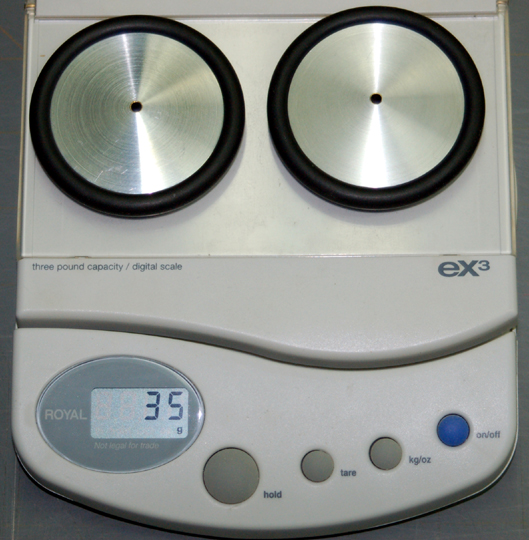
Then one day he showed up with a set of wheels for me. Unfortunately, I had
only given him a very basic specification with approximate measurements and I
hadn’t attempted to locate appropriate O-Rings.
 The
wheels were beautiful, but the rims were machined for an O-Ring with a much
smaller cross-sectional diameter than I would use. And there wasn’t enough
metal left to increase the diameter. The
wheels were beautiful, but the rims were machined for an O-Ring with a much
smaller cross-sectional diameter than I would use. And there wasn’t enough
metal left to increase the diameter.
So Joe told me that I screwed up by giving him a lot of incorrect information
and to come back to him when I had my act together. I apologized repeatedly
until he stopped punching me in the face. I thanked him for that.
I made several calls and found there is only one commonly available O-Ring
having both an outer diameter and cross-sectional diameter in the range I
needed. They cost something like six bucks for a package of five.
I ordered them and turned them over to Joe. I also bought a square chunk of
aluminum for twelve dollars and gave that to Joe as well. Lastly, I gave him a
piece of 1/8” ID brass tubing to use as axle bearings.
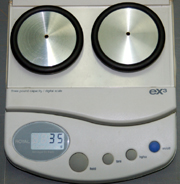
A couple days later Joe came back with three more pairs of wheels. The set I
liked best was the heaviest unfortunately, but considering any of these sets
would work and he didn’t charge me a dime and they were all beautiful, I didn’t
complain.
The biggest problem is that all the pairs will add too much weight. Joe cut
the wheels really thin, but they are metal. The only way to bring the weight
down is to remove more material.
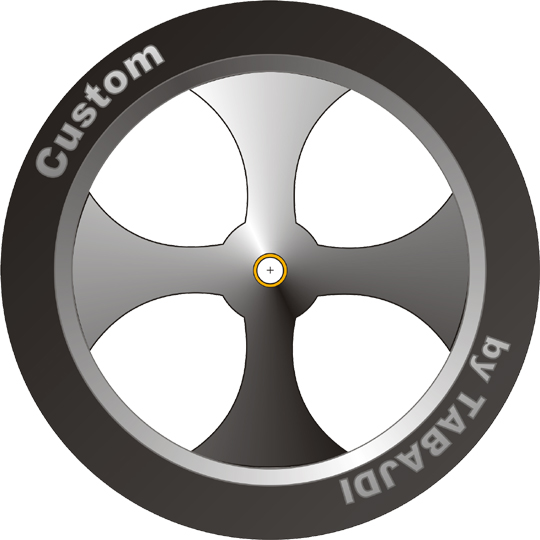
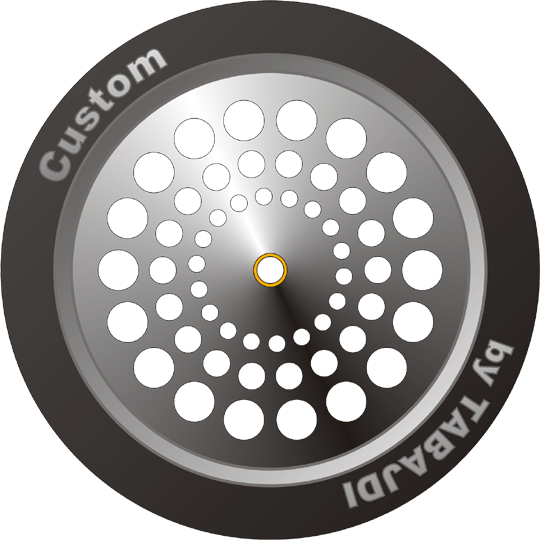
So I fired up CorelDraw with which I have very little experience. After
experimenting I had a good base wheel. I then learned how to create a pattern
and duplicate it by rotating it around a point. Lastly I learned how to use
that pattern to be a cookie-cutter and make a punch-out through another drawing
object.
Once I had all that stuff down, I was able to turn out a whole lot of example
wheels in a very short time. The wheels shown here are probably about 1/3 of
the wheels I drew and all together they took me just a couple of hours. |