![]()
|
|
|
|
|
|
|
|
|
|
|
|
|
|
|
|
|
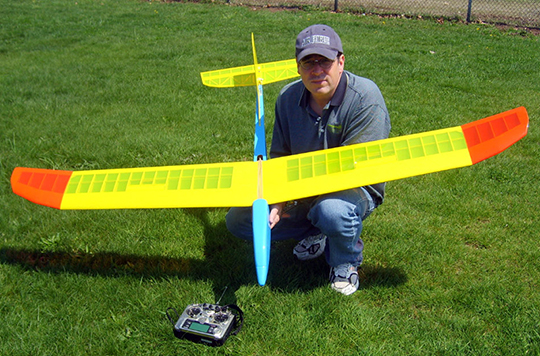
IntroductionWilliam's BR1 Sailplane is a very good design and build effort. It's his first design but you'd never know it. I was very impressed by how far this model flew on a modest hand toss. The BR1 is a very simple and practical model which usually means long life and lots of flight hours. I think William will be enjoying this model for a very long time. Text, photos and linked photos that follow are Copyright William Rahiser
|
|
|
About the BR1 SailplaneAfter being away from model aircraft for over twenty years, I decided to get back into the hobby in March of 2007. I started with radio control aircraft in 1977 and got out of it around 1987. During that time I had built several model aircraft from kits. Now I wanted to do something that I had never done before in my aero-modeling experience — design and built a radio controlled model aircraft completely from scratch. The idea for my first scratch model was to build a two meter sailplane. The main reason for this is to keep the cost down for this project because I am starting with no building equipment, radio gear, parts, or materials. As time went on I began draw ideas on paper and thinking what shape this little model aircraft would look like. I am a strong believer in the basic reason an aircraft flies though the air is simply because of its shape and if I could get that shape right I would have a model aircraft that really flies. Putting on paper an actual design became much more difficult than I thought because I would put something on paper then begin to second-guess myself. I went to the internet for help and that’s where I found the Airfield Models website. The website gave me ideas and also some confidence that I was on the right track. The website was also sponsoring a model aircraft building contest too so I decided to enter the contest. During the shape design phase I wanted to build a sailplane with a very efficient and clean wing so I decided to do two things. First, make a wing with low dihedral over much of its span for efficiency, and at the tips bring up the dihedral more for stability and turning assistance. The wing would also have a slight taper sweep for additional direction stability. With this setup, I knew that the ship would most likely need ailerons for roll performance but instead I wanted to keep the airfoil as clean as possible so I put into the design small spoilerons to aid in roll control. Now to design the airfoil shape which was very hard for me to decide. After looking at many airfoil shapes and studying a little on airfoil design I actually free hand drew my own airfoil profile with what I had learned. I called the design the R1 which came out to have a 9.4 percent thickness and it also has an undercamber shape to it for efficiency. The tail feathers I drew up for function and style and made their surface area sizes and moments from the wing by best guess. The fuselage was again freehand drawn for function and style. Now to begin the construction process. When the design was finalized I taped together sheets of graph paper and drew actual size plan templates for the wing, fuselage and tail feathers. From there on out I built and designed the actual structure as I went with the things I knew and learned of model aircraft construction. I wanted to keep the model as light as possible and had a target airframe weight of 16 ounces. CA was the primary glue. Epoxy glue was used in areas of high stress. The little ship took shape after much cutting, sanding and fabricating over the course of a month. Much to my delight I thought that this thing may really fly. The ship is covered with MonoKote using sky blue for the fuselage and a transparent yellow and orange scheme on the wings for high visibility. The tail feathers are covered in transparent yellow. The completed airframe came in (without radio gear) at 16.3 ounces! The radio I selected was the Futaba 9C Super which provides massive capability for programming flight control coordination. Four micro servos are installed for control of the elevator, rudder, left spoileron and right spoileron. The weight ready-to-fly came to 23 ounces with the radio gear installed! Airborne telemetry equipment from Eagle Tree Systems was also installed. This moved the flying weight to 27 ounces. The ship was now ready to fly. It was a day in early May that I went out to a local school's soccer field to perform a hand toss flight to see if the sailplane would indeed fly. After assembling the ship and placing ballast for a best estimate of the proper center of gravity it was time to fly. With a big lump in my throat, I lifted the craft up over my head and did a last chance flight control check. I then tossed the sailplane straight ahead and a little high of me. What happened next was amazing and I’ll never forget it. The sailplane flew and flew and flew for about 180 feet before landing in the grass! The pitch control of the craft was absolutely superb and the roll seemed OK. The rudder seemed to work fine in the yaw axis. After a few more hand tossed flights, I noticed that the roll control response was much less than to be desired. To fix this problem (which I had somewhat expected) I increased the spoileron throw and mixed more rudder throw in with roll inputs. This along with a change in the center of gravity fixed most of the problem. Roll response is much better now. In the end I really enjoyed the entire design and construction process even though at times I was a little frustrated. But that goes with the endeavor. It is such a gratifying feeling to know that the sailplane I am flying at my AMA club’s field, I designed, fabricated and built myself. Lastly the sailplane needed a name so I decided to use the initials in my name plus the number 1 for my first scratch built model aircraft, thus the sailplane is called the BR1.
|
|
|
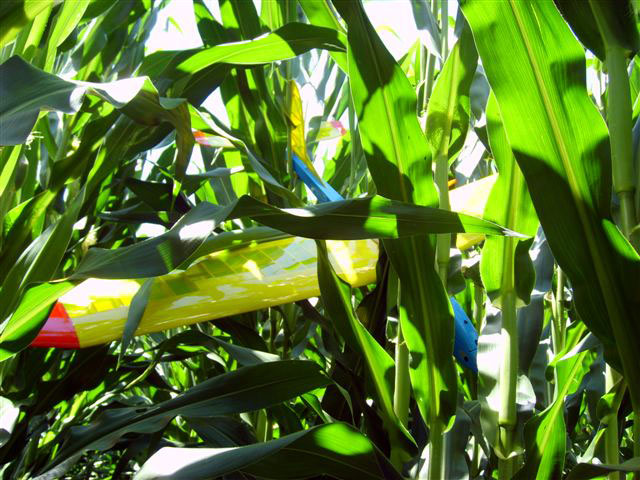
JudgingWilliam did the best job of building a model to the contest requirements. The design is simple and has pleasing lines. The construction is all wood. While William did not photograph every step of the construction he did take enough for most builders to duplicate the construction methods. William may have been able to save an ounce or so of weight by building up the fuselage sides rather than using sheet but in this case I think the performance gain would have been negligible. I like how the design carries a theme across the model. The wing tips, horizontal stabilizer and vertical stabilizer compliment each other and give the model a nice flow. Aesthetically I would have liked the fuselage to be a little less boxy and a different color scheme. Changing the fuselage cross-section could make the model look more streamlined but I don't think it would improve the efficiency more than a percentage point or two. I've yet to see a light blue that looked good as a base color. Some trim might help or just replacing the blue with another color. Clearly from the photos in the next section, blue and yellow don't contrast sharply with corn stalks so it may behoove William to use other colors if he decides to make a career of flying through it. Flight qualities are not part of the judging criteria so I won't comment on those other than to say that I see nothing on the model that needs to be improved and only the pilot can determine if the design can be better through flight testing. Even though I often don't do it myself, I like simple, functional model aircraft. Even when I was a kid I liked well-built rubber powered models built from sticks more than the typical sport R/C or Control-Line aircraft (at least after the initial "Wow!" wore off). I really like this model and want to congratulate William for successfully taking his idea to completion. He seems to be very pleased with the model - enough so that it was worth it to him to rent an airplane to help him locate the model after it got lost in a corn field. I think this model will last a long time and be one of those planes that logs a lot of flight hours due to its lack of complication, reliability and flight qualities (assuming he can stop losing it).
|
|
|
I received this e-mail from William on July 24, 2007
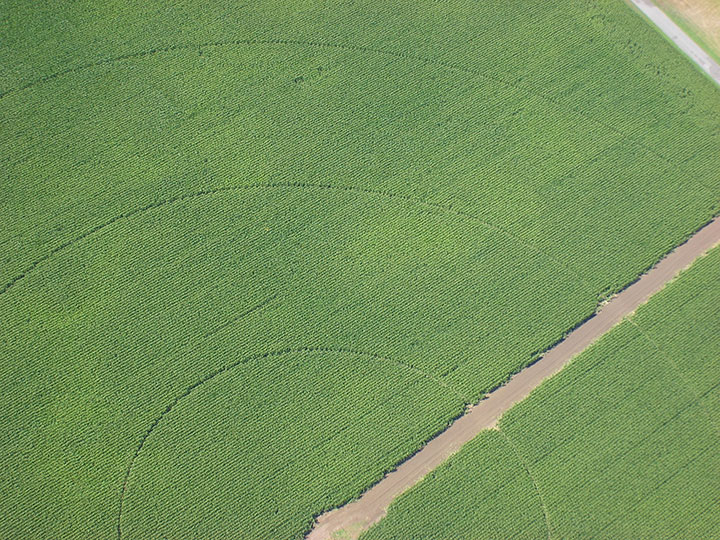
The ship just leveled out and flew away and all I could do was watch it slowly descend into a very large corn field off in the distance that had 12 foot high stalks! My GPS telemetry was lost too because it gets power from the receiver. So to find it, I had to rent an airplane and fly over the corn field to take digital pictures. Being lucky, the BR1 was spotted from the air. After landing I took the digital camera and a GPS back to the corn field where the glider lay hidden and with permission of the farmer to enter the corn crop formed a plan to locate my ship. Using the digital camera, I was able to zoom in on the photo taken in the air and look for a reference position to enter the field, then using the hand-held GPS for course guidance. I entered the field on a line I felt would take me right to the sailplane. The useful visibility in the field was only about 10 feet. After a 20 minute search, it was found about 400 feet in; without the aerial photos and the hand-held GPS I never would have found it.
I now am considering building the Squarra Birdy II project for this winter, the SB-II was the name I was going to use for my current ship, but since it is my first scratch build, I decided to call it the BR1. The SB-II will be a standard-class sailplane with a 99.5 inch wingspan for that category. This aircraft will be designed for more performance and fun. I plan to examine many design factors to see if I can improve the glide ratio over the BR1 which I estimate around 21:1. I also want to do a different flight control configuration and sailplane style. In the end the SB-II might look somewhat similar to the BR1, but there will be significant changes.
|
|
|
|
|
|
Back to 2006-2007
Design and Build Contest
|
|
|
Copyright © 2007 Paul K. Johnson
|
|