Airfield Models - Model Building Tools

Setting Up a Model-Building Shop

December 19, 2021


Home
About
What's New
History
Models Gallery
Model Building Safety
Articles
Mail & FAQ
Site Map
Site Feedback
Contact
Add to Favorites
Comments
Search Airfield Models

Back to Model Building Tools


Airfield Models (http://www.airfieldmodels.com)Setting up a Model Building Shop

An efficient, well laid out shop invites me to come in and build something.  It is a joy to work in and allows me to get more work done in less time.  A poorly set up shop is an endless source of frustration and misery.

I have never set up a shop properly on the first attempt.  Each shop I have worked in has been a different shape than every other shop I have had so I have not been able to come up with a standard for arranging things.

I have to work in the shop for a while to figure out all the little things that could be better.  These things include electrical outlets, access to frequently used items, efficient storage, lighting, space around power tools so larger pieces can be worked on without bumping them into other things, etc.

A few months after setting up a new shop I make major changes to improve efficiency.  It does not stop there.  Shop improvement is an ongoing process.


My Workshop

Before I go much farther into this article I should tell you that even though I am pleased with my shop it would be a lot different if I had the funds to invest in it.  My shop is host to a variety of types of shelving and storage that are odd sizes, intended for different purposes than used and overall aren't as efficient as they could be.

If you can afford to spend several thousand dollars, then you should continue reading to have an idea of the types of things you will need to store, but then get an industrial supply catalogue to find heavy-duty, enclosed metal storage units specifically made for tools, paints and other shop items.

My current shop is long and narrow making it a challenge to arrange it efficiently and still have room to move around.My 
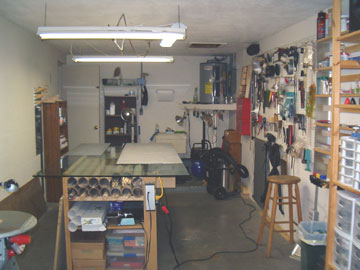
current workshop is a 10' x 30' garage.  It is a true workshop having no yard tools, general household storage or other impurities.

At the far end just to the left of the water heater (ok, one impurity) there is a laundry tub.  This is the first time I've had running water in a shop and it has been a true blessing.  No more wet-sanding in the bathtub.

The long, narrow shape of the workshop has been a challenge.  I've rearranged it several times, but I simply have more stuff than I can set up properly.

The main problem is that when anyone else is in my shop we are always tripping over each other because there is barely room for two people to pass.  I would also like the ceiling to be about 10' higher than it is.

Nevertheless it is a good shop and the best that I've had.

Originally there was only one electrical outlet in the entire shop.  It was located just to the right of the laundry tub.  I had high-amperage extension cords strung all over the shop until I dropped two boxes.  You can see the one in the lower right corner of the photo.  The other is on the opposite wall and is mainly for my utility bench.  I still need to use extension cords to get power to my bench.  Both of these boxes share a breaker, but they are separate from the breaker that powers the original outlet.

Most tools I use have a low current draw, but there are times when my compressor and shop vac are running at the same time.  When I only had one outlet, the lights would dim and the motors would slow down.  Not a good situation.  Get your power arrangement taken care of early on to avoid melting cords, blowing fuses, starting your home on fire and other aggravating situations.

Note the lighting arrangement above the bench.  I actually have five 4' dual fluorescent fixtures in the shop and one more that I plan to hang.  The extension cords all over the ceiling aren't great, but they work and they're on the light switch.  Eventually I plan to install real lighting - probably 12' fixtures.

One thing I have considered adding is conduit along the walls that is connected to my air compressor.  I would add quick connects about every 6' or so.  I use my compressor often for blowing dust from structures and the bench and general cleaning tasks.  The conduit would make the setup more convenient.


Climate Control

If you can afford to climate-control your shop it will be much more pleasant.  Realistically, most shops are either impromptu areas set up in the house where climate control is already taken care of or it is in the garage or a tin building in the back yard.

Neither of the last two areas are usually very well insulated and the utility bill can run fairly high.  If you plan to stay put for a while, it may be worth it to insulate the area so that it can be more economically climate-controlled.

I've been in my current home for a couple years and for most of that time I did not climate control my shop.  I would generally work with the garage door open.  There were too many times when it was unbearably hot and I couldn't work in the shop.

This summer I decided to try leaving the door open between the house and the garage.  My electric bill went up a bit, but it hasn't been as bad as I expected and the shop is much more pleasant to work in now.

It even gets cold in Florida in the winter.  In my area the day time temperatures hover just above freezing.  I'll try leaving the door open with the heat on this winter, but I suspect the heating bill will probably be more than I want to pay.  I'll see what happens after I get my first bill.

In the mean time, I plan to silicone some insulating Styrofoam boards to the inside of the garage door to help keep the outside temperature outside.

Another item you may want to look at is a dust extraction system.  I have no experience with these systems so I can't help you, but dust accumulates quickly in a model building shop.  I sweep the immediate work area several times during a building session using a broom and go around less frequently used areas of the shop about once a week.

Whenever I use the shop vac for anything I put a brush attachment on the hose and vacuum whatever else is in the area.  For example, if I use the vac to remove saw dust and small scraps from my scroll saw then I'll also vacuum anything else nearby such as shelves, items on the shelf, etc.

That helps prevent inch thick layers of dust from building up on top of items that haven't been used for a while.  It's also something I'm more likely to do rather than try to clean the whole shop at one time which would take hours and only last a few days.


Lighting

After a good workbench, lighting is the most important thing in your shop.

Your lighting goal is not to have extremely bright light.  The goal is to have even lighting and minimize shadows and glare.  If you are stuck building on the kitchen table then your only options are to have portable lamps or deal with the existing lighting.  If you have a shop then the money spent on good fluorescent fixtures is money well spent.

It is difficult to see flaws and easier to create them if you work under poor lighting.

Personally, I would rather work under low light than uneven light.  Uneven light causes areas of light and shadow.  Glare is also a problem.  Your eyes adjust to the average light — even if there is not much light.  The problem with uneven lighting is that when you look into an area with a glare you are temporarily blinded and when you look into an area with a shadow, you can not see details.

Lighting should be placed so that it is above the work or behind it if you have one light.  It should never come from behind you or directly between you and the work.  If it is above you and between you and the work, then it is ok, but still not great.

Generally I like dual lighting to be set up to come from the sides to provide even lighting that does not cast strong shadows.

Shop Lighting poor example 1 - Light behind builder Poor lighting casts shadows on work.
Shop Lighting poor example 2 - Light behind work Better lighting, but work can sometimes throw shadows on itself or cast shadows when you lean over the work.
Shop Lighting good example - Dual lights on either side of work Good lighting prevents strong shadows from being cast on work.


Previous —
Next —

Basic Tools used for Model Building
Model Shop Storage

Comments about this article


Back to Model Building Tools
Airfield Models Home


Copyright © 2002 Paul K. Johnson