December 25, 2023


Home
About
What's New
History
Models Gallery
Model Building Safety
Articles
Mail & FAQ
Site Map
Site Feedback
Contact
Add to Favorites
Comments
Search Airfield Models

Back to Model Airplane Hardware


Airfield Models (http://www.airfieldmodels.com/)Pushrods and Pull-Pull Controls for Model Aircraft

A pushrod is used to transfer motion from one device to another.  In a radio control airplane, a pushrod is used to transfer motion from a servo to a control surface, throttle, retractable landing gear or anything else that needs to be moved.

There are many choices when it comes time to make pushrods and attaching them to control horns or servo arms (collectively referred to as horns from here on).

The choices are enough to confuse anyone especially a beginner.  Although some applications limit which pushrod system can be used, it is normally a matter of personal preference.  Almost all pushrods are reliable if properly constructed.

Pushrods tend to have a lot of pieces the failure of any part will most likely cause the plane to crash.  It should be obvious that the pushrod system must be carefully assembled and free from obvious defects but there is a great deal of evidence that many guys just do not take this critical component seriously.


Pushrod Rigidity

It is very important that all pushrods in a model aircraft are rigid.  The pushrod itself can be flexible, such as stranded cable, but pushrods must be supported so that they can not flex unintentionally.

Before you attempt to fly your aircraft you should push on each control surface to ensure the pushrod does not collapse under a reasonable amount of force.  Air loads on flight surfaces can collapse a pushrod making the surface ineffective and subsequently lead to a crash or allow flutter (which can break the flight surface, strip servo gears or cause other damage that will also result in a crash).

In my early R/C days, I lost three airplanes due to poorly constructed pushrods.  I had no understanding of the loads imposed on flight surfaces.  All three of these crashes were due to a pushrod that collapsed under load or allowed flutter.

For years after losing the airplane due to pushrod collapse, I thought the crash was the result of radio failure.  When I knew more and looked back at the crash, I realized what had actually happened.

Specifically, I had used unsupported NyRods that pushed the elevator up and pulled it down.  At several hundred feet I rolled the plane inverted and attempted a half loop.  The plane would not pull out and went straight into the ground.  I was not experienced enough at that time to push the stick down which would have saved the plane.  Because the plane went straight in and would not respond to up elevator, I thought I lost radio.

What actually happened, was the air loads on the elevator caused the pushrod to collapse which made the elevator ineffective.  It was not the fault of the NyRod.  it was the fault of an inexperienced builder me.


Pushrods

Short Pushrods

Short rods are typically made from a piece of threaded rod.  One end can have a bend (see next section) or a solder clevis.  The threaded end usually has a threaded clevis or a ball link.

1/16" music wire can also be used.  Again, one end can employ a bend and the other end can have a solder coupler and threaded clevis.  At times, it is possible to put a bend in both ends making the pushrod non-adjustable.

Long Pushrods

Longer pushrods can be solid wood, such as a balsa or spruce stick or a birch dowel.  While each of these are adequately strong if the correct size is selected, they have a problem that is inherent in wood shrinking and expanding due to climatic conditions.  This will change the trim of the aircraft from one day to the next.  I avoid wood pushrods.

To make a wood pushrod, drill a hole in the side that is the same size as the threaded rod.  Drill the hole about 2" from the end of the pushrod.  Put an L-Bend in the threaded rod and insert it in the hole.  Wrap heavy thread around the pushrod and threaded rod to secure it in place.  Finally, coat the threaded areas with glue.

A more stable pushrod can be made from a fiberglass or carbon fiber tube.  A small hole is drilled about 1-1/2" to 2" from each end of the tube.  A threaded rod with an L-Bend on one end is put in the tube with the bent portion engaging the hole.

The end is then plugged with a dowel that has a groove to slide over the rod.  The dowel is glued in place with CA or epoxy.  Be sure the dowel does not have to be forced into the end or the pushrod may crack.  The dowel should be a slip fit.  It is a good idea to wrap some thread or glass cloth around the ends of fiberglass or carbon fiber pushrods to prevent them from splitting.

The other ends of the pushrod has a wire having a bend, clevis or ball link attached.  This type of pushrod is very rigid and stable and generally does not need any type of support to prevent flexing unless the tube is very long.

Very Long Pushrods

In same cases you may have a pushrod that is so long that it will flex even if made from fiberglass or carbon fiber tube.  If this is the case, then you are probably building a large airplane and should look at a different system, such as Pull-Pull or servos mounted near the control surface.  The end result will be stronger and lighter.

If you must use a long pushrod, then it needs to be supported at intervals along its run to ensure that it can not flex.

Tube-In-Tube Pushrods

Tube-in-Tube pushrods are very popular as well.  These are flexible and must be anchored every 3"-4" to ensure they are rigid.  Do not use pneumatic tubes that are sold by some companies as tube-in-tube pushrods.  They have too much drag and will cause all types of trim problems.  Instead use a system specifically designed for model aircraft such as Sullivan NyRods.
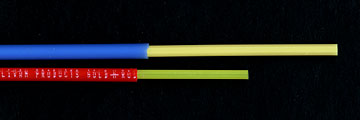
Two styles of Sullivan NyRods. Two styles of Sullivan NyRods.  The blue NyRod is larger in diameter and stronger than the red version.  The outer casing must be anchored every few inches to ensure the pushrod is rigid.

Note the splines on the yellow inner.  These splines reduce friction and allow smooth movement.

Besides anchoring these pushrods, you should also ensure that the inner portion is adequately stiff from where it exits the fuselage to where it connects to the control surface.  Often there is five or more inches of unsupported pushrod.  The fix to this is to only allow about 2" of the inner pushrod to exit the fuselage.  The rest of the run should be a threaded rod.

Alternatively, you can slide the same length of threaded rod into the inner pushrod until the threads engage.  Turn the threaded rod into the pushrod several turns and it will be secure.  You can also use a file to notch the unthreaded portion of a threaded rod and use CA to glue the threaded rod into the pushrod.


Pull-Pull Controls

An inherent problem with pushrods is that they are under compression in one direction and under tension in the other.  Generally speaking, when a pushrod is under tension, the pushrod itself probably will not fail, but as mentioned previously they can fail under compression.

Another problem with pushrods is that they add a noticeable amount of weight to an aircraft.  Pull-Pull controls solve both of these problems because they are always under tension.  Actually only the side that is pulling is under tension, but that is what's important.  Because of that they do not need to be able to resist compression loads, so a pull-pull system can be significantly smaller and lighter while being as strong or stronger than a pushrod system.

For small models, monofilament fishing line can be used.  It can be directly tied to the servo and the control horn with care.  Of course it will not be adjustable, but it does not need to be if the lengths are correct.

For larger models, coated metal fishing leader is often used.  Again, it can be attached directly to the horns or it can be attached to a threaded stud with a hole in it.  It is crimped using small diameter tube and is very secure.  The threaded stud allows an adjustable clevis to be used.

There are two drawbacks to using pull-pull controls.  First, you must create a perfect parallelogram.  If the system is not right, then when one side is being pulled, the other side can tighten and cause severe binding and battery drain due to excessive servo strain.  In the worst case, it can cause something to break or the servo to stall.

The other drawback is that the wire must have a fairly tight bend where it goes through the horn or the stud.  This can cause the wire to kink and break.  Frequent inspections should turn up any problems before they cause a catastrophe.

On my latest model, I am using .020 music wire for pull-pull controls.  It is inexpensive, very strong and less prone to breaking at the bends.

Update 12-25-2023:  Music wire is a really bad idea for pull-pull controls.  Don't do what I just said.  Use proper pull-pull cable instead.  Modern fishing lines makes excellent pull-pull cables.  You should check them frequently for stretching and adjust them as necessary.  They don't need to be replaced when they stretch if they're not damaged or worn but the linkages need to be adjusted to take up the slack.

The guys flying 40% scale aerobatic aircraft almost always use pull-pull controls so this system is certainly up to the task if it is assembled properly.


Previous —
Next —

Threaded Fasteners used in Model Airplanes
About Pushrod Linkages (Clevises, Ball Links and Bends)

Comments about this article


Back to Model Airplane Hardware
Airfield Models Home


Copyright © 2004 Paul K. Johnson