Making the Lattice
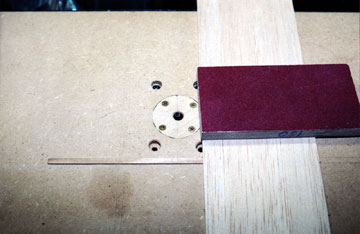 |
Cut a guide from hardwood, thin aluminum or hard plastic.
It should be the exact width of the grooves, no thicker than the depth of
the cut and extend before and after the cutter at least the width of the
board. In this case I used a piece of 3/16" x 1/32" x 9" basswood.
Be sure the edges are smooth. I rounded the feed side slightly to
allow the board to slide on without catching. I glued the guide to my router table using
wood glue.
Lightly sand along the edges to
remove excess glue.
The wood can start to cock even with a good fitting guide.
It is a good idea to draw some lines on the table that are perpendicular to
the cut. Use these lines to help keep the board aligned as it is fed through
the cutter.
I used a coarse sanding block to hold even pressure on the board as it
was fed through the cutter. |
 |
The first cut is made by pushing the edge of the board
against the guide while feeding the board through the cutter.
This is why it's very important that the end of the board
is exactly square to the long edge. I used a machinist's
square to true the end.
It is very easy to have a mis-cut here. Trim
off the end and try again if that happens. Work slowly and deliberately.
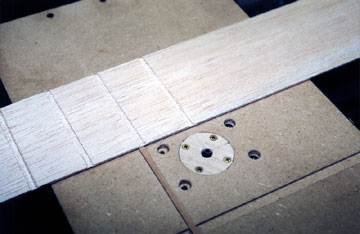
After the first cut is made, place it on the guide and continue with
the second cut. Repeat until the entire board is
grooved.
It is best to sand the board to remove as much
fuzz as possible before cutting the strips. |
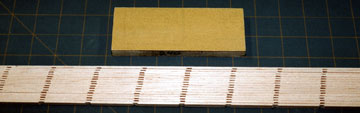 |
Strip the board into sticks using whatever method you
like. I used a fine blade in my table saw, but a hobby knife and
straight edge will work too. I cut the strips just slightly too
wide so I could stack them on their sides and block sand them to the
correct width. |
 |
Important! Cut
all the longest pieces first. Do not cut for one panel at a
time. For example, if you are skinning the left
and right wing panels separately, then there are four skins (top left,
top right, bottom left, bottom right).
Identify the longest piece and cut 4 of them. Place them in three
stacks and put the fourth piece over the drawing so you know
which pieces have been cut.
Continue with the next longest stick and so on. If you cut one
panel at a time you may end up with enough wood that could have made all
the skins, but no pieces are long enough. |
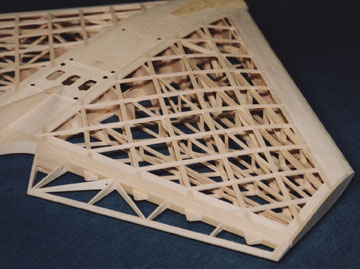
Gluing the Lattice
Because the wing curves along its chord but is straight from root to tip,
I glued the lattice so that the bottom pieces ran spanwise and the top
pieces ran chord wise. The reason being that the curve will open or
close the joints depending on which side is up. Putting the chord wise
pieces on top closes the joints.
Keep in mind that you will need to make two lefts and two rights (in this
example) — they are mirror images of each
other.
Make the skin over-size and then trim to fit. I suggest you pick one
corner, such as the corner at the root and trailing edge to use as a base
point. Cut all other edges to fit the panel. This will ensure
the skin is consistent on all panels.
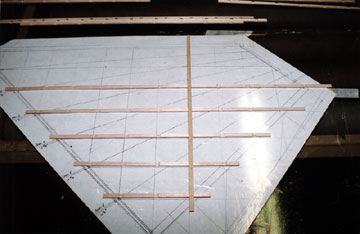
I used Weldbond adhesive that was thinned slightly with water to join the
lattice. I started by laying all pieces in one direction on the table
and then gluing on the cross pieces one at a time.
After it was all glued up I put a large board over it and weighted it
down until it was dry.
I suggest you make a special sanding block to sand the lattice skins.
Cut a bevel on all the edges and make the sandpaper go over the bevels up
onto the sides. The reason being that if your sanding block is flat it
will catch in the lattice and make gouges or take out chunks.
If you sanded the sheet before you stripped it and you cut the grooves to
the right depth, it should take very little sanding to even out the joints.
The Center Section
Most wings have center section sheeting. I mentioned at the
beginning of the article that I haven't done this because
Thwing! didn't work that way. As I see it there are two ways to go
about adding the center section.
The method I would use is to make the lattice large enough to cover the
entire wing panel in one piece (top or bottom). In the center I would cut balsa squares of the same
thickness as the lattice and fill in the openings out to where ever the
center section sheeting should stop. If you assembled the lattice
accurately it should have perfect squares. A table saw can make these
squares quickly and easily.
If you don't have a table saw then it is probably best to make a plywood
template and use a hobby knife. Note that the grain of the squares
will run diagonally to the square so that it is parallel to the span of the
wing.
The other method is to cut the center sheeting to the correct length.
Lay the lattice over it and cut away the center sheeting so that the
lattice locks into the sheeting. This method seems like it would
be more tedious and weaker.
In any case, I think that butt-joining the lattice to the center sheeting
would be a really bad idea — especially if the
wing depends on the skin for any strength at all.
Attaching the Lattice
After the lattice was trimmed I glued it to the wing structure along one
edge and allowed it to dry. Be sure that it is aligned properly before
it dries.
I used moderate pressure to stretch the lattice across the wing and glued
it to the opposite edge. A generous number of pins held it in place.
A syringe was filled with Weldbond adhesive thinned about 25% with water.
I went around the wing lifting the lattice slightly and applying the
adhesive to every spot where it contacted the wing structure. More
pins were added and it was allowed to dry.
The lattice adds tremendous torsional rigidity to the wing, but I doubt
it adds much spanwise strength. It also will not be very resistant to
crashes. I would expect the stuff to make a pretty spectacular, yet
non-repairable, explosion if it hits the ground with much force.
Build to fly — not to crash.
 |